Jonta is a project delivery and client support platform. In one place it holds client organisations, project boards and tickets, sprints, time tracking, incidents, a client support desk and a knowledge base (wiki).
This guide is for the people who run a Jonta workspace day to day: administrators, developers and support staff. Each section explains what a screen is for, then gives step-by-step instructions. The screenshots use a fictional client, Meadowbrook Garden Supplies, and its project, Meadowbrook Online Shop (key MGS).
Introduction
How Jonta fits together
| Building block | What it is | Where to find it |
|---|---|---|
| Client | A company you deliver work for. It owns one or more projects, its own portal users and its default structures. | More (⋮) › Accounts › Clients |
| Project | One client engagement, with its own board, backlog, sprints, incidents and settings. Each project has a short key (e.g. MGS) used to number its tickets. | Projects |
| Development board | The project’s internal board of tickets, arranged in columns (Backlog › To Do › In Progress › In Review › Done in the Standard structure). | Project › Board |
| Support board | A first-line triage board for tickets raised by clients. Every project sits on exactly one Support board. | Support |
| Ticket | A unit of work: Bug, Epic, Question, Story, Sub-task or Task. Any ticket can be the parent of a Sub-Task. | Board, Backlog, Search |
| Workflow | A shared set of columns plus the moves (transitions) allowed between them. Project and Support workflows are kept separate. | More (⋮) › Settings › Workflows |
| Wiki space | A set of related pages, such as runbooks and how-tos. Pages can be drafts, internal, or shared with clients. | Wiki |
Who can do what
Jonta has four built-in roles. Administrators can change what each role is allowed to do (see Roles and permissions).
| Role | Type | Typical use |
|---|---|---|
| Admin | Full access | Configures the workspace, manages users and billing, and sees every project and Support board. |
| Developer | Internal | Works on tickets in the projects they have been added to. |
| Support | Internal | Triages client tickets on the Support boards they can see. |
| Client | Client portal | Raises and follows their own organisation’s tickets. Clients never see internal notes or extra boards, and only see wiki pages that have been shared with them. |
Internal users and client users are licensed separately. Billing shows how many seats of each kind you have left.
Live system: Jonta sends real emails, including invitations, client replies, automatic thank you replies, watcher updates, incident notices and release notes. Always use real, correct contact details, and read Notifications and emails before you invite clients or turn on client visibility.
Getting started
To sign in, go to your organisation’s Jonta address (for example https://yourcompany.jonta.cloud) and enter the email address and password you chose when you accepted your invitation.
Sign in
- Go to your Jonta web address.
- Enter your Email and Password. Click the eye icon to check what you have typed.
- Click Sign in.
- If two-factor authentication is turned on for your account, enter the code from your authenticator app.
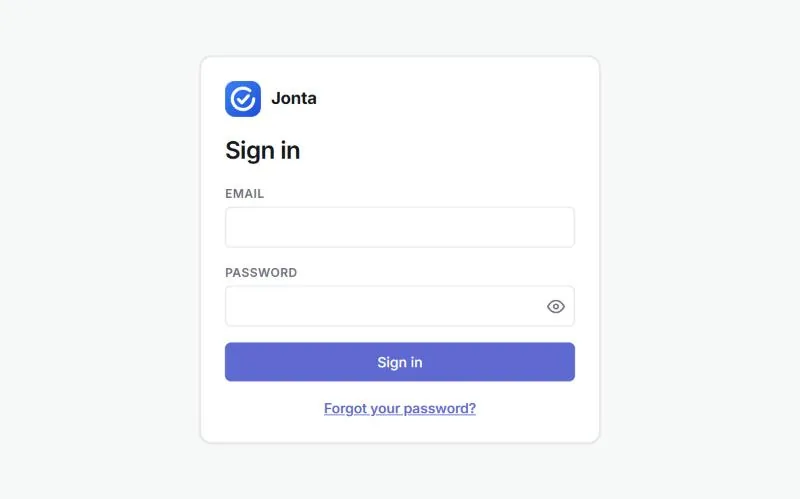
Forgotten your password? Click Forgot your password? on the sign-in page and follow the emailed link. An administrator can also send you a reset link from Accounts › Users.
Find your way around
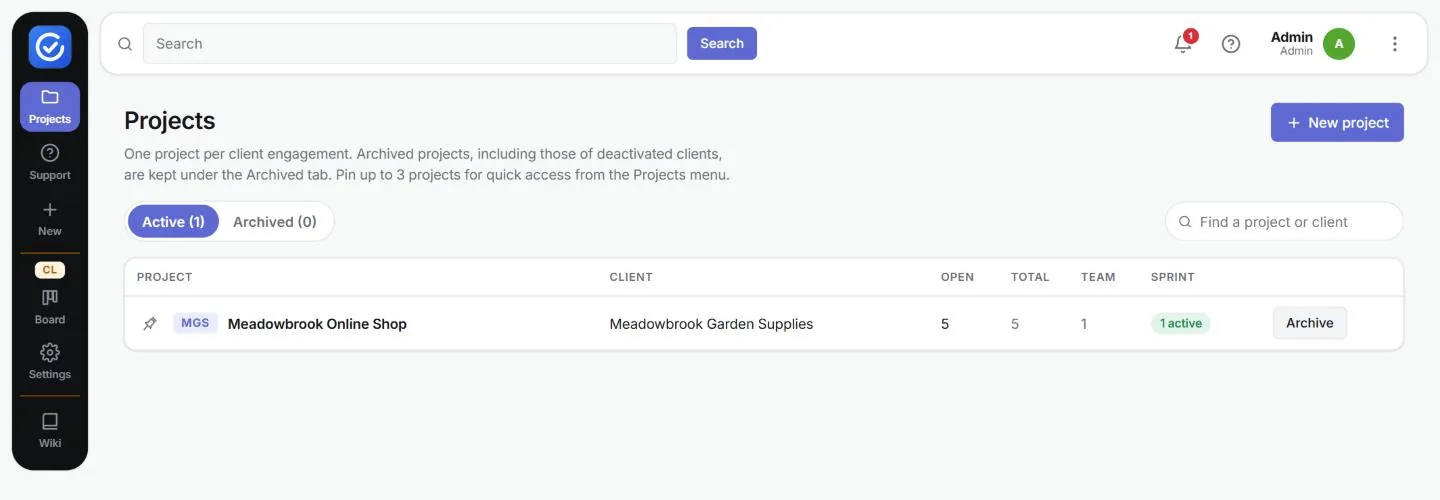
The dark navigation bar on the left is always visible. It changes with what you are working on: inside a project it shows that project’s key (MGS) and pages, and on a Support board it shows the board’s key (CL) with Board and Settings.
| Left-hand bar | What it opens |
|---|---|
| Projects | The list of active and archived projects. This is your home page. |
| Support | The Support boards used to triage client tickets. |
| New (+) | A quick New ticket form for the project you are working in. |
| Dashboard, Board, Sprints, Incidents, Project | The pages of the current project (shown inside a project). |
| Board, Settings | The current Support board and its settings (shown on a Support board). |
| Wiki | The knowledge base. |
The bar along the top holds:
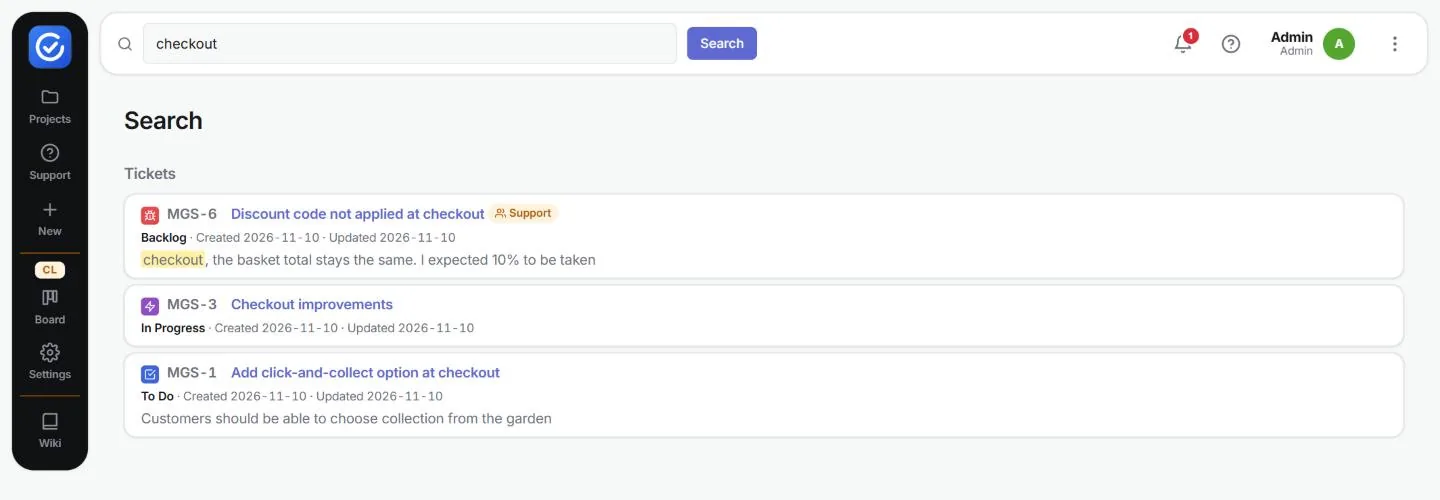
- Search: type a word or a ticket key and press Search (or Enter) to search across tickets.
- Notifications (bell): recent activity that concerns you.
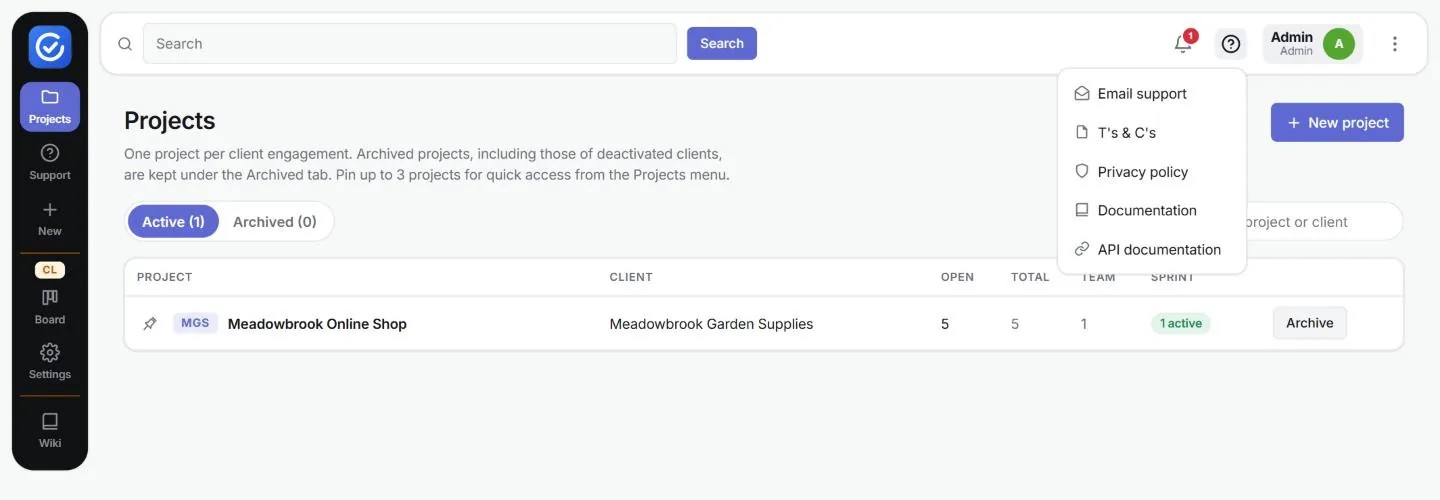
- Help (?): Email support, T’s & C’s, Privacy policy, Documentation and API documentation.
- Your name and avatar: opens Your profile.
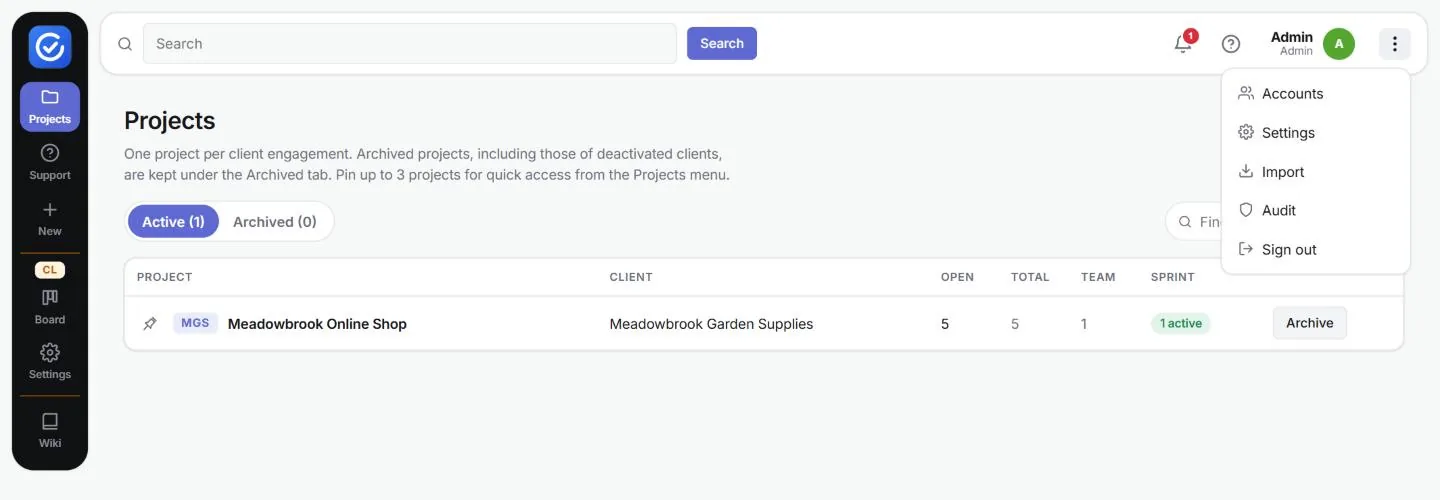
- More (⋮): the administration pages Accounts, Settings, Import and Audit, and Sign out.
Search the system
- Click Search in the top bar.
- Type a word, phrase or ticket key (for example checkout or MGS-1).
- Press Enter or click Search.
- Click a result to open it. Each result shows the ticket key, title, current status, created and updated dates, and a snippet of the description.
Set up your profile
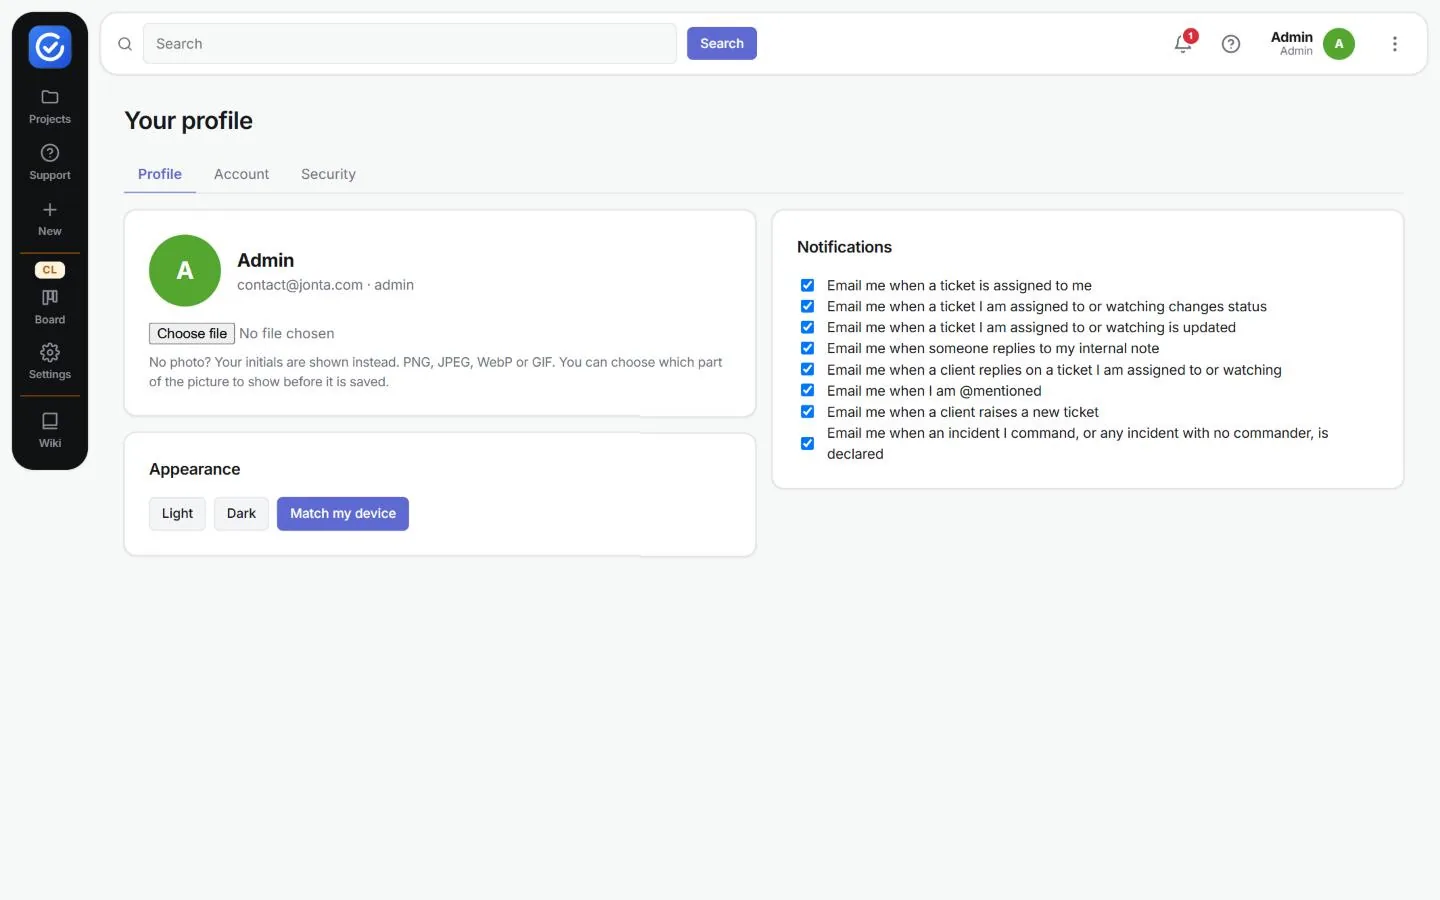
To open Your profile, click your name or avatar in the top right. The page has three tabs.
Profile tab
- Photo: click Choose file to upload a PNG, JPEG, WebP or GIF image. If you don’t upload a photo, your initials are shown instead.
- Appearance: choose Light, Dark or Match my device.
- Notifications: tick or untick each email you want to receive (see Notifications and emails).
Account tab
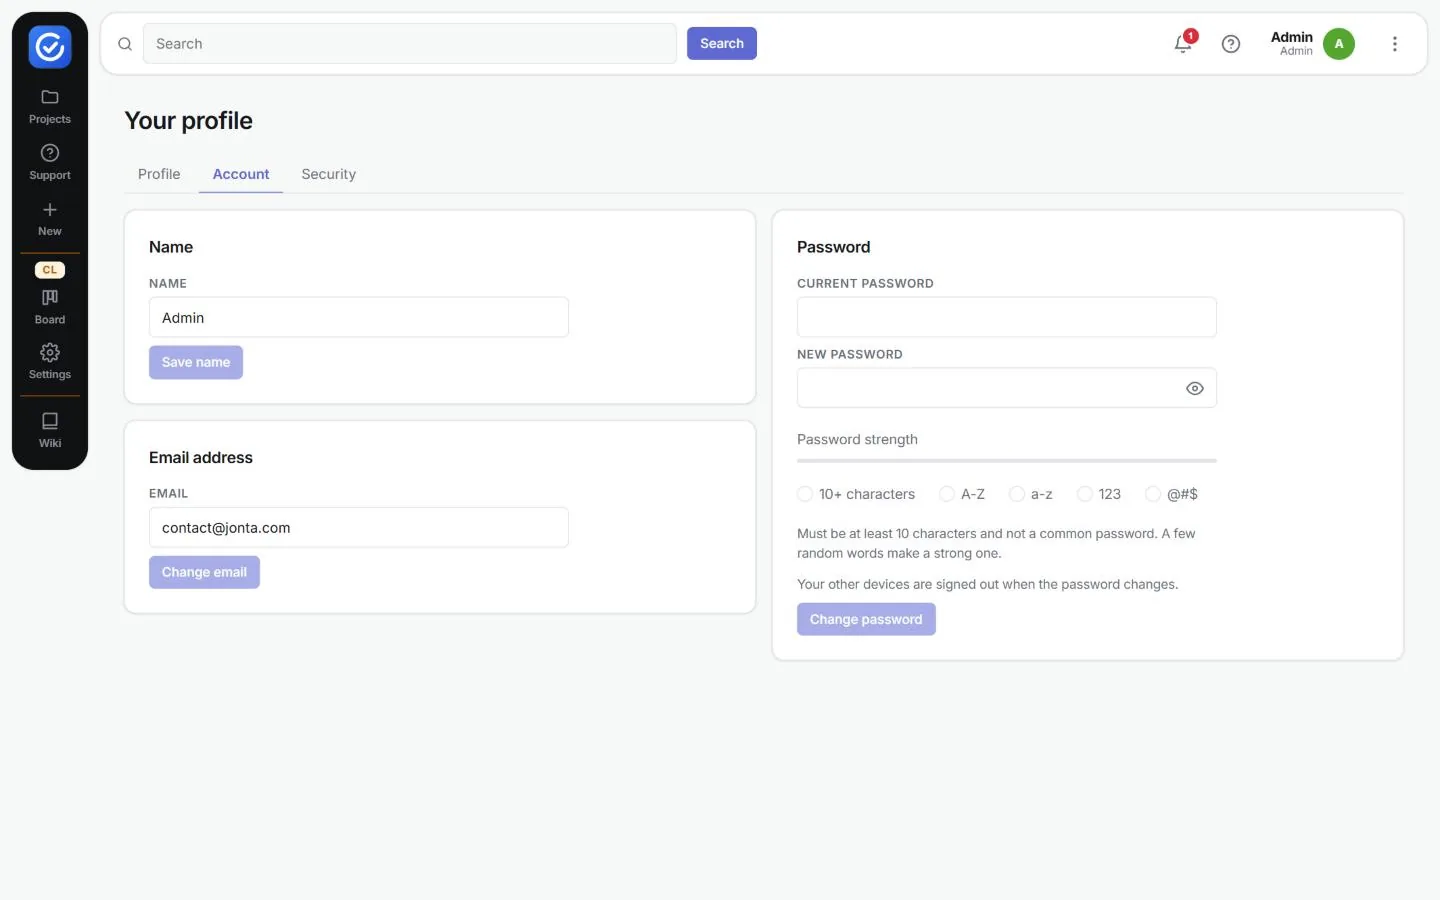
- Name: edit it, then click Save name.
- Email address: edit it, then click Change email. This signs out your other devices.
- Password: enter your current password and a new one, then click Change password. The new password must be at least 10 characters and must not be a common password. Your other devices are signed out when the password changes.
Security tab
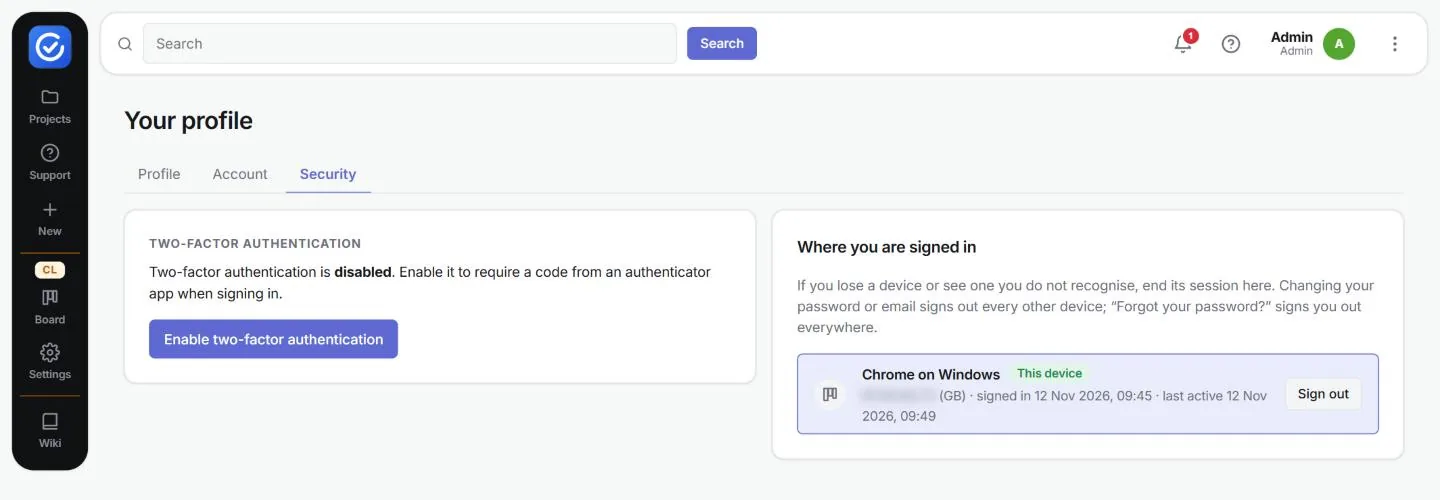
- Two-factor authentication: click Enable two-factor authentication and follow the steps to link an authenticator app. From then on you will need a code from the app each time you sign in.
- Where you are signed in: lists every browser where you are signed in, with its location and when it was last active. Click End session to sign out a device you do not recognise, or Sign out all other devices.
Projects and boards
Every client engagement is a project. The Projects page lists them with their client, the number of open and total tickets, the team size and the number of Active Sprints..
- Active / Archived tabs: finished projects, and projects of deactivated clients, are kept under Archived.
- Find a project or client: filters the list as you type.
- Pin (pin icon to the left of the key): pin up to three projects for quick access.
- Archive: moves a finished project to the Archived tab. You can restore it later.
Create a project
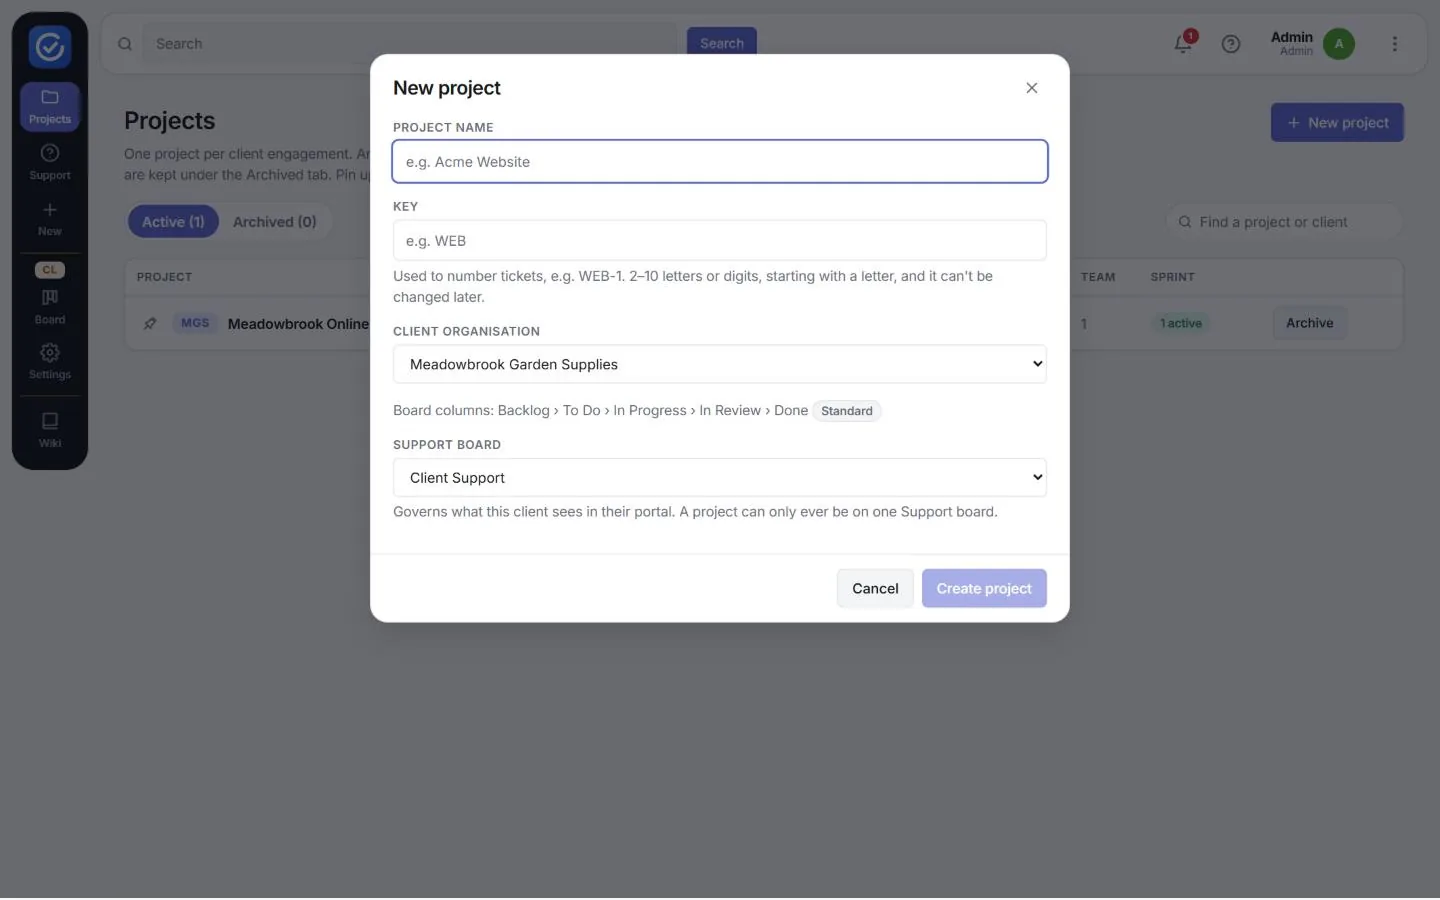
A starter project is created automatically when you add a client (see Clients). To add another project:
- On the Projects page, click + New project.
- Enter a Project name, for example Meadowbrook Online Shop.
- Enter a Key of 2 to 10 letters or digits, starting with a letter (for example MGS). Tickets are numbered with it (MGS-1, MGS-2 and so on), and it cannot be changed later.
- Choose the Client organisation. The board columns the project will start with are shown underneath, with the name of the client’s structure (for example Standard). If the client doesn’t exist yet, choose + Create a new client….
- Choose the Support board that this client’s tickets will arrive on. A project can only ever be on one Support board. If the Support board doesn’t exist yet, choose + Create a new Support board…
- Click Create project.
Use the board
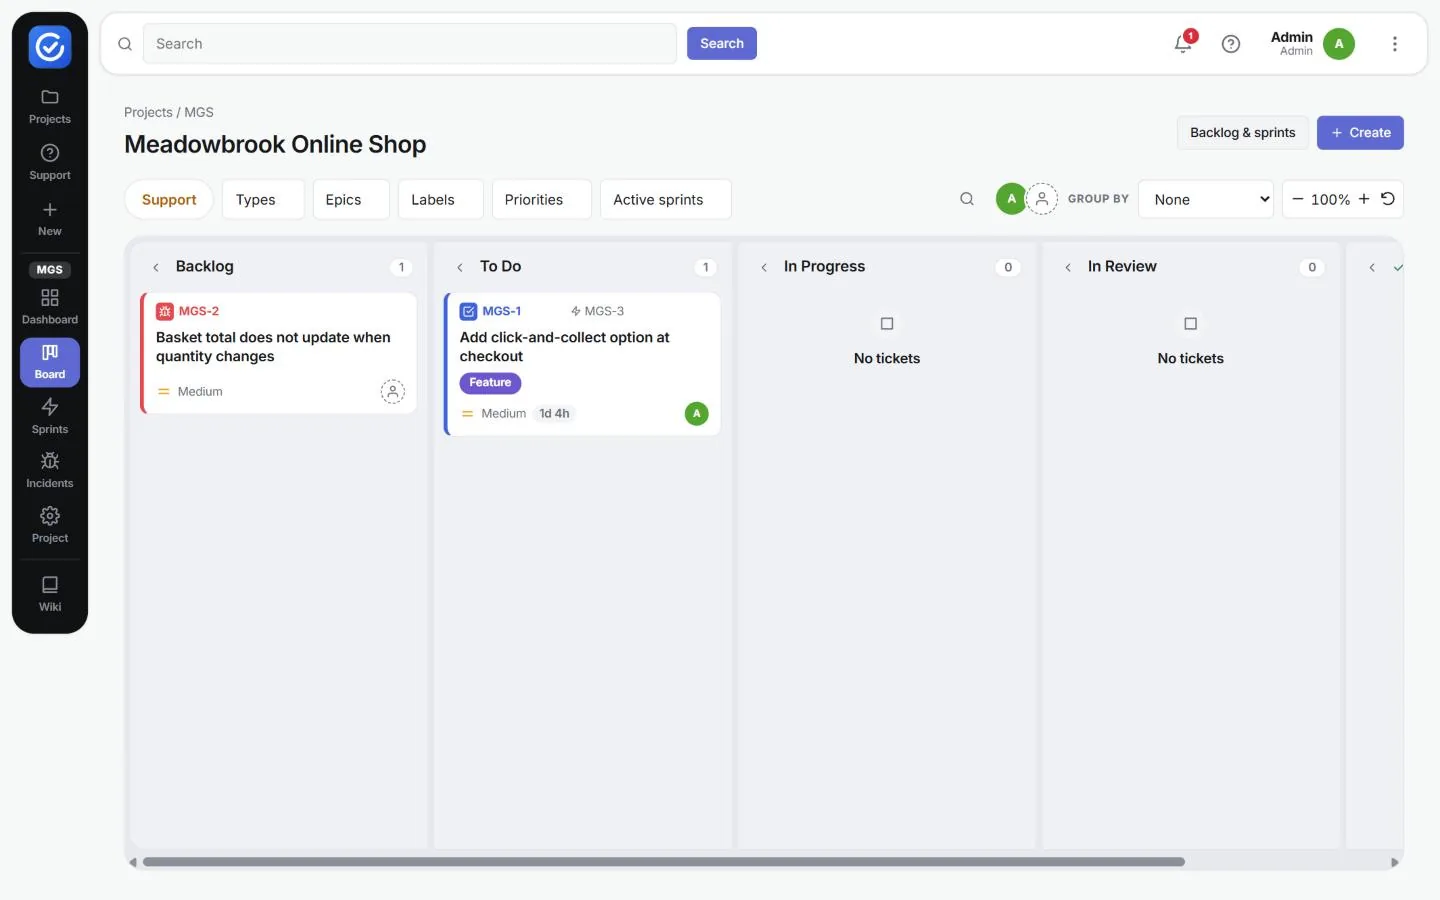
To open a project, click its name. The Board shows every ticket as a card in its current column. Each card shows the key, title, labels, priority, estimate, parent ticket and assignee.
- Move a ticket: drag its card to another column. The move is recorded in the ticket’s history, and watchers are emailed. If the project uses transitions, only the allowed moves are possible (see Project settings).
- Filters (top row): Support (only tickets that clients raised), Types, Epics, Labels, Priorities and Active sprints. Click an avatar to show only that person’s tickets, or the empty avatar for unassigned tickets.
- Search this board: the magnifying glass finds tickets on this board only.
- Group by: arranges the cards in rows, for example by assignee, sprint, ticket type or priority.
- Zoom: use − / + to fit more columns on screen, and the circular arrow to reset to 100%.
- Collapse a column: click the arrow beside a column name.
- Backlog & sprints opens sprint planning, and + Create adds a ticket.
Tickets
A ticket records one piece of work, together with its discussion, time, history and links to code. Jonta numbers tickets with the project key: MGS-1, MGS-2 and so on.
Create a ticket
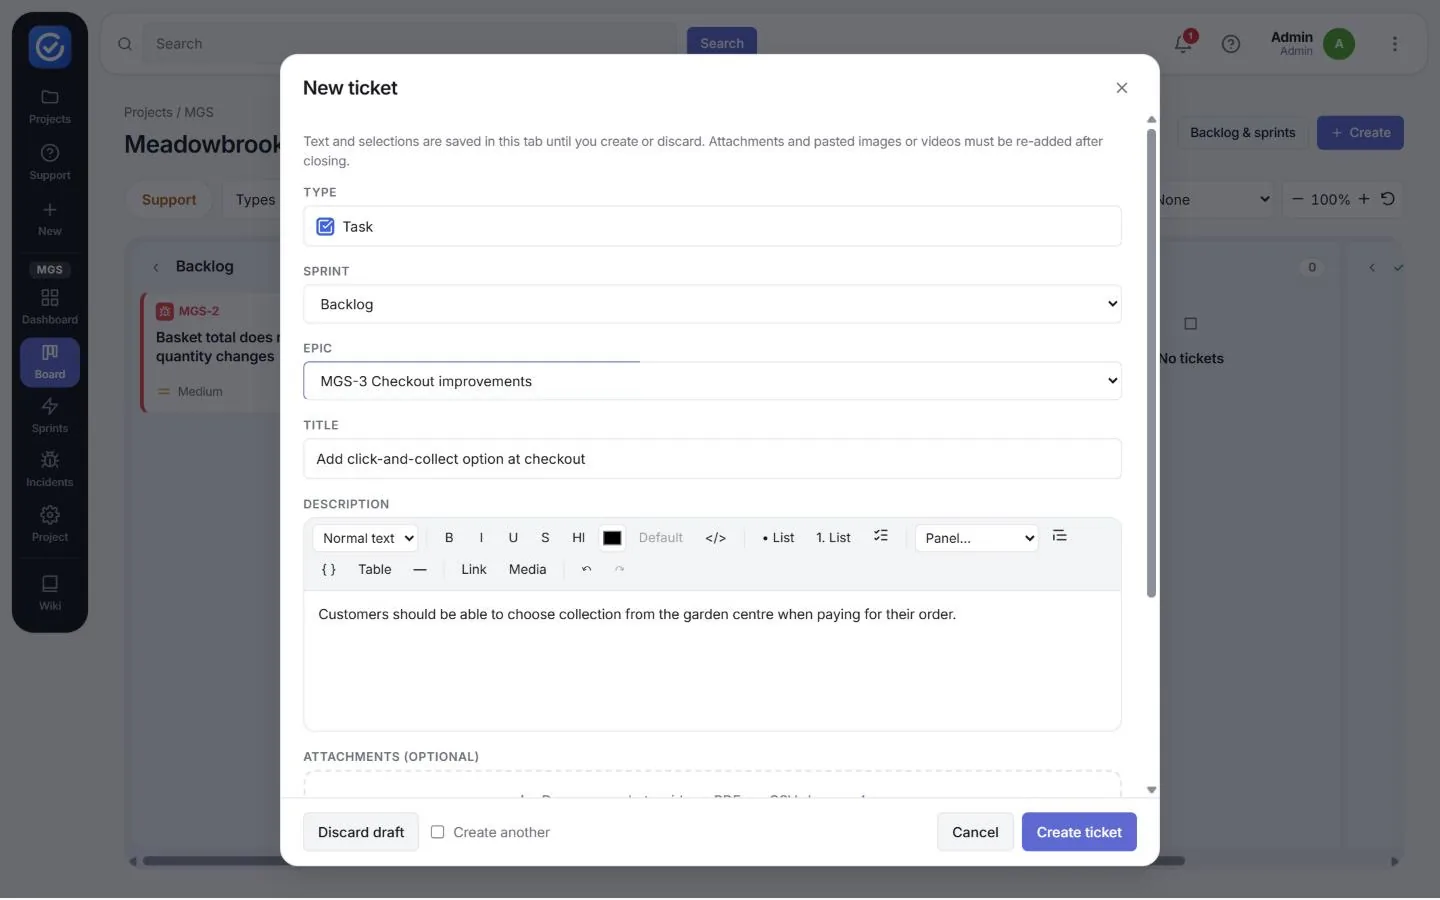
- Click + Create on the board or backlog, or New (+) in the left-hand bar.
- Choose a Type: Bug, Epic, Question, Story, Sub-task or Task.
- Choose a Sprint. Backlog means not yet scheduled.
- Optionally, link the ticket to an Epic. Once the ticket is created this field is shown as Parent.
- Enter a Title that says what needs to be done.
- Write the Description. The editor supports headings, bold, italic, highlight, colour, code, bulleted, numbered and checklist lists, coloured panels, quotes, code blocks, tables, links, and images or videos (you can paste or drop them in).
- Optionally, drop screenshots, videos, PDFs or CSVs into Attachments.
- Set the Priority (medium is the default), the Assignee and an Estimate such as 1d 4h or 2h 30m.
- Leave Visible to the client unticked unless the client should see this ticket in their portal.
- Add Labels by typing in the search box and pressing Enter.
- Click Create ticket. To add several tickets in a row, tick Create another first.
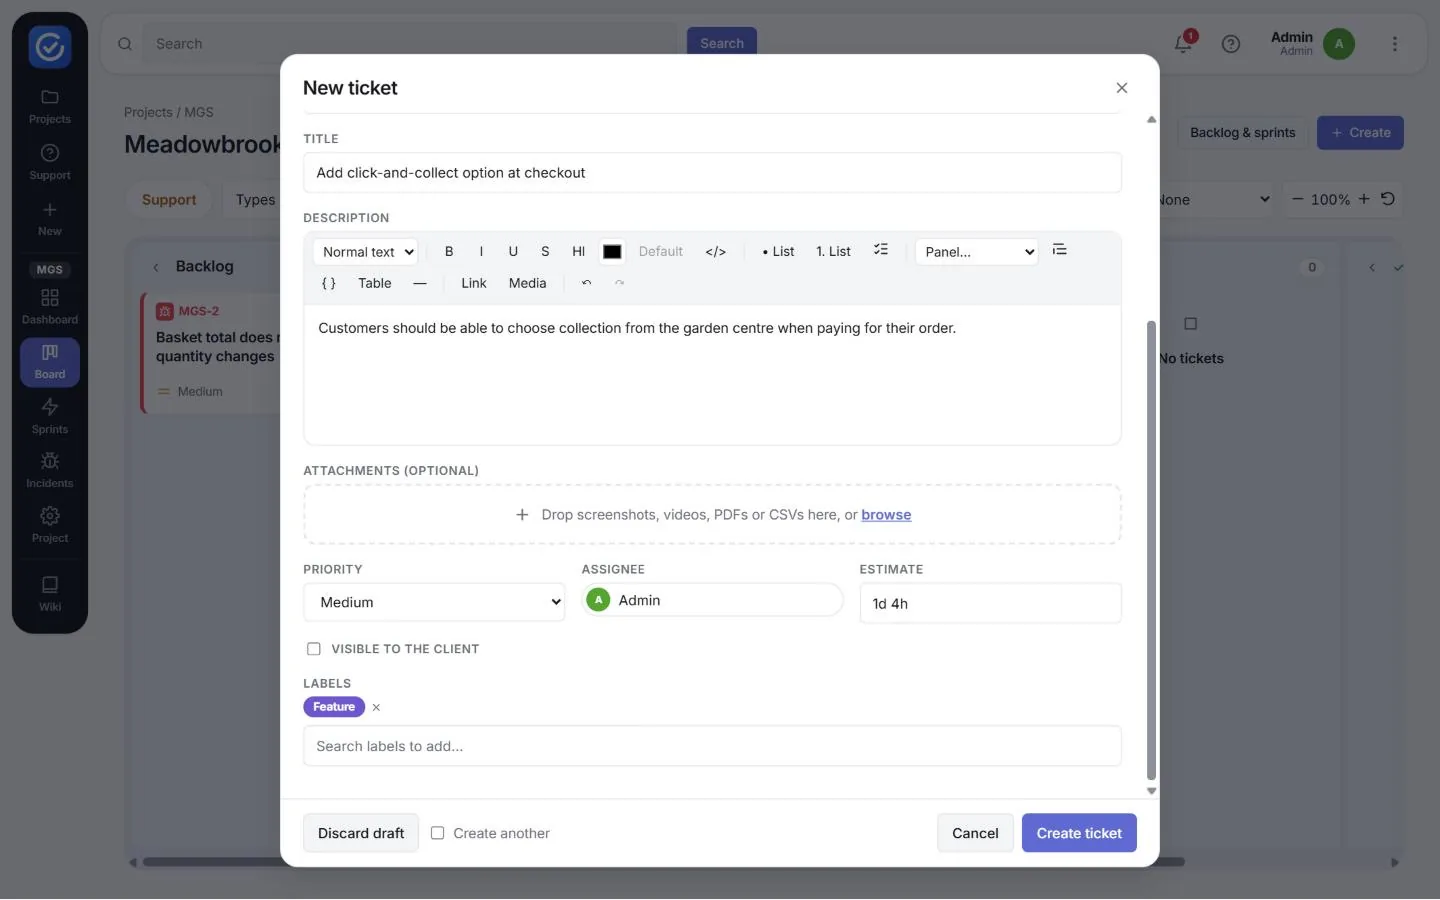
Tip: What you type is saved in that browser tab until you create the ticket or click Discard draft. Attachments and pasted images or videos are not saved this way, so add them again if you close the form.
Read and edit a ticket
To open a ticket, click its card, its search result or its key. The header shows the ticket key and title, with who raised it, their organisation and the date.
- Copy link and Copy reference (beside the key) copy the ticket’s web address or its key, ready to paste into an email or chat.
- Edit the title by clicking it.
Below the header are seven tabs:
| Tab | Use it to |
|---|---|
| Details | Interact with attachments, linked tickets & wiki pages. |
| Internal notes | Discuss the ticket within the team. Clients never see notes. You can edit or delete your own notes. |
| Client conversation | Message the client. Everything on this tab is visible to the client, and your replies are emailed to them. |
| Time | See the time logged against the estimate, and log more time. |
| Watchers | Follow the ticket. Watchers are emailed whenever the status changes. |
| Development | See the commits and pull requests that mention the ticket key. |
| History | See every change: when, who, which field, and old → new value. |
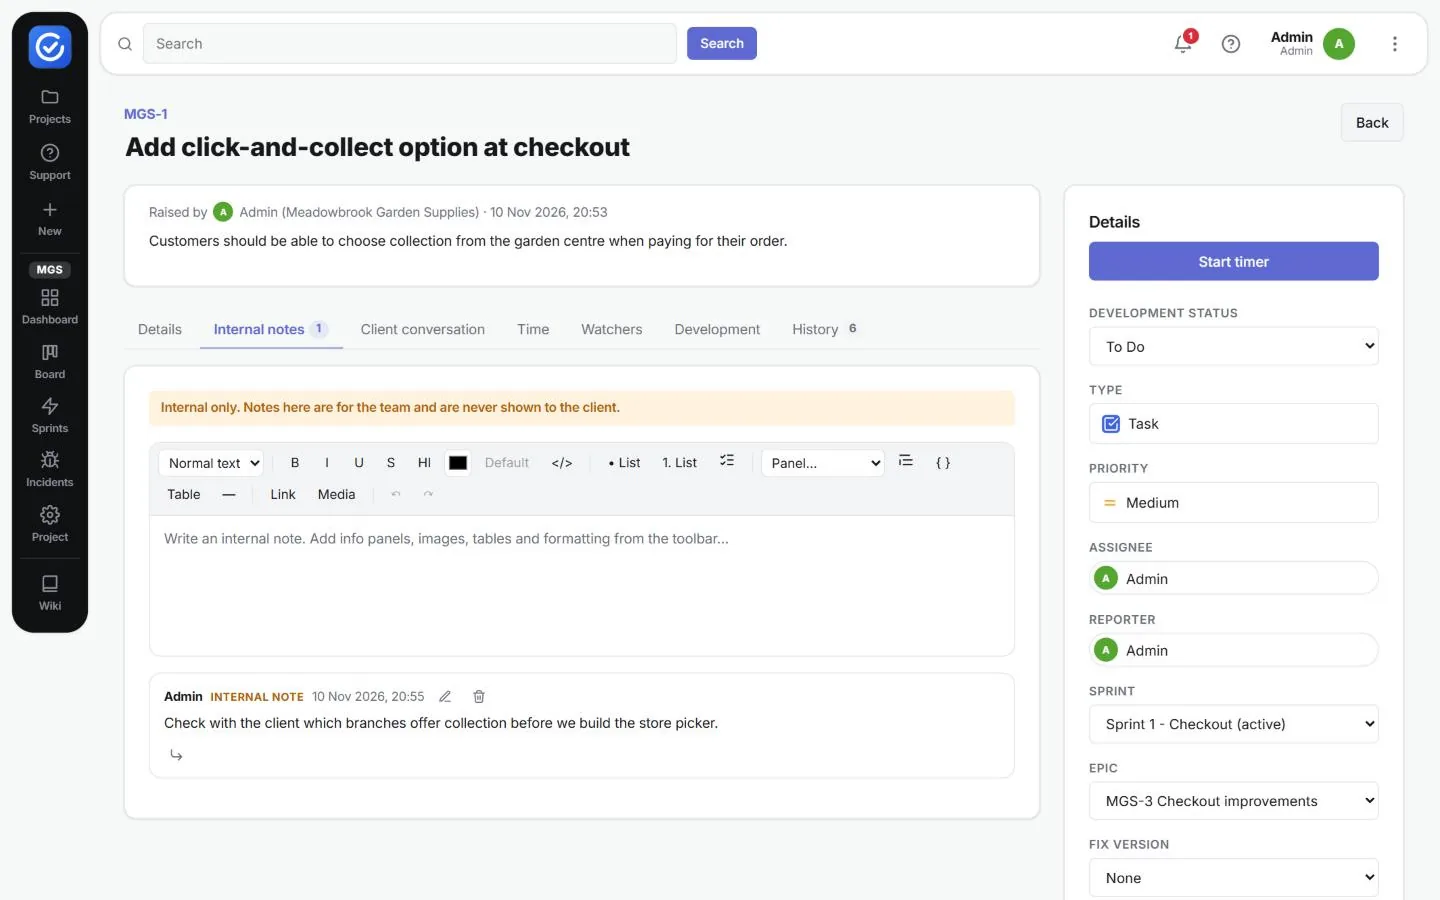
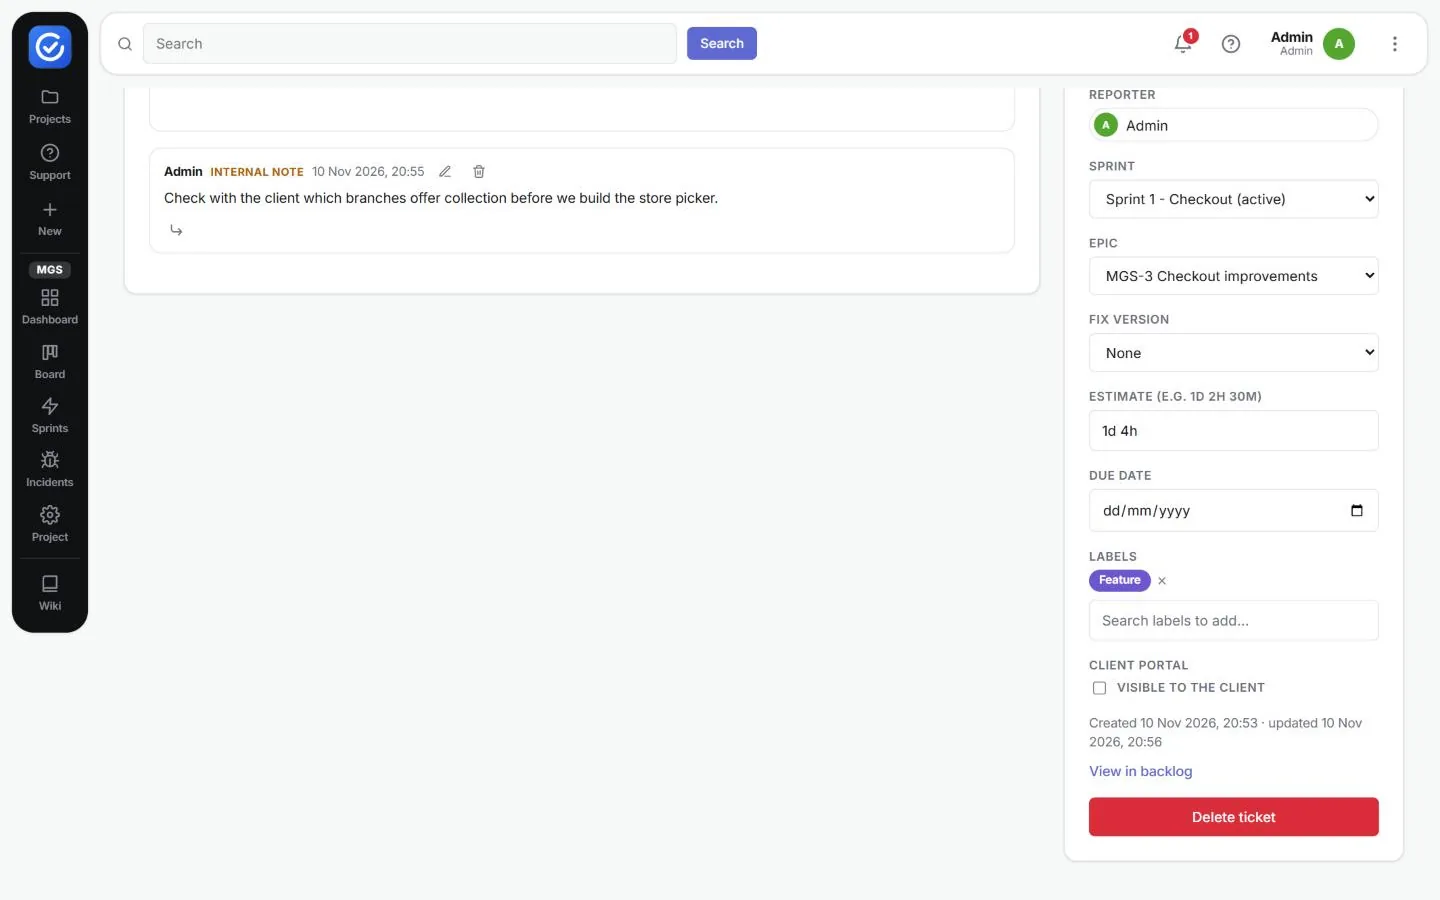
The Details panel on the right holds the editable fields: Development status (the board column), Type, Priority, Assignee, Reporter, Sprint, Parent, Fix version, Estimate, Due date, Labels and Visible to the client. Changes save as soon as you make them.
- Parent can be set to any ticket in the project, not just an epic. Use it to build a hierarchy such as epic › story › sub-task.
- Start timer at the top times your work as you go.
- View in backlog opens the ticket’s place in sprint planning.
- Delete ticket (red button) is permanent and removes the ticket’s comments, history and attachments.
Add an internal note
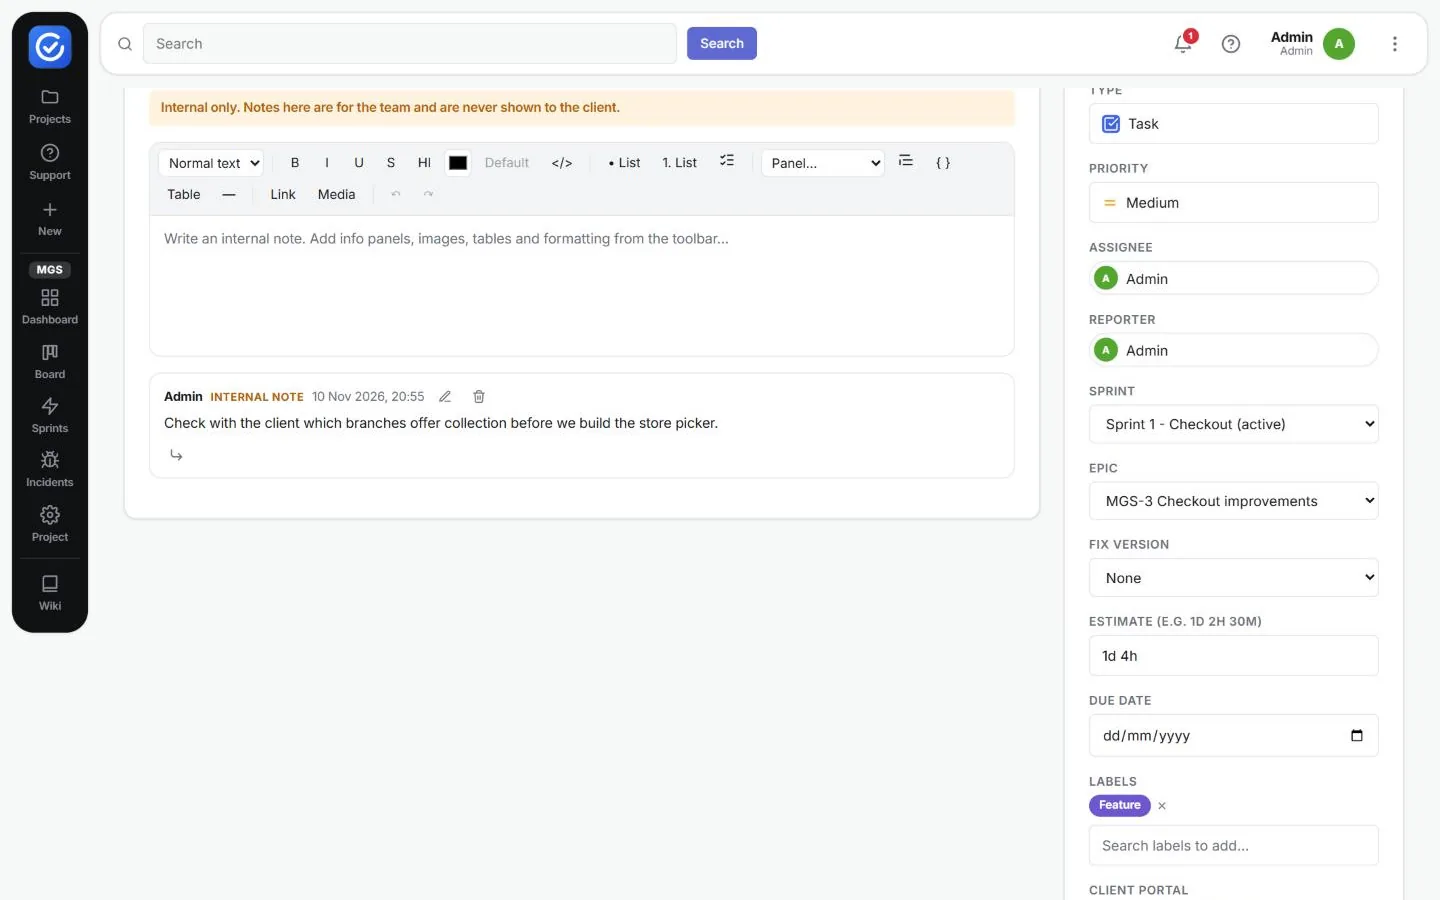
- Open the ticket and click Internal notes. The orange banner reminds you that notes are never shown to the client.
- Type your note in the editor. You can use the full formatting toolbar.
- Click Add internal note. The note appears below the editor with your name, an Internal note tag and the time. Use the pencil or bin icons to edit or delete it, and the arrow to reply.
Reply to the client
- Open the ticket and click Client conversation.
- Check that the ticket is meant for the client, then write your message.
- Send it. The message appears in the client portal, and the client is emailed.
Log time
Time tracking must be switched on for the project (Project settings › Timesheets).
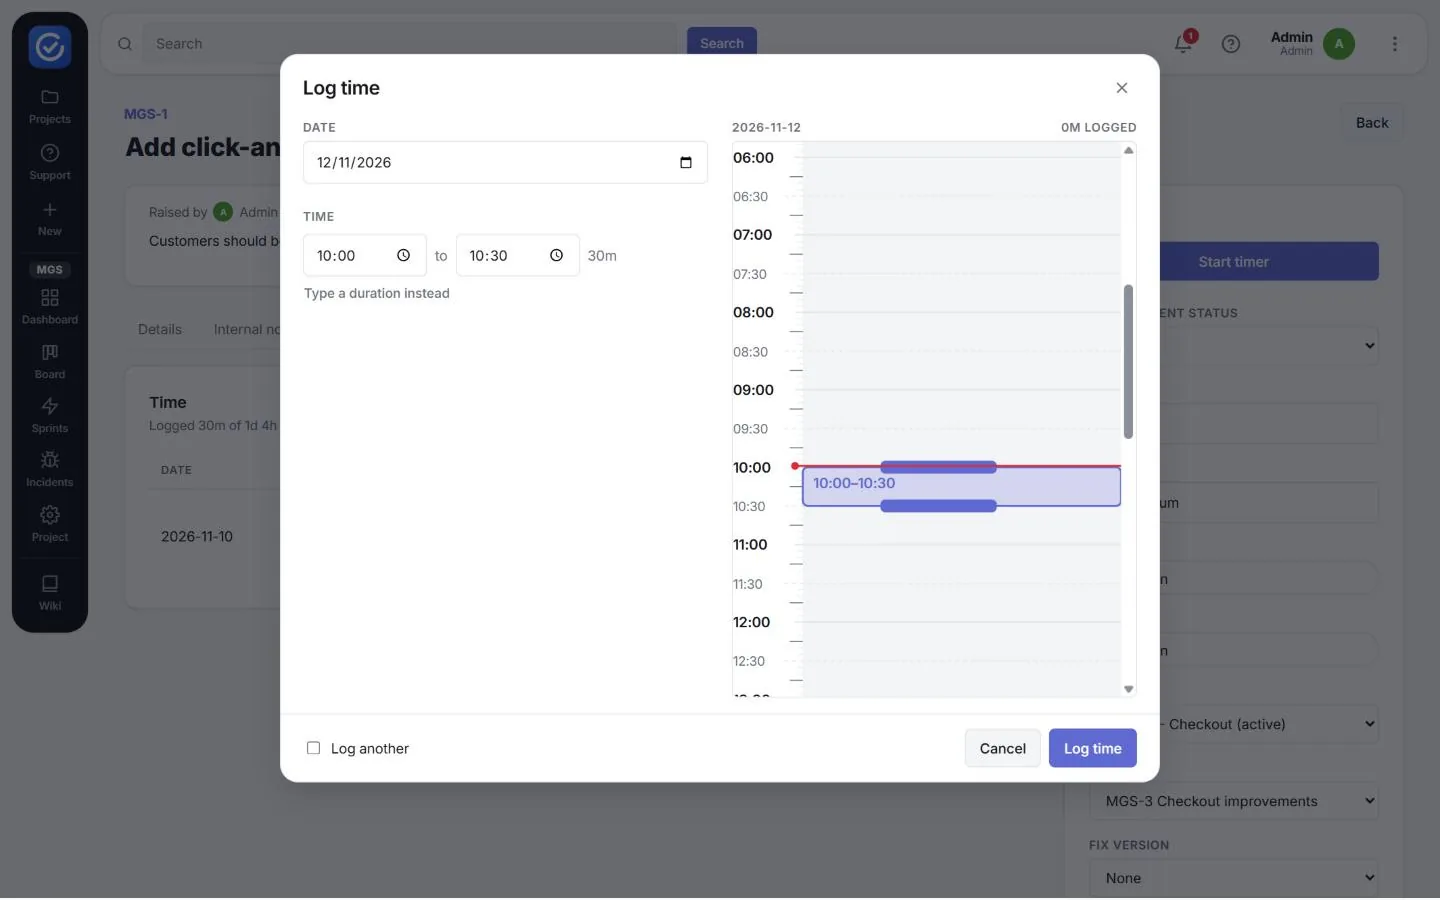
- Open the ticket and click Time, then Log time.
- Choose the Date.
- Enter a start and end Time, or drag on the day calendar on the right. To enter a length instead, click Type a duration instead.
- Click Log time. Tick Log another first if you want to add more entries.
Watch a ticket
Open the Watchers tab and click Watch this ticket. Only people on the project can watch, and watchers are emailed when the status changes.
Link code to a ticket
Put the ticket key (for example MGS-12) in a commit message or pull request title. Once a repository is connected (Project settings › Git integrations), the commit or pull request appears on the ticket’s Development tab.
Move a ticket to another project
Users whose role has the Move tickets to another project permission can move a support ticket to another project of the same client. The ticket gets a new number in its new project, and old links and email replies still find it.
Backlog and sprints
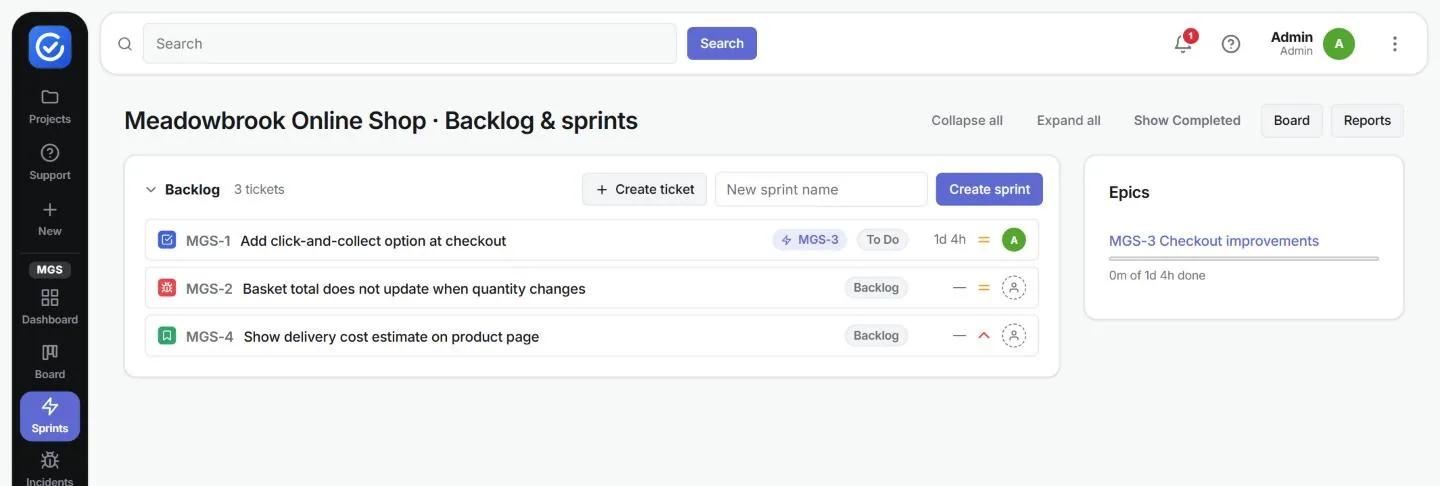
To plan work in time-boxed sprints, click Sprints in the project menu (or Backlog & sprints on the board). The page shows each sprint, then the unscheduled Backlog, with the project’s Epics and their progress on the right. Board and Reports at the top right take you to those pages.
Plan a sprint
- In the Backlog panel, type a name in New sprint name (for example Sprint 1 - Checkout) and click Create sprint. The sprint appears as planned.
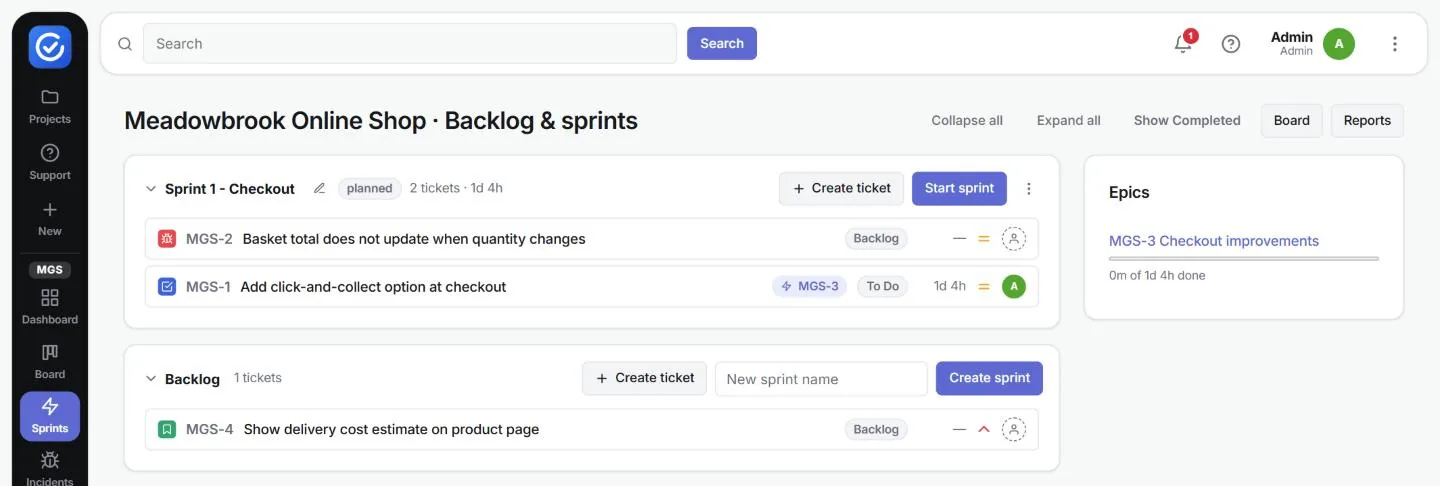
- Drag tickets from the Backlog into the sprint. The sprint header shows the number of tickets and the total estimate, for example 2 tickets · 1d 4h.
- To rename the sprint, click the pencil icon beside its name. To delete an empty sprint, click Delete.
- Use Create ticket inside a sprint to add a new ticket straight into it.
Start and complete a sprint
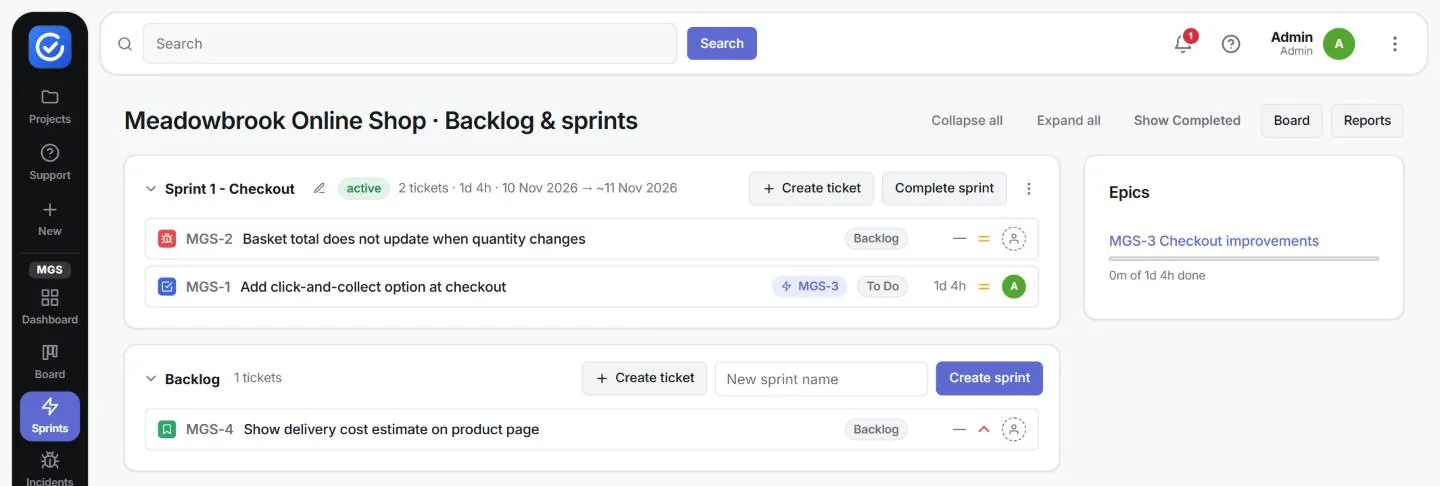
- Click Start sprint. The sprint becomes active straight away, starting today. Its header now shows the date range with an estimated end date (marked ~), and it appears in the board’s Active sprints filter.
- When the sprint ends, click Complete sprint. You can then choose whether to move any unfinished tickets into the next planned sprint or back into the backlog.
- Click Show Completed to see past sprints, and Collapse all or Expand all to tidy the page.
Work with epics and parent tickets
An epic groups related tickets, such as Checkout improvements. Create it as a ticket with the type Epic, then set the Parent field on each child ticket. The Epics panel shows how much of the epic’s estimate is done, for example 0m of 1d 4h done, and child tickets show the parent’s key as a tag on the backlog.
Parent accepts any ticket, so you can also nest a sub-task under a story or task.
Dashboard and reports
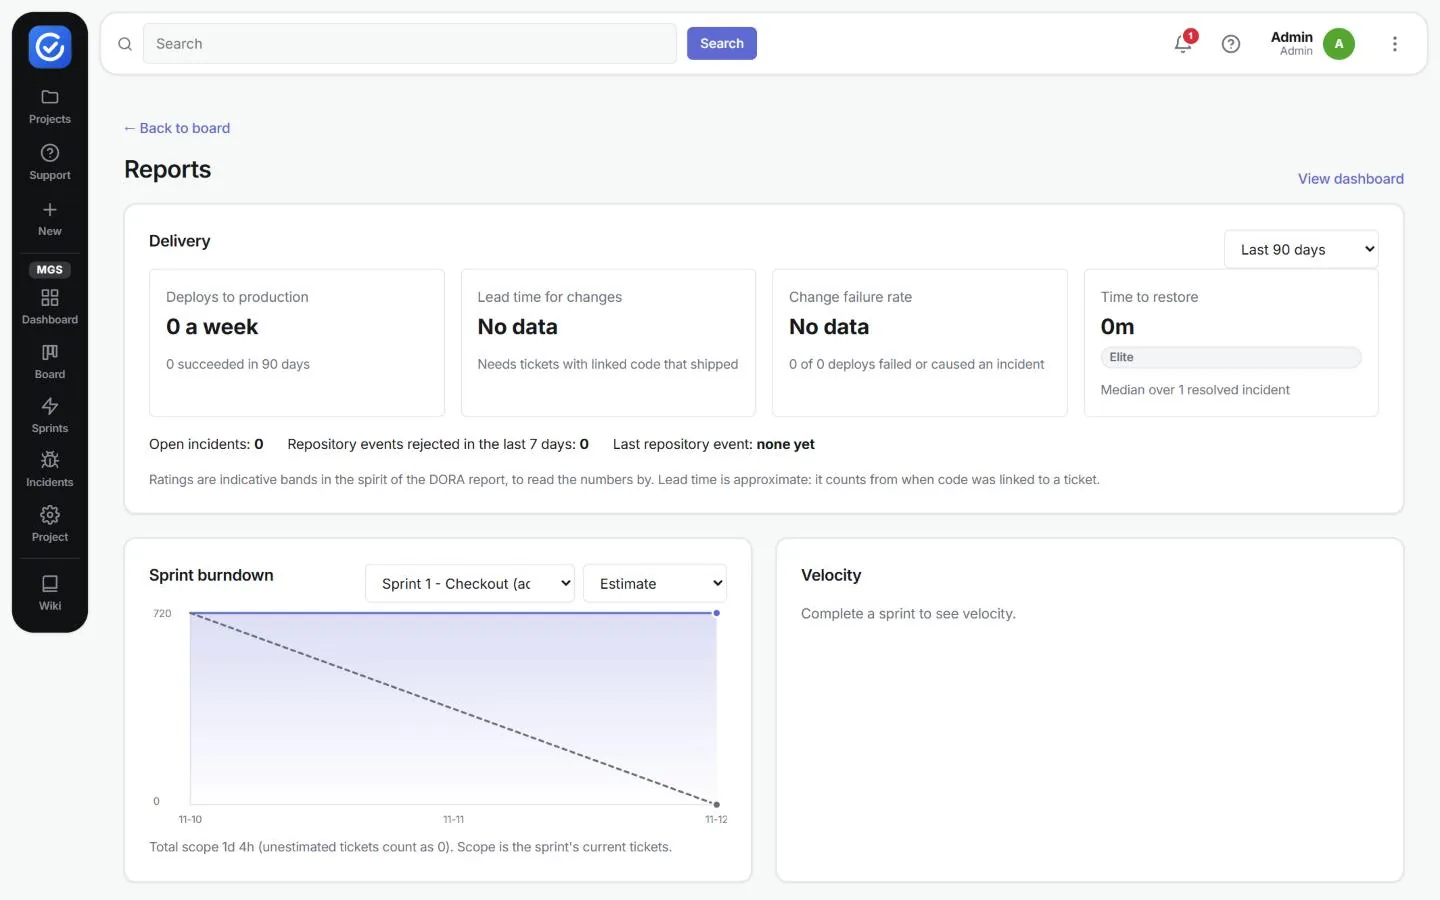
The project Dashboard gives a live overview, and Reports gives the detailed figures. To move between them, use Classic reports on the Dashboard and View dashboard on Reports.
Dashboard
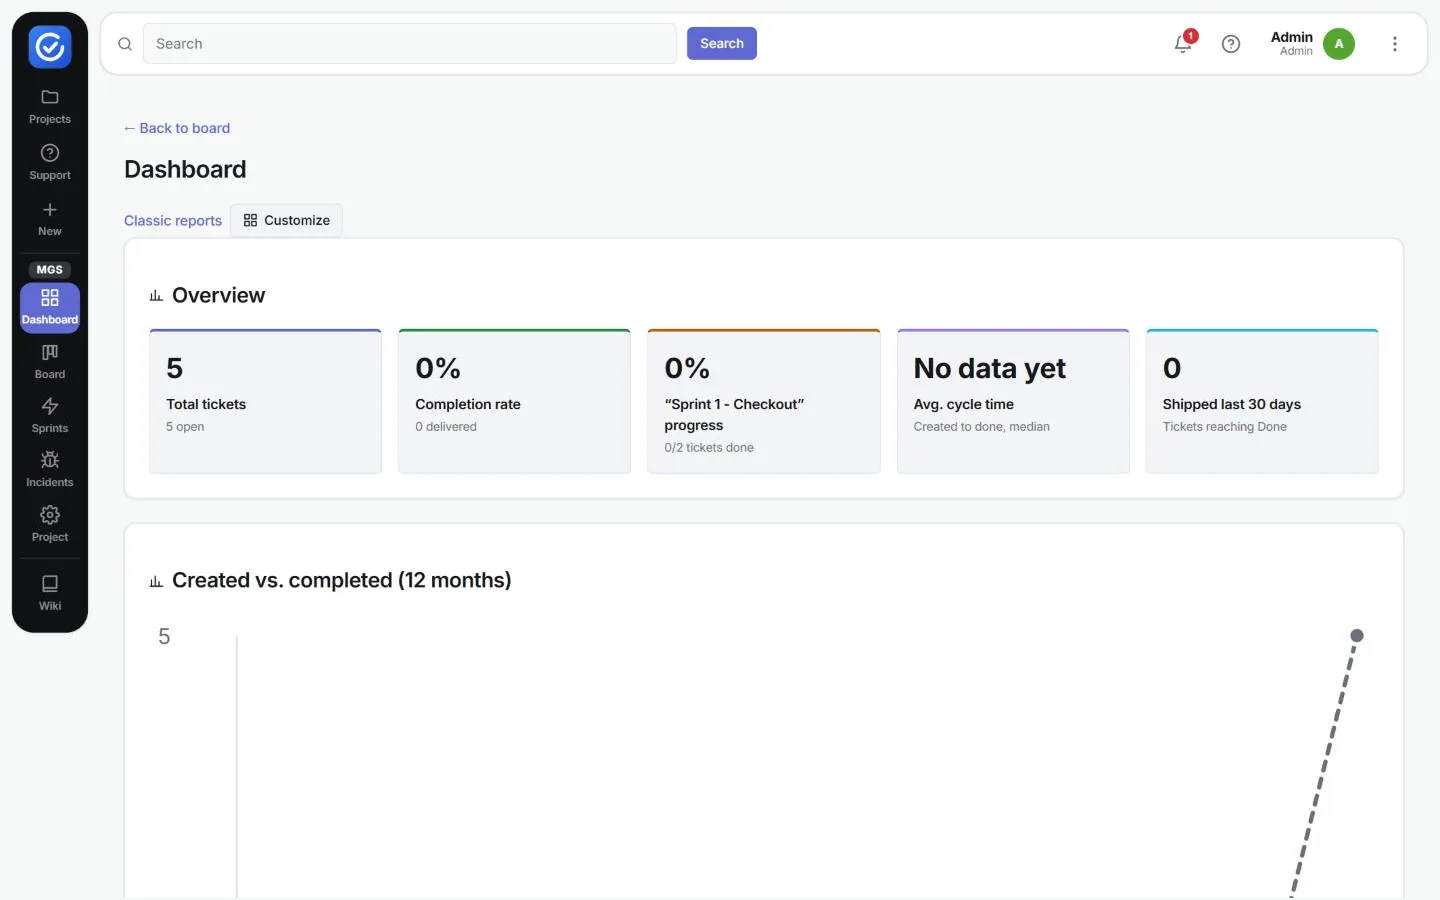
The Dashboard is made of panels. Customize lets you adjust the layout.
- Overview: total tickets, completion rate, progress of the active sprint, average cycle time (created to done) and tickets shipped in the last 30 days.
- Created vs. completed over 12 months, and the Active sprint burndown.
- Status overview, Types of work and By priority breakdowns.
- Sprint velocity, Team workload (tickets per person) and Epic progress.
- Delivery (DevOps): deploy frequency, lead time for changes, change failure rate and time to restore.
Reports
- Delivery: the four DORA-style measures (deploys to production, lead time for changes, change failure rate and time to restore) over the last 30, 90, 180 or 365 days. Lead time needs tickets whose linked code has shipped, and change failure rate needs recorded deploys.
- Sprint burndown: remaining work for the chosen sprint, by estimate or by ticket count. Unestimated tickets count as zero.
- Velocity: appears once at least one sprint has been completed.
- Time vs estimate: estimated against logged time, by sprint, release or person.
- Breakdowns by status, priority, assignee and type.
Incidents
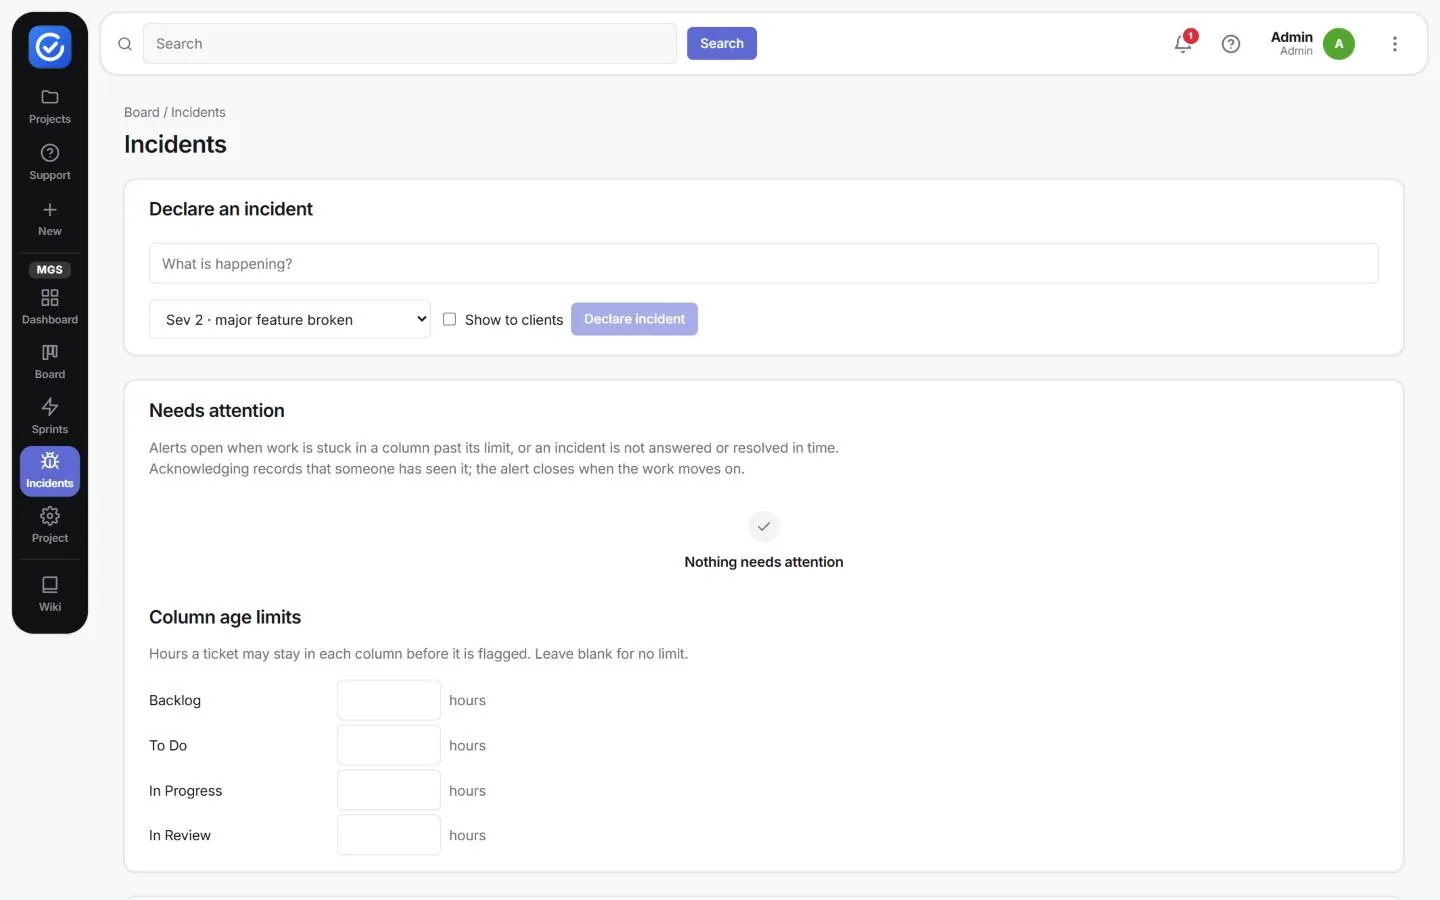
Use Incidents to track live service problems: declare the incident, post timed updates, keep clients informed if needed, and write a review afterwards. Each incident gets a ticket key in the project (for example MGS-5). While an incident is open, a red badge on Incidents in the left-hand bar shows how many need attention.
Declare an incident
- Open the project and click Incidents.
- Under Declare an incident, describe the problem in What is happening?.
- Choose a severity:
| Severity | Meaning |
|---|---|
| Sev 1 | Full outage |
| Sev 2 | Major feature broken (default) |
| Sev 3 | Partial outage; a workaround exists |
| Sev 4 | Minor |
- Tick Show to clients only if the client should see the incident on their status page and receive emails about it.
- Click Declare incident. The incident opens with the status Investigating.
Update and resolve an incident
- Click the incident to open it. The header shows its severity, status, the number of subscribed clients, and whether it is internal only.
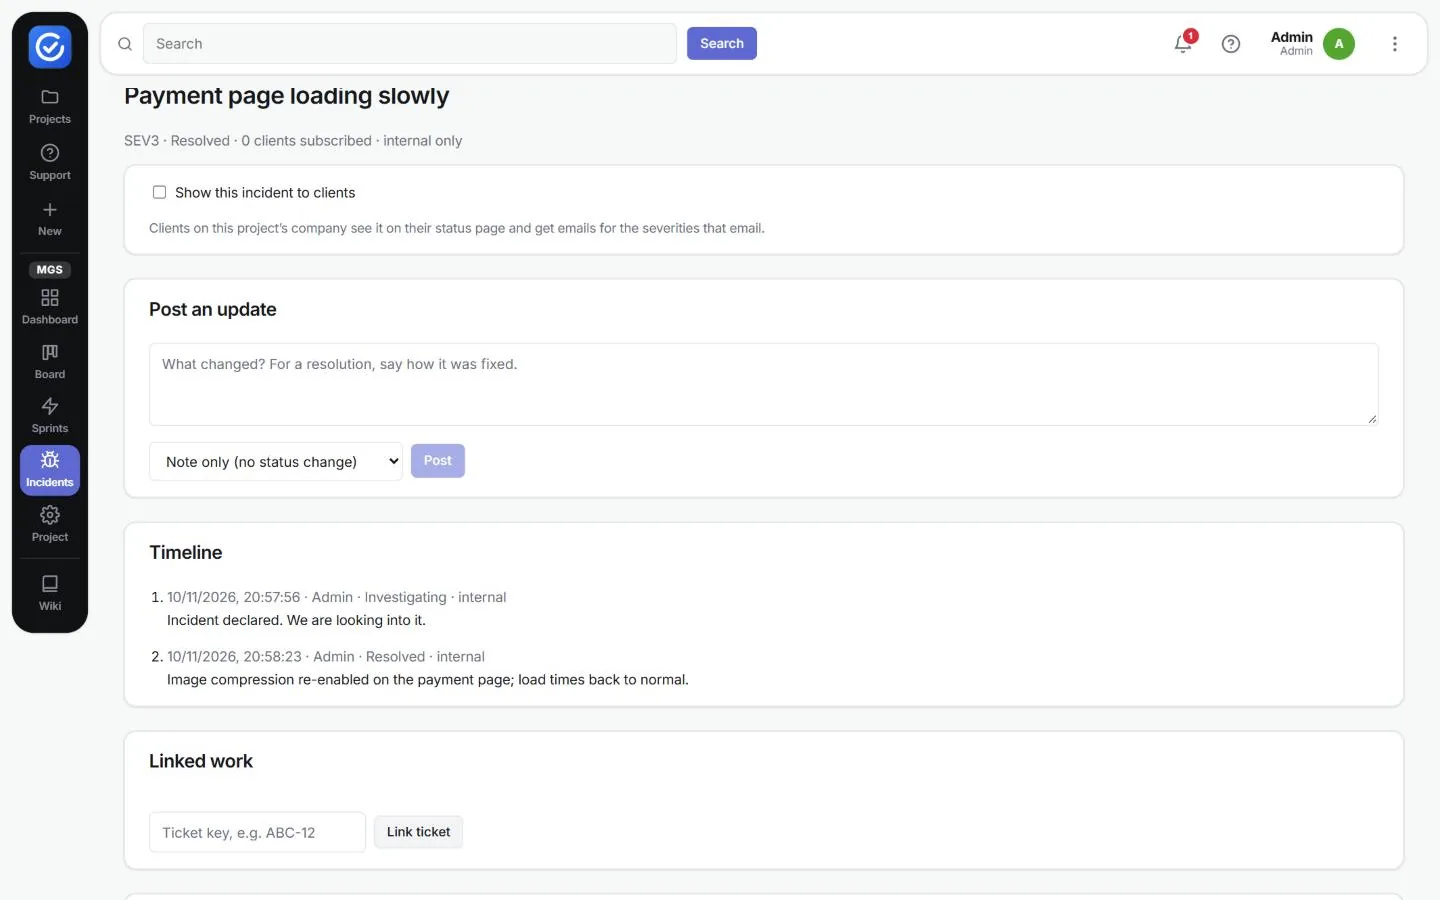
- Under Post an update, describe what has changed. When you resolve the incident, say how it was fixed.
- Choose Note only (no status change), or move the status to Investigating, Identified, Monitoring or Resolved.
- Click Post. The update is added to the Timeline.
- Under Linked work, type a ticket key (for example MGS-1) into Ticket key and click Link ticket to connect the tickets involved.
- Under Post-incident review, record what happened and the follow-up actions, then click Save review.
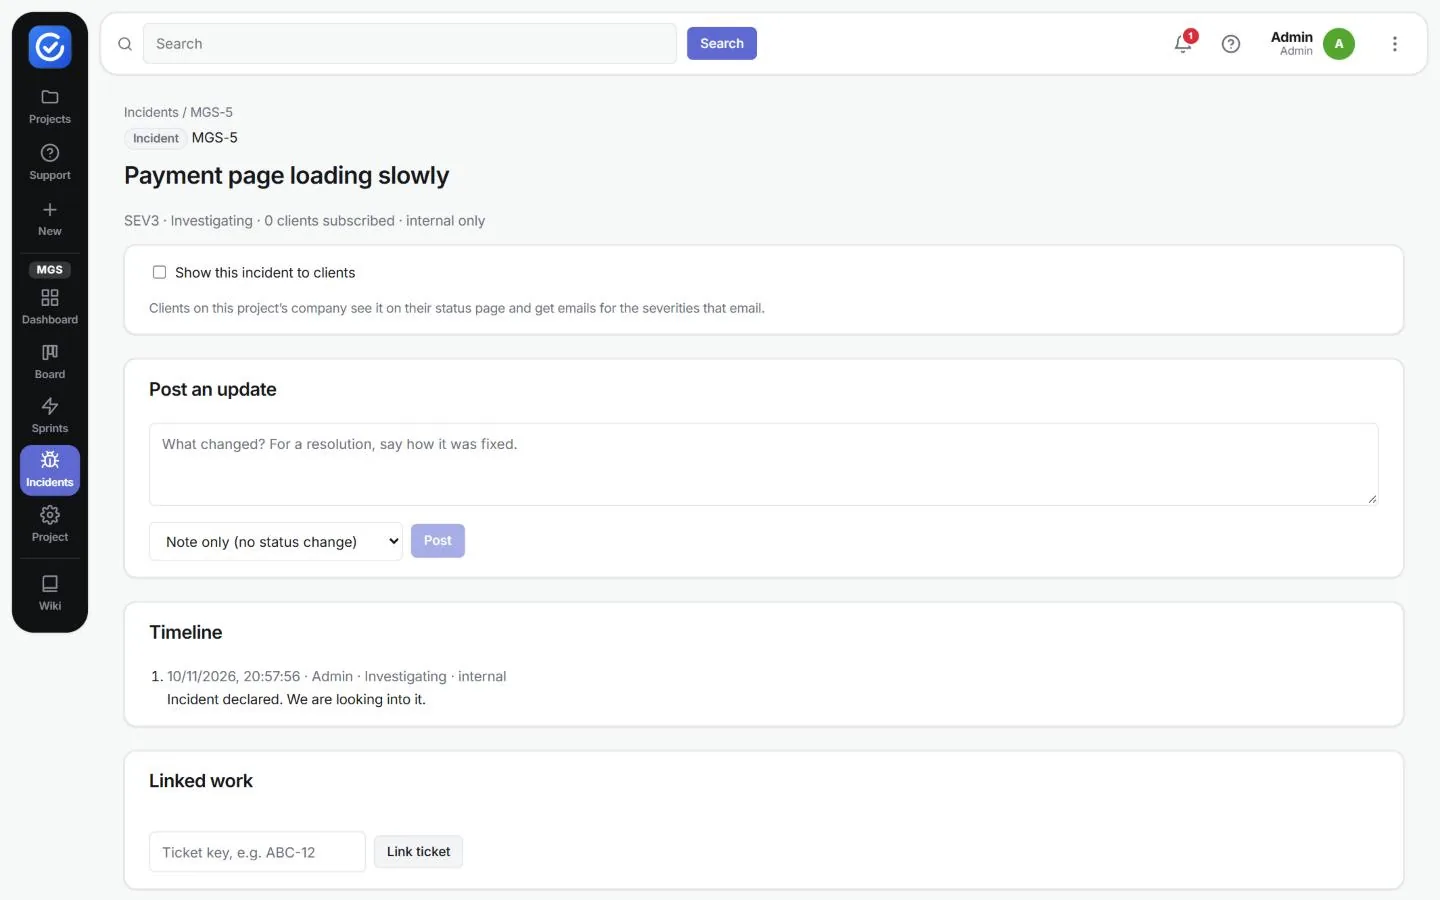
Careful: ticking Show this incident to clients publishes the incident to the client’s status page, and emails clients on the project’s company for severities that send email. Delete incident permanently removes the incident, its timeline and its alerts.
Alerts, column age limits and uptime checks
- Needs attention lists open alerts. An alert opens when a ticket stays in a column past its limit, or when an incident is not answered or resolved in time. Click Acknowledge to record that someone has seen it.
- Column age limits: enter the number of hours a ticket may stay in each column before it is flagged. Leave a column blank for no limit.
- Uptime checks: enter a public web address, how often to check it, the severity to use and whether clients see the resulting incidents, then click Add check. Failed checks open an incident automatically, and good checks close it again.
Project settings
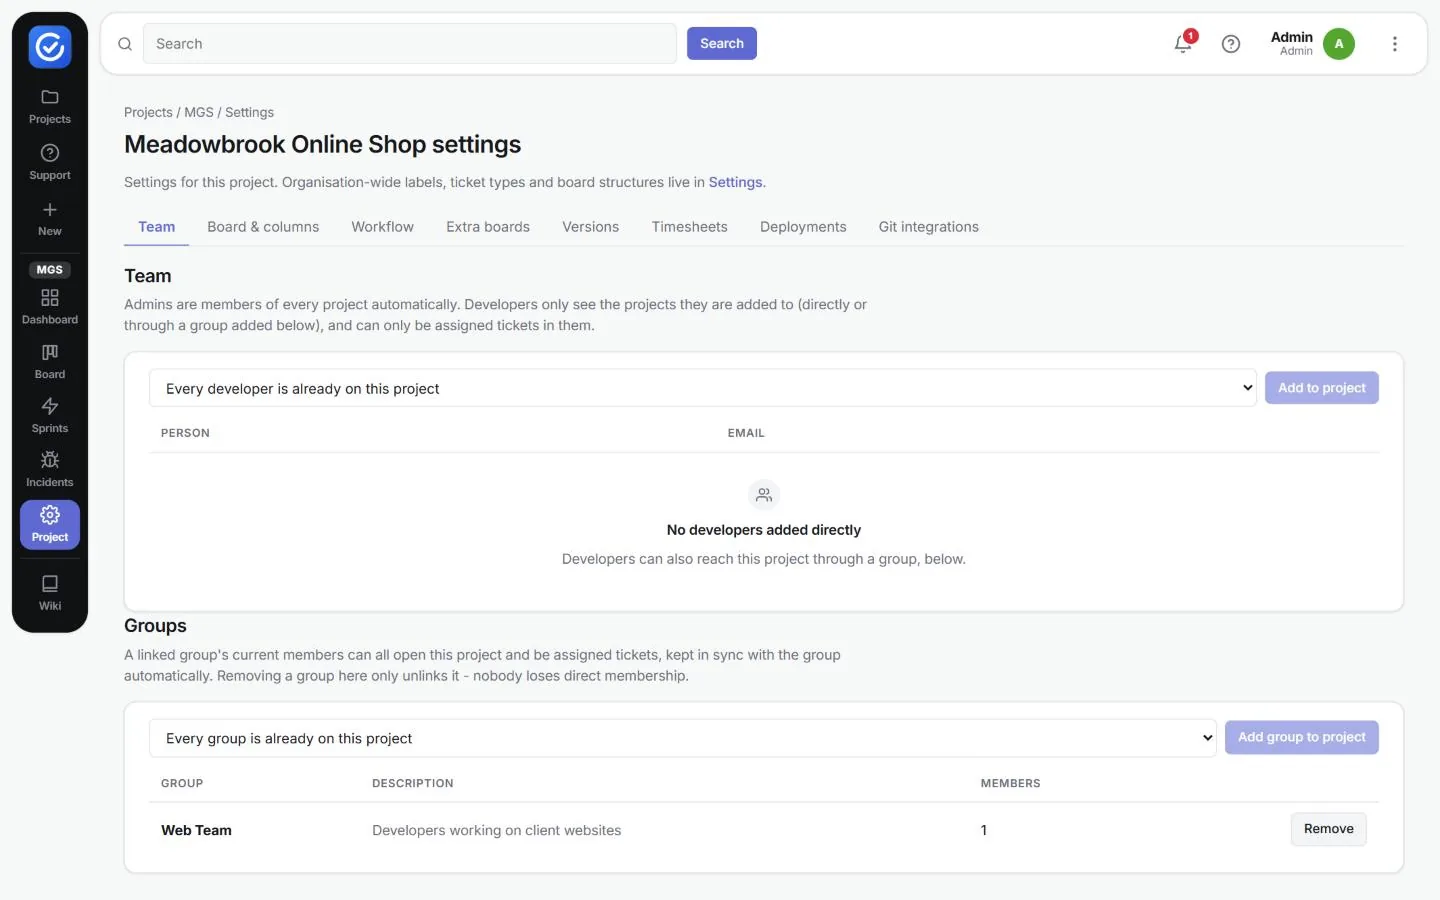
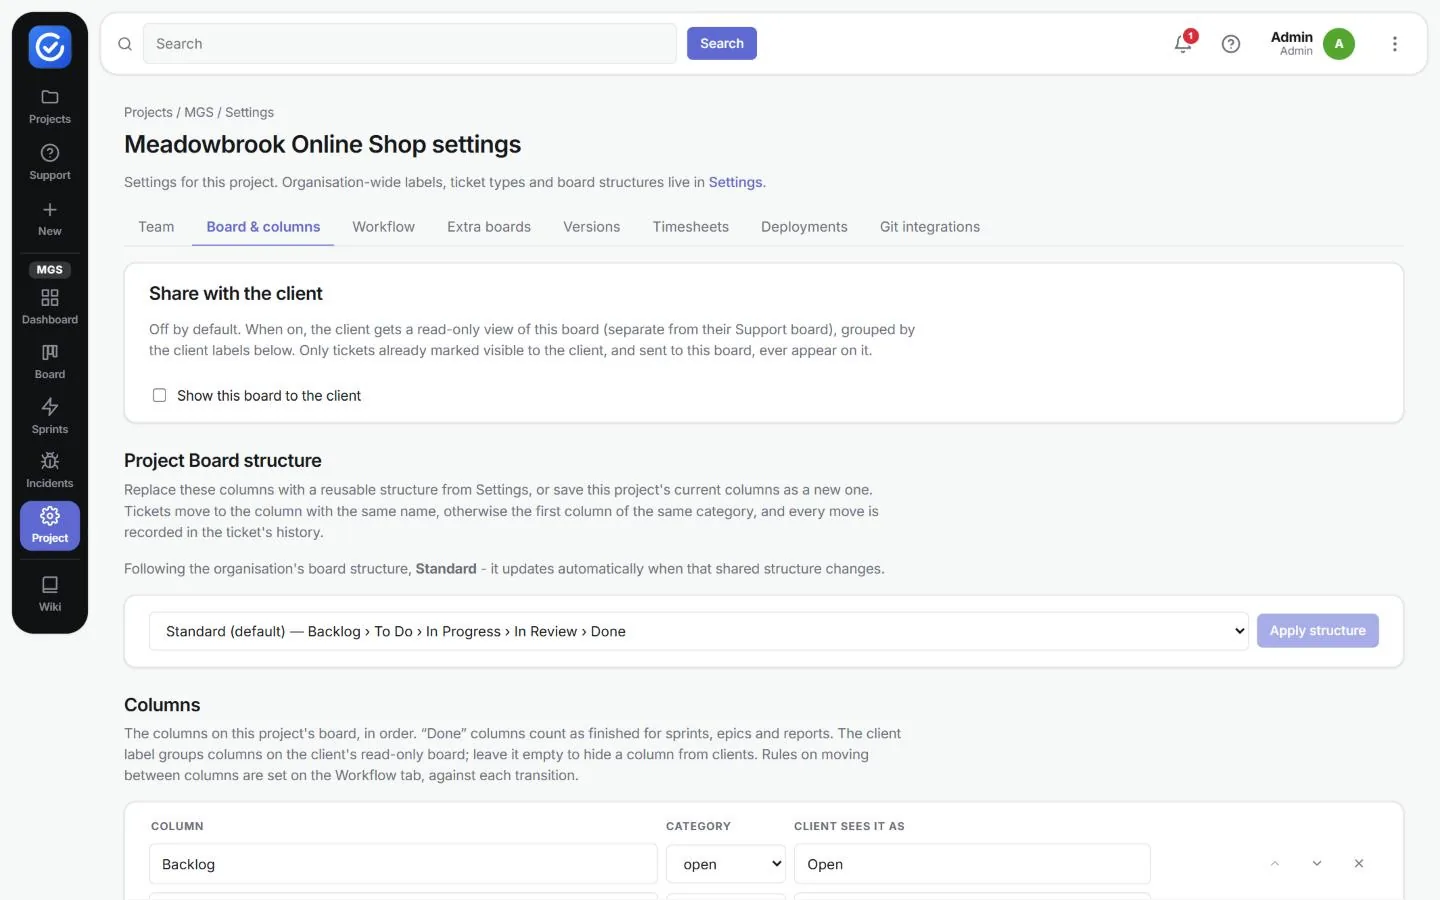
To open a project’s own settings, click Project in the project menu. Labels, ticket types and board structures are shared across the whole organisation and are managed under More (⋮) › Settings. Everything below applies to this project only.
| Tab | What you can do |
|---|---|
| Team | Add developers to the project one at a time, or link a group under Groups. Admins belong to every project automatically. Developers only see, and can only be assigned tickets in, the projects they belong to. A linked group’s members stay in sync with the group, and removing a group only unlinks it: nobody loses a membership you gave them directly. |
| Board & columns | Share with the client: Show this board to the client (off by default) gives the client a read-only view, grouped by the client labels, that only includes tickets marked visible to them. Project Board structure: shows which organisation structure the project follows (for example Standard); it updates automatically when that shared structure changes. Choose another and click Apply structure to replace the columns. Columns: add, rename and reorder columns, and give each a category. Done columns count as finished for sprints, epics and reports. Client sees it as sets the column name shown to clients; leave it blank to hide the column. |
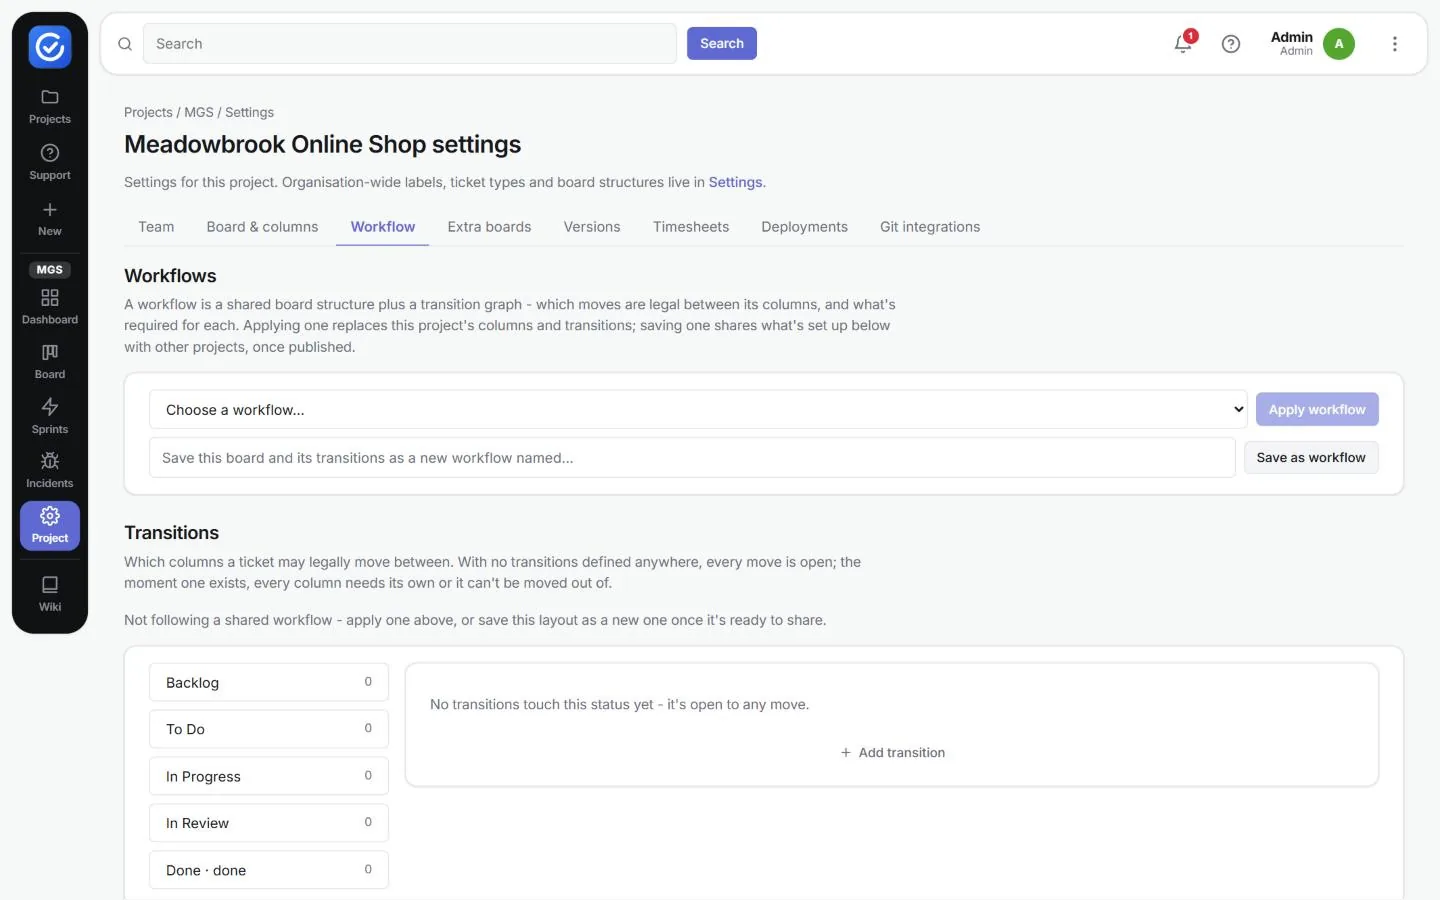
| Workflow | Apply workflow replaces this project’s columns and transitions with a published shared workflow. Save as workflow shares this board and its transitions under a new name, once published. Transitions set which column moves are allowed (see below). |
| Extra boards | Add a second board for the same tickets, such as a Documentation board. A ticket joins it when it moves into a trigger column you choose, then moves through the extra board’s own columns. Clients never see extra boards. |
| Versions | Click Add version to create releases, then set Fix version on tickets. Releasing a version stamps the date and produces release notes grouped by ticket type. Clients see released versions in their portal, and the notes can be emailed to them. |
| Timesheets | Track time on this project switches the Time tab and time reports on or off. Time already logged is kept. |
| Deployments | Lists environments (for example staging and production) and deploy history. A successful deploy to a mapped environment can move its tickets to a lane you choose, such as Released. |
| Git integrations | Click Connect a repository to link a GitHub repository. Commits and pull requests that mention a ticket key then appear on the ticket. |
Transitions: how the rule has changed
Important: when an internal board has no transitions at all, every move is allowed. As soon as you add one transition, every column needs its own. A column with no outgoing transitions becomes a dead end: tickets can’t be moved out of it.
To add a transition, open the Workflow tab, select the column on the left, click + Add transition, then enter a Transition name and choose From, To and the ticket types it applies to. Plan the full set of moves before you add the first one, so that your team isn’t blocked part-way through.
Support desk
When a client raises a ticket, it lands first on a Support board for first-line triage. It does not touch the project’s Development board until someone sends it there. A client only ever sees their own project’s tickets, even when a Support board is shared by several clients.
Everything to do with Support boards lives on the Support page. The Support boards tab has gone from Settings.
Find a Support board
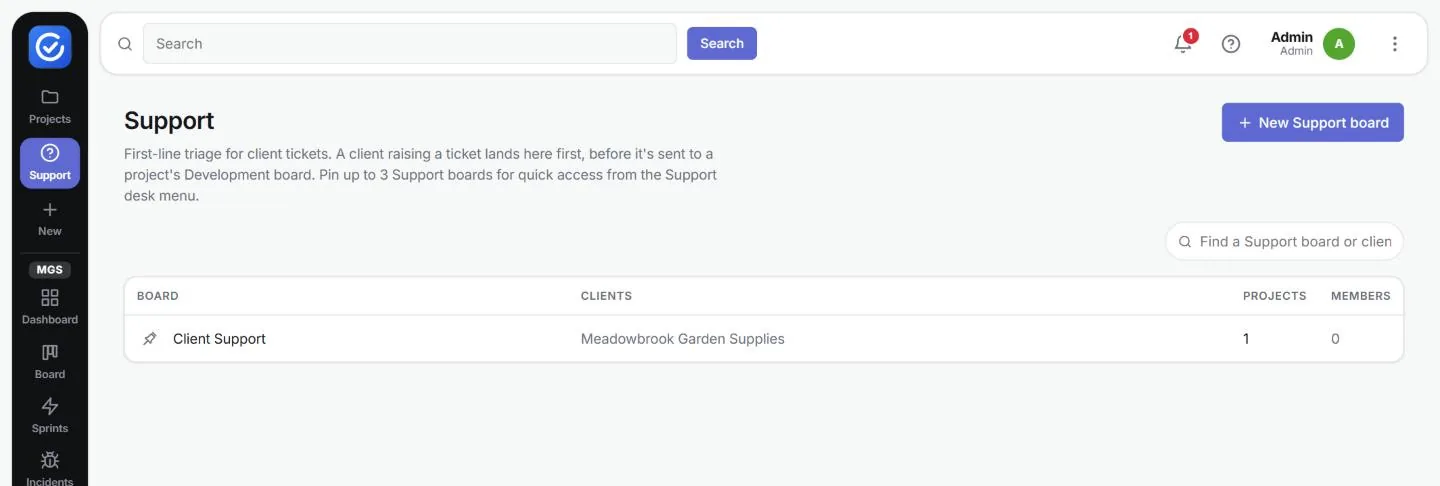
Click Support in the left-hand bar. Each board is listed with its clients, the number of projects on it and its members. Type in Find a Support board or client to filter the list. Click the pin icon beside a board to pin it: you can pin up to three for quick access.
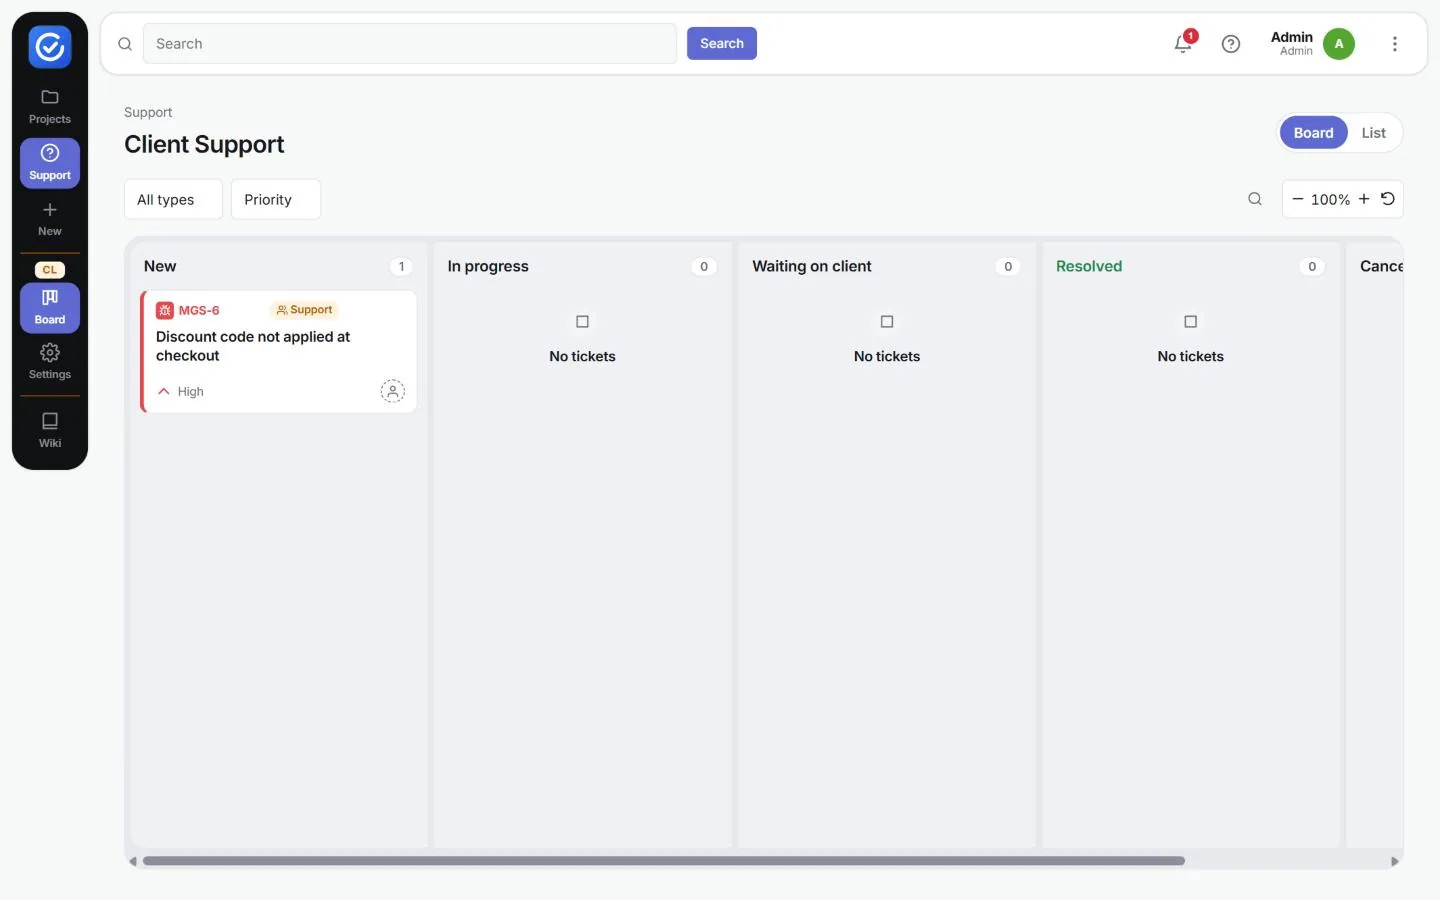
Work the Support board
Open a board to see its tickets. While you are on it, the left-hand bar shows the board’s key (for example CL) with Board and Settings.
- The default columns are New, In progress, Waiting on client, Resolved and Cancelled.
- Switch between the Board and List views at the top right.
- Filter with All types, Priority and the search icon, and use − / + to zoom.
- Drag tickets between columns as you work them. Open a ticket to reply on its Client conversation tab, or to send it on to the project’s Development board.
On a project’s board, the Support filter shows only the tickets that clients raised.
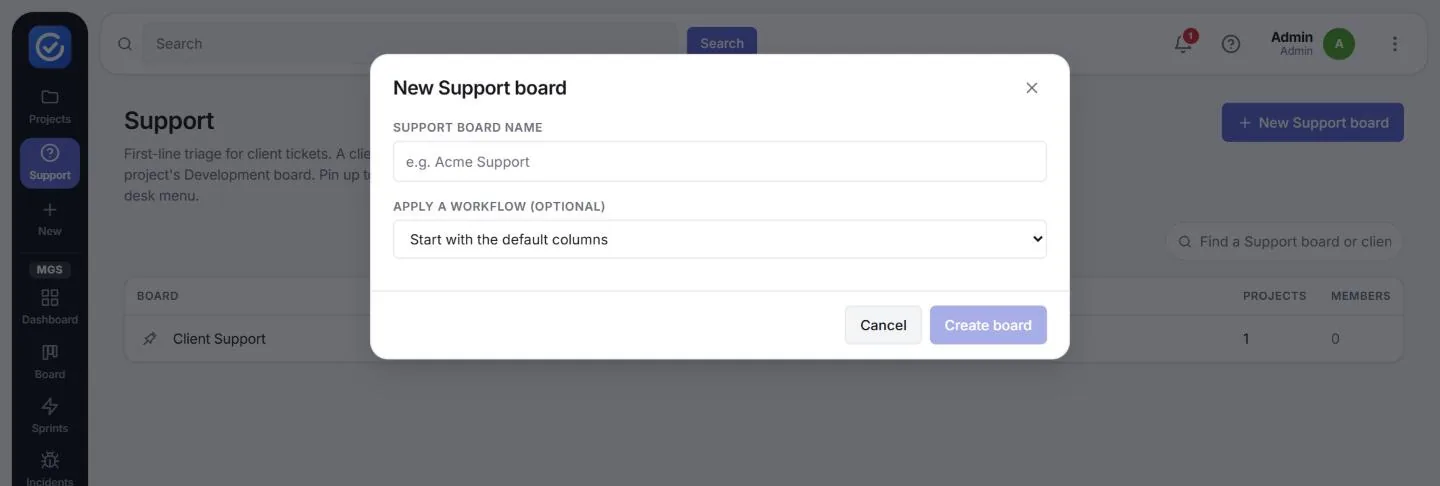
Create a Support board (admins)
- On the Support page, click + New Support board.
- Enter the Support board name.
- Optionally, choose a workflow under Apply a workflow. Leave it on Start with the default columns to use the standard five columns.
- Click Create board. The board’s settings page opens so you can finish setting it up.
You can also create a Support board while adding a client.
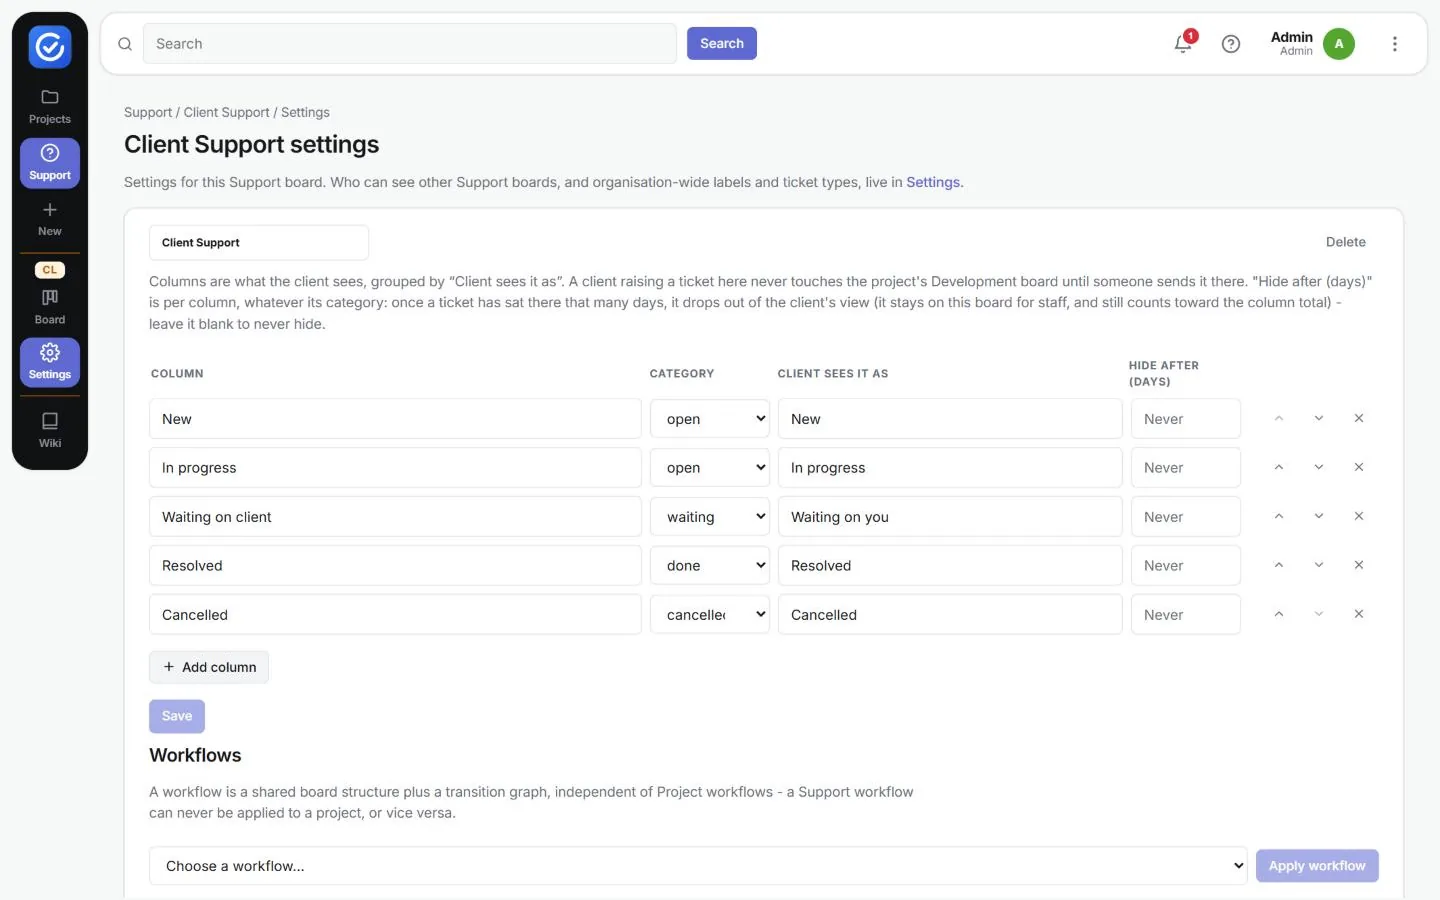
Configure a Support board (admins)
Open the board and click Settings in the left-hand bar.
- Name and columns: rename the board, and add, rename, reorder or remove columns. For each column, set its Category (open, waiting, done or cancelled), the name the Client sees it as (for example Waiting on client is shown to clients as Waiting on you), and Hide after (days). Hide after now works on any column, whatever its category: once a ticket has been in that column for that many days, it drops out of the client’s view but stays on the board for staff. Leave it on Never to keep tickets visible. Click Save.
- Workflows: choose a Support workflow and click Apply workflow. Support workflows are separate from project workflows, and one can never be applied to the other.
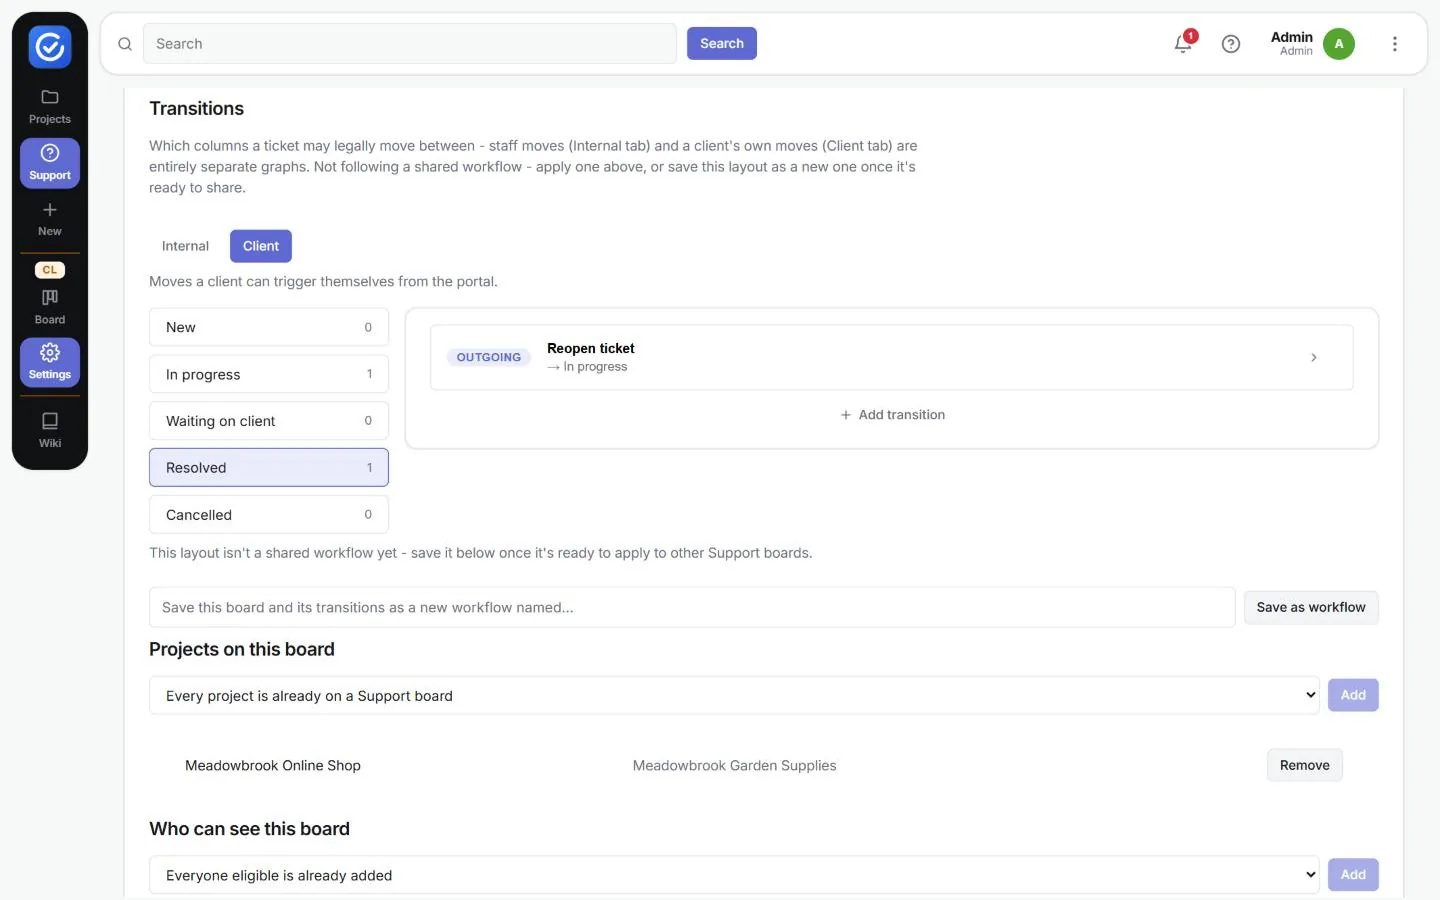
- Transitions: these now come in two sets.
- Internal: the moves staff can make.
- Client: the moves a client can trigger themselves from the portal, such as Reopen ticket from Resolved back to In progress. If a column has no client transitions, clients can’t move tickets out of it.
- Save as workflow: saves this board’s columns and transitions as a new shared Support workflow.
- Projects on this board: add or remove projects.
- Who can see this board: add support or admin users. Admins always see every board. You can also link a Support group.
- Delete (top right) removes the board.
Wiki (knowledge base)
The Wiki holds documentation, runbooks and how-tos, organised into spaces. Each space is a home for related pages, such as those for a product, a team or a client. Before any spaces exist, the Wiki page offers New space and Import from Confluence.
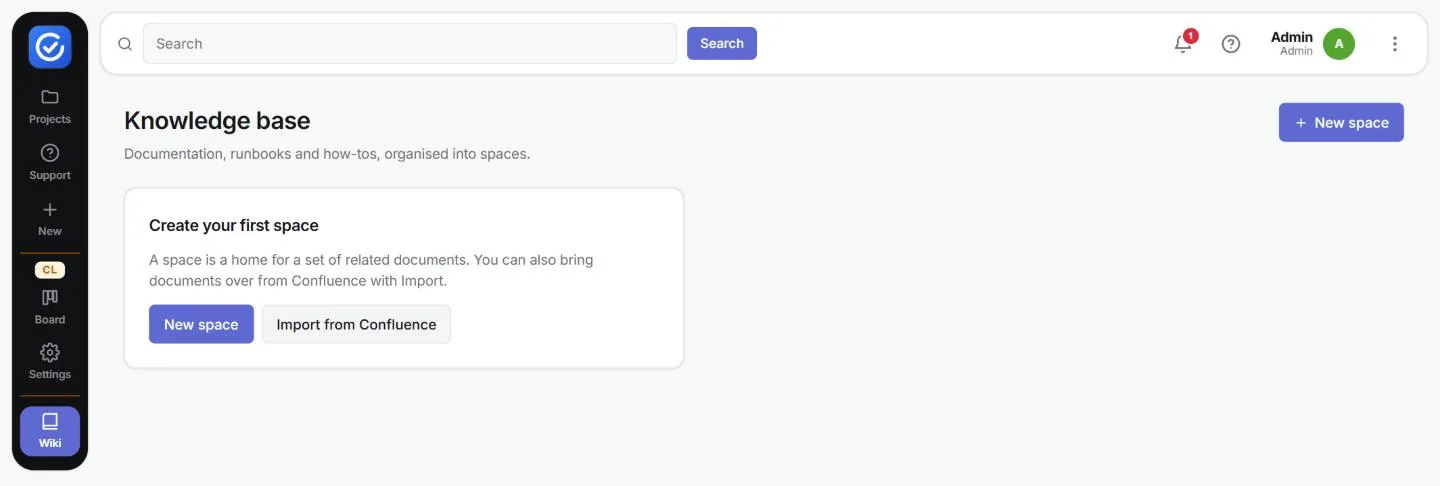
Create a space
- Click Wiki, then + New space.
- Enter a Name (for example Meadowbrook Handbook).
- Enter a Key of 2 to 10 letters or digits (for example MHB). The key cannot be changed later.
- Optionally, add a Description.
- Click Create space. A new space starts as admins only. Give others access next (see below).
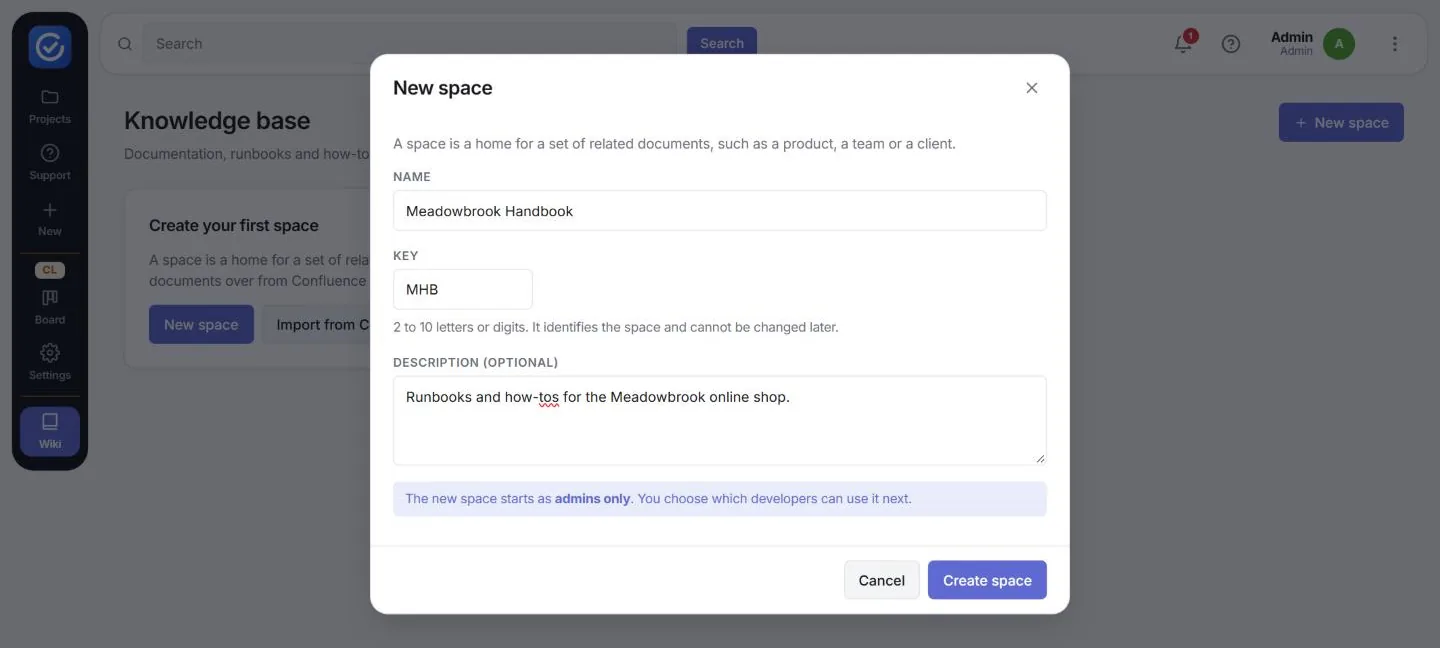
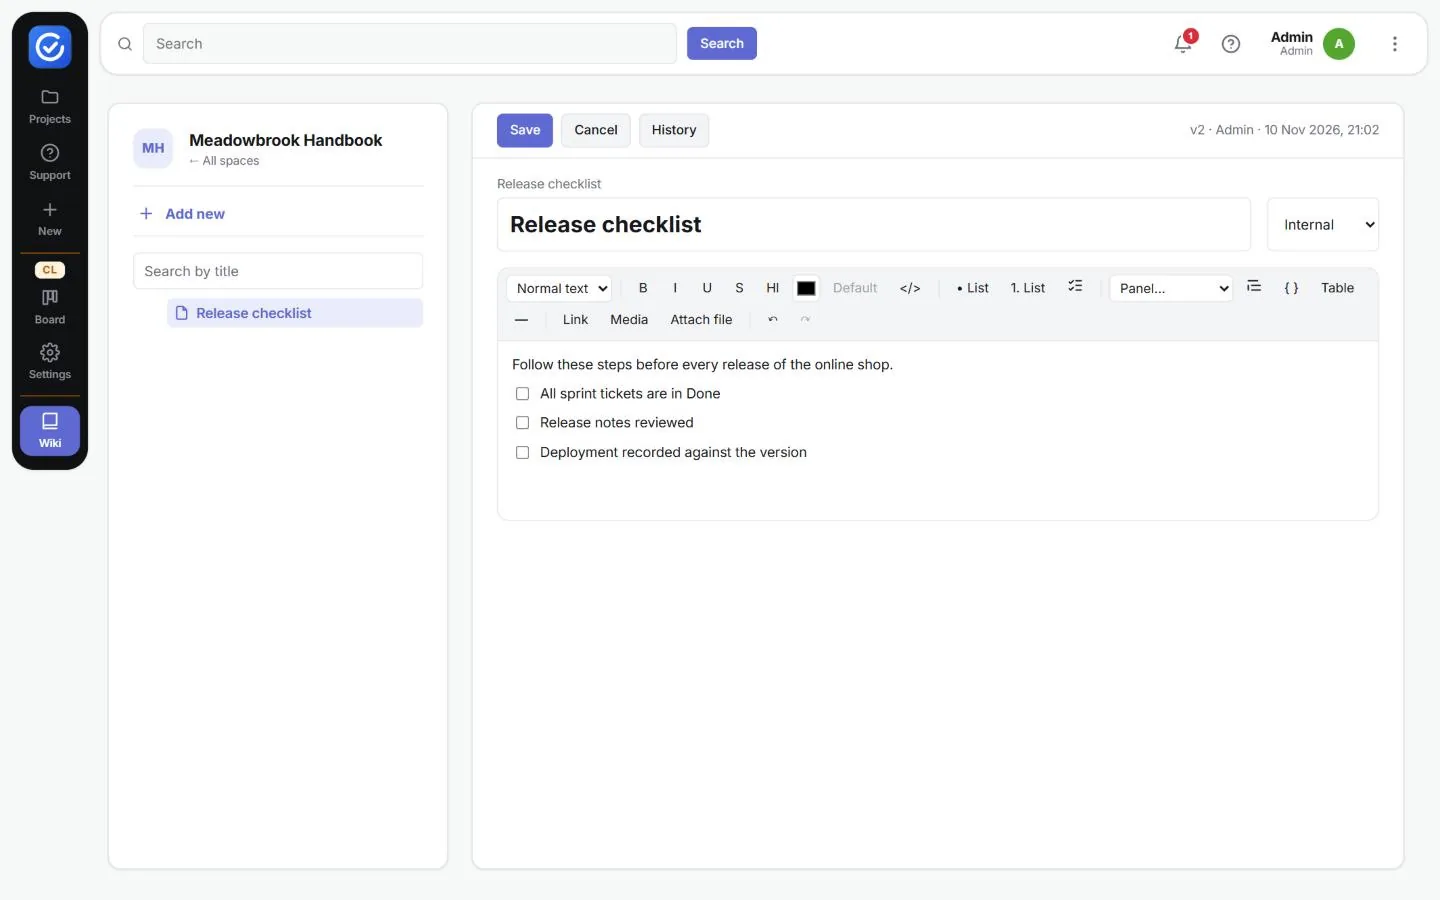
Add and edit pages
- Open the space and click Add new, enter a Page title, then click Create page.
- Click Edit. Use the toolbar to format the page. The wiki editor works like the ticket editor, and also has Attach file.
- Set the page status with the drop-down beside the title:
| Status | Who can read the page |
|---|---|
| Draft | New pages start here. Use it while the page is being written. |
| Internal | Your team, according to the space’s permissions. |
| Client | Also clients who have been given access to the space. |
- Click Save. Each save creates a new version, shown as v2 · Admin · date.
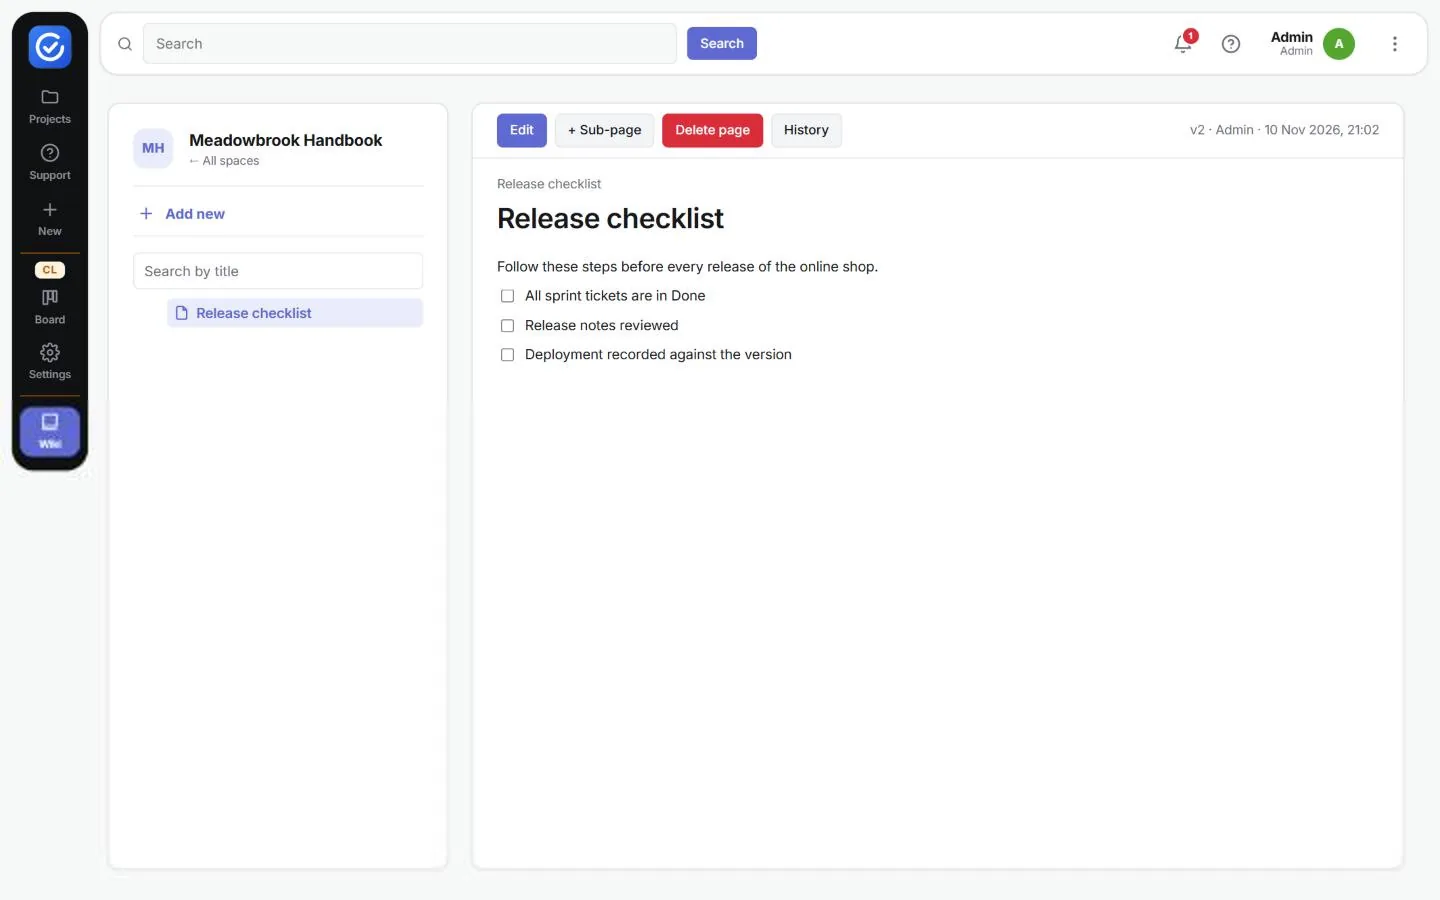
On a saved page you can:
- click + Sub-page to nest a page underneath it
- click History to see earlier versions
- click Delete page to remove it
- reorganise pages in the page tree, or filter the tree with Search by title
Control who can use a space
On the Wiki home page, each space card has two icons: the people icon for Permissions and the cog for Settings (name and description). A card marked No developers yet is still admins only.
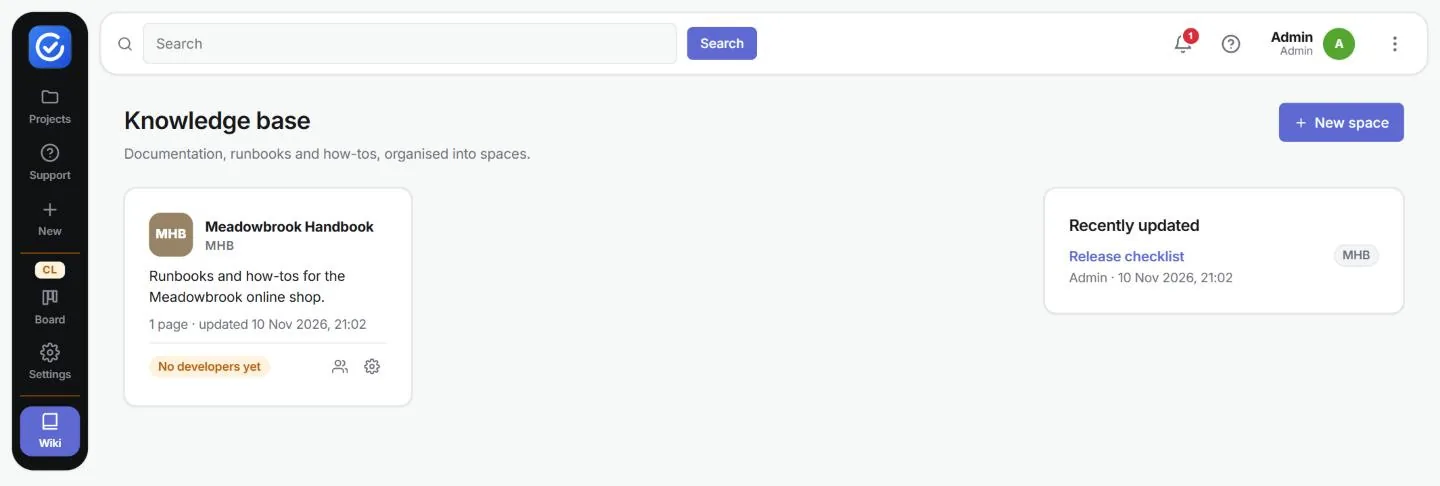
The permissions dialog now has three tabs:
- Staff: choose a developer from Add a Developer and click Add. New developers start with Access and Read. Tick Create and Edit as needed.
- Clients: choose from Add a Client and click Add to give a client access to the space. Clients only see pages whose status is Client.
- Groups: choose from Add a Group to give everyone in a group access at once.
| Permission | Allows the person to |
|---|---|
| Access | Enter the space and see the page titles |
| Read | Open pages, their files and their history |
| Create | Add new pages |
| Edit | Change existing pages |
Click Done when you have finished. Admins can always do everything in every space.
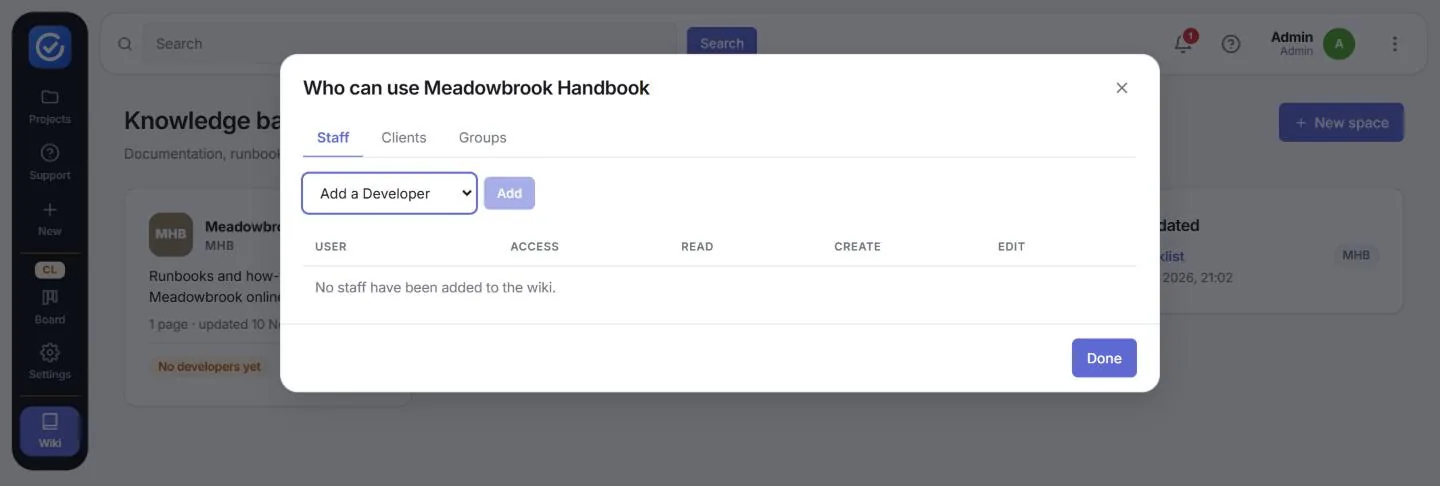
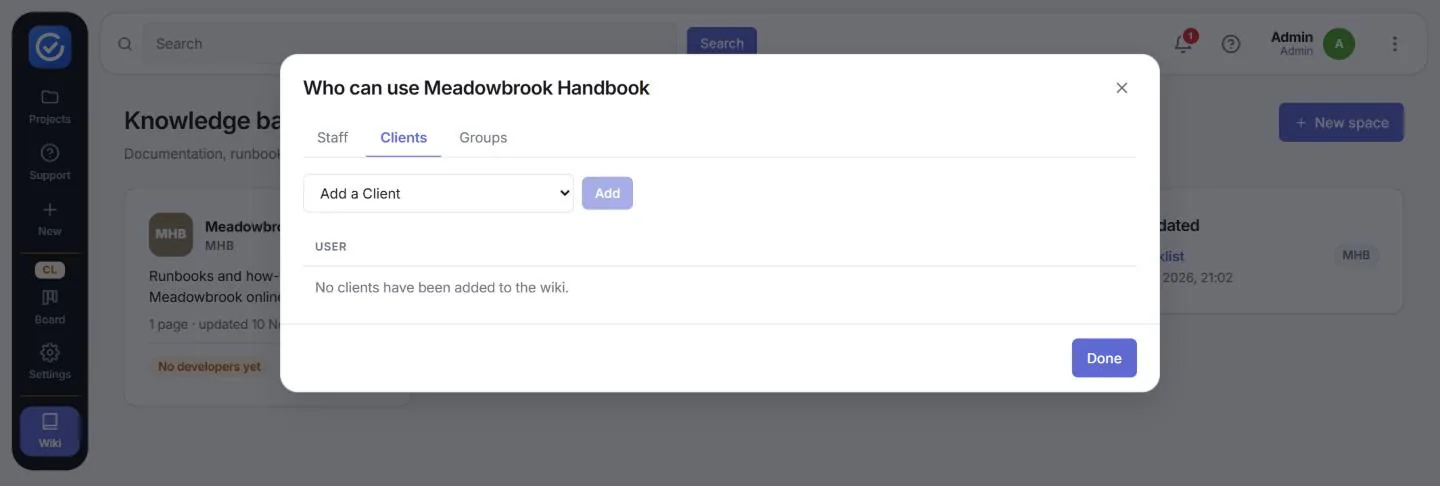
Before sharing with clients: check each page’s status. Giving a client access to a space and setting a page to Client makes it readable in their portal.
Import from Jira and Confluence
Admins can bring tickets, history, comments, attachments, sprints and wiki pages across from Atlassian, either straight from Jira or Confluence or from an uploaded backup file. To open it, click More (⋮) › Import. Importing only ever reads from Atlassian and never changes anything there. Data is first read into a holding area, and nothing is created in Jonta until you have reviewed the mapping and run a dry run.
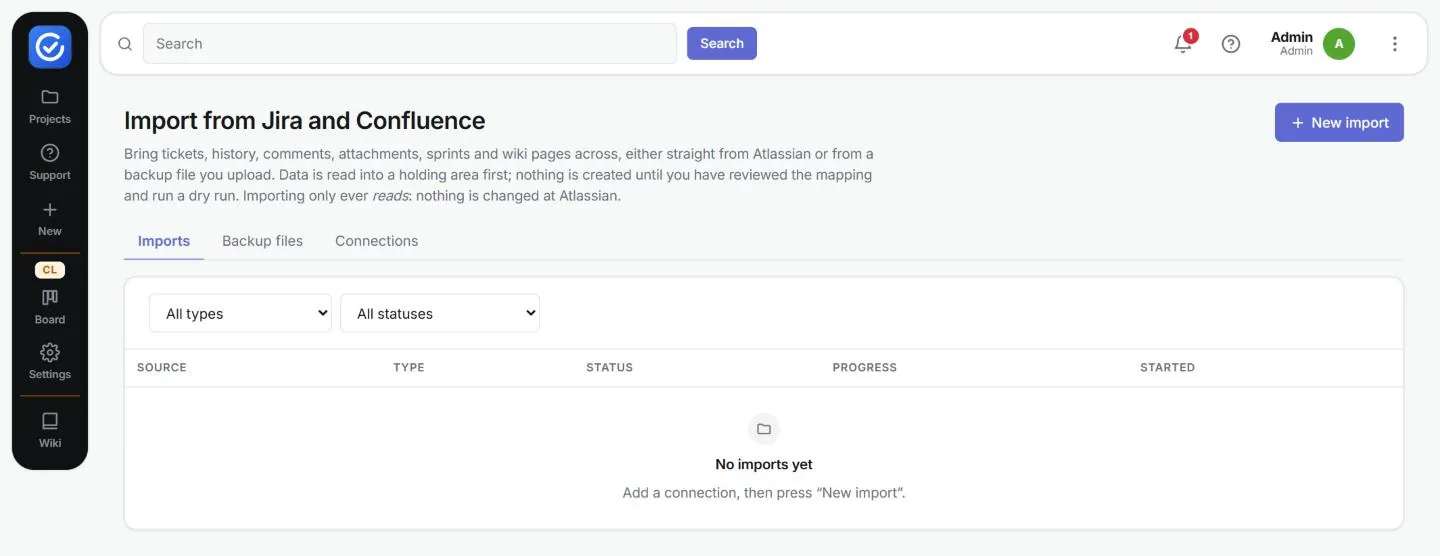
Add a connection
- Open the Connections tab.
- Choose the Product: Jira or Confluence. Jira and Confluence on the same site share the site address and token, but each needs its own connection.
- Enter a Name, the Site address, and the Account email of an Atlassian user who can read the projects or spaces you want.
- Create an API token at id.atlassian.com › Security › API tokens and paste it in. The token is checked straight away, stored encrypted and never shown again.
- Click Test and save.
Run an import
- Click + New import.
- Choose Connect to Atlassian (using a saved connection) or Upload a backup file.
- Click Start reading projects.
- Follow the progress on the Imports tab. An import moves through Queued, Reading from source, Needs mapping, Checking and Dry run ready to Importing and Completed. It can also be Stopped or Cancelled.
- When the status is Needs mapping, review how the Atlassian data maps to Jonta. Then check the dry run before you confirm the import.
Uploaded backups are listed on the Backup files tab, with their size, contents and status.
Administration
The pages in this section are for administrators. They are all opened from the More (⋮) menu at the top right: Accounts, Settings, Import and Audit. Set them up in roughly this order: organisation settings, clients, users and groups, then roles.
Clients
Accounts › Clients lists every client with its Project structure, its Support structure and its status.
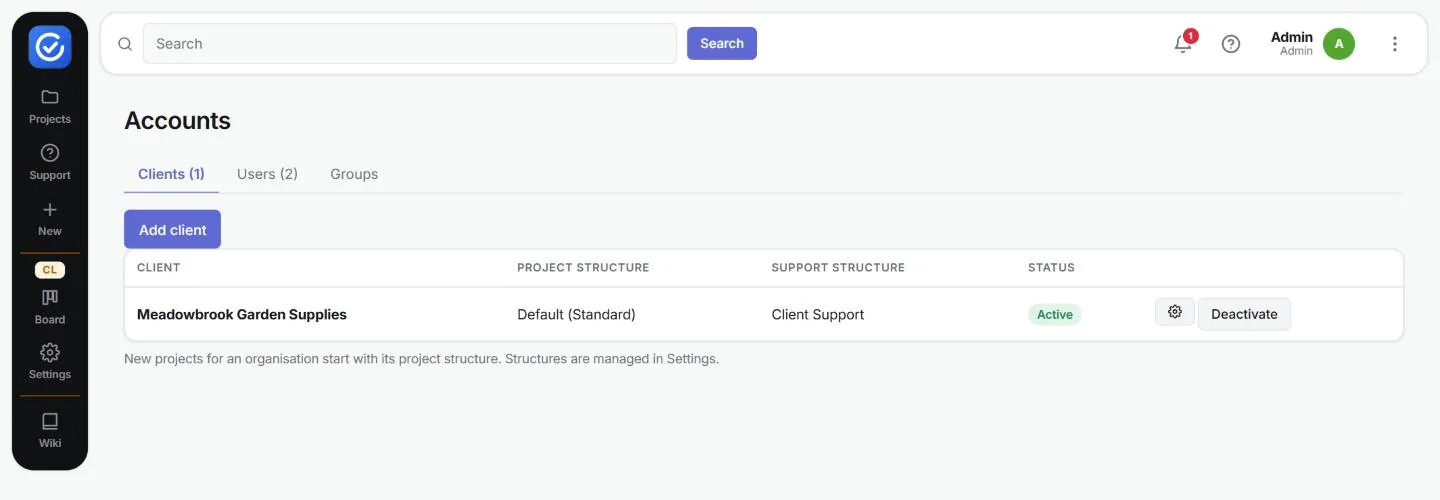
Add a client
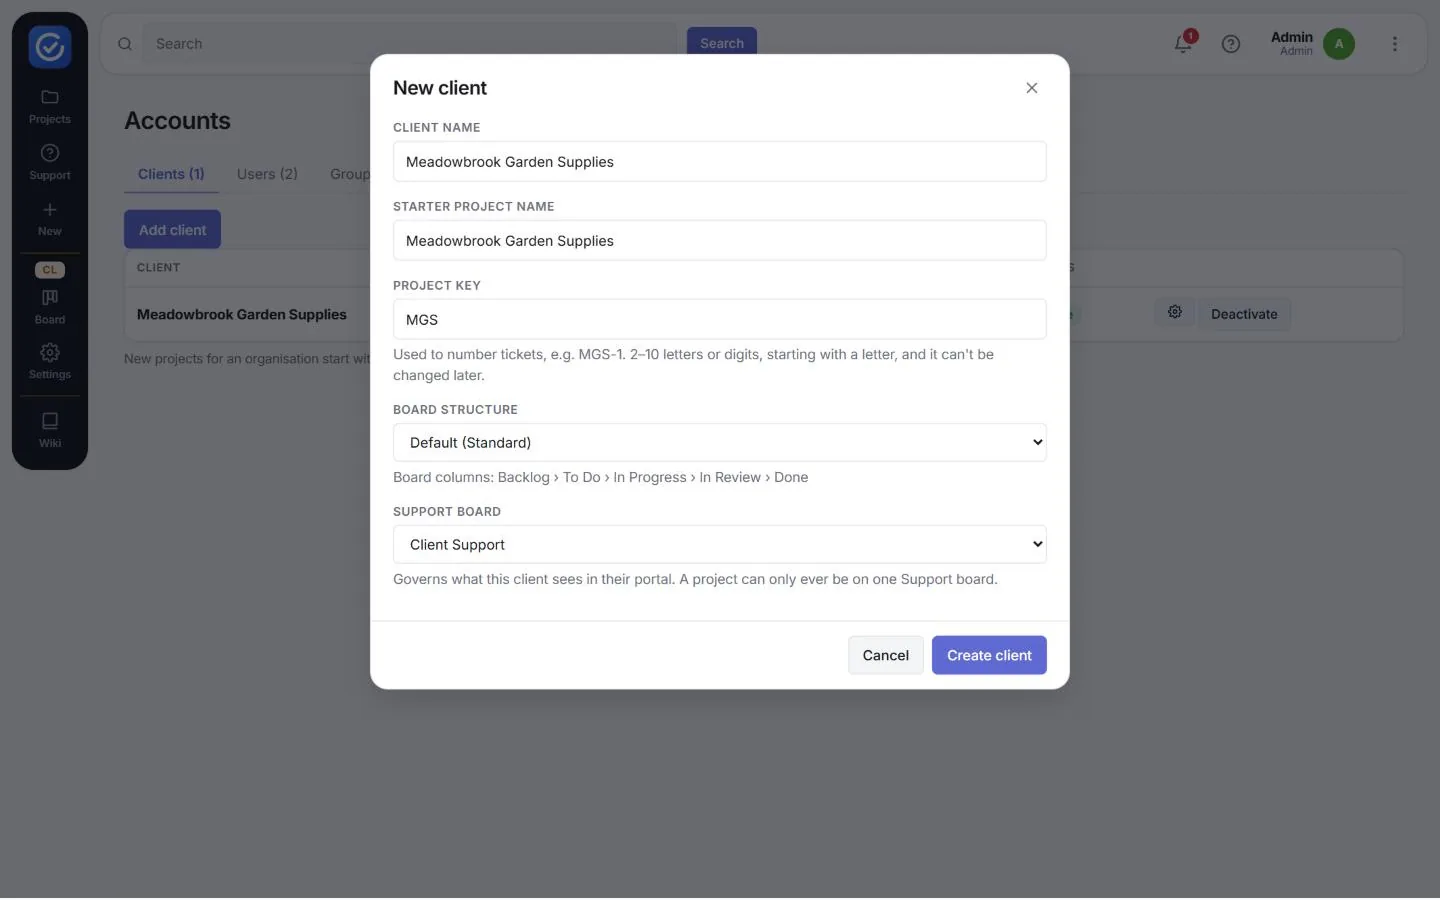
- Click More (⋮) › Accounts, then Add client.
- Enter the Client name, for example Meadowbrook Garden Supplies.
- Check the Starter project name, which is filled in from the client name, and change it if needed.
- Check the Project key, which is suggested automatically. It must be 2 to 10 letters or digits, start with a letter, and cannot be changed later.
- Choose the Board structure. The board columns are listed underneath so you can check them.
- Choose the Support board that governs what this client sees in their portal, or create a new one.
- Click Create client. The client and its starter project are created together.
Structure settings
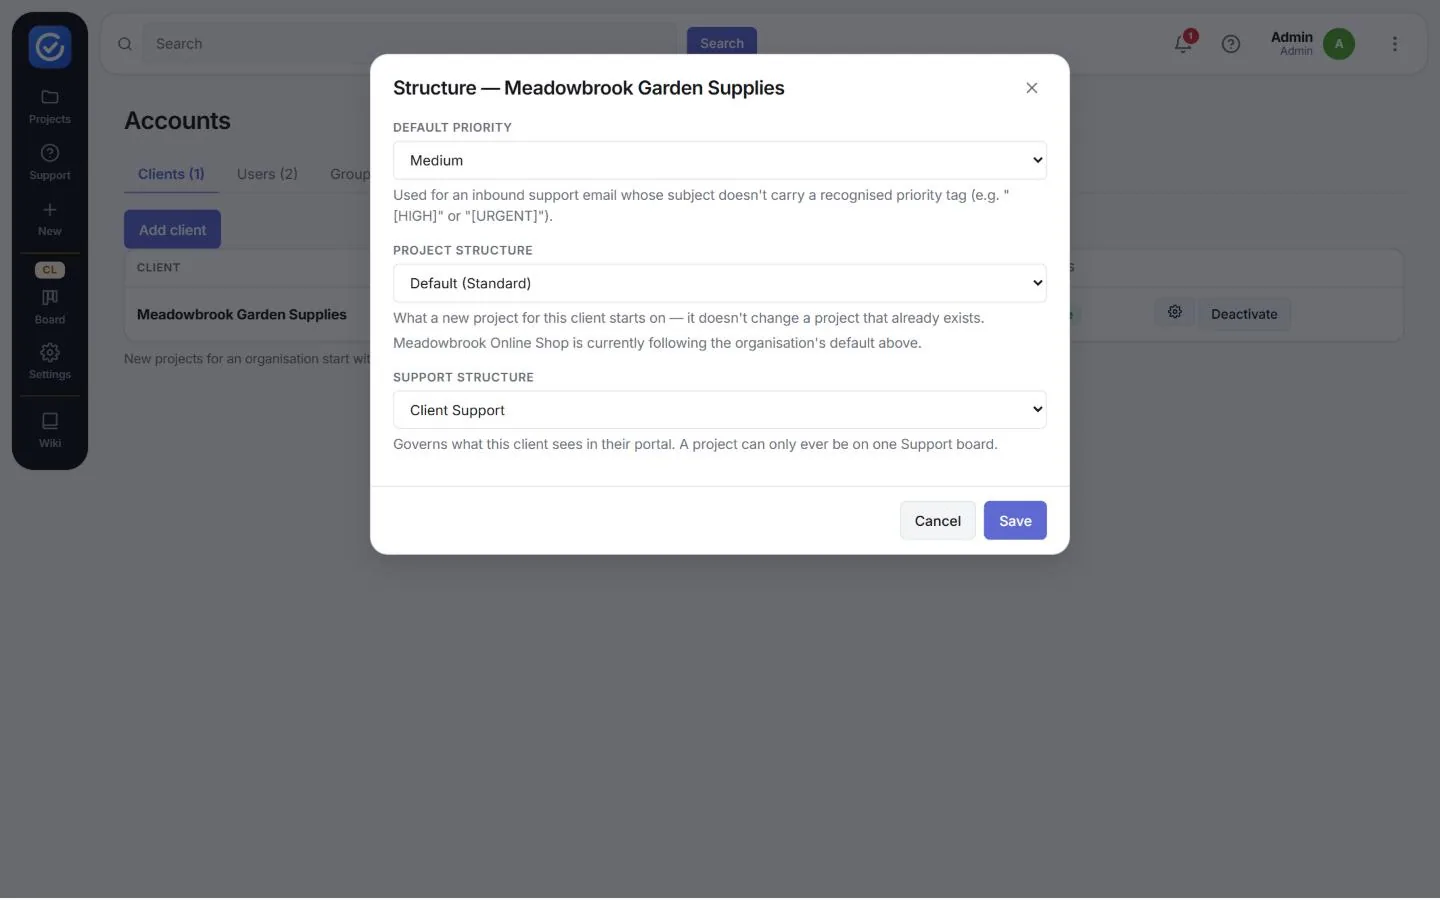
Click the cog beside a client to open its structure settings:
- Default priority: the priority given to a support ticket that arrives by email when its subject has no recognised priority tag, such as [HIGH] or [URGENT].
- Project structure: the board structure that new projects for this client start on. It doesn’t change projects that already exist.
- Support structure: the Support board for this client.
Click Save. Deactivate (beside the cog) suspends a client: its projects move to the Archived tab. Reactivate the client to bring them back.
Users
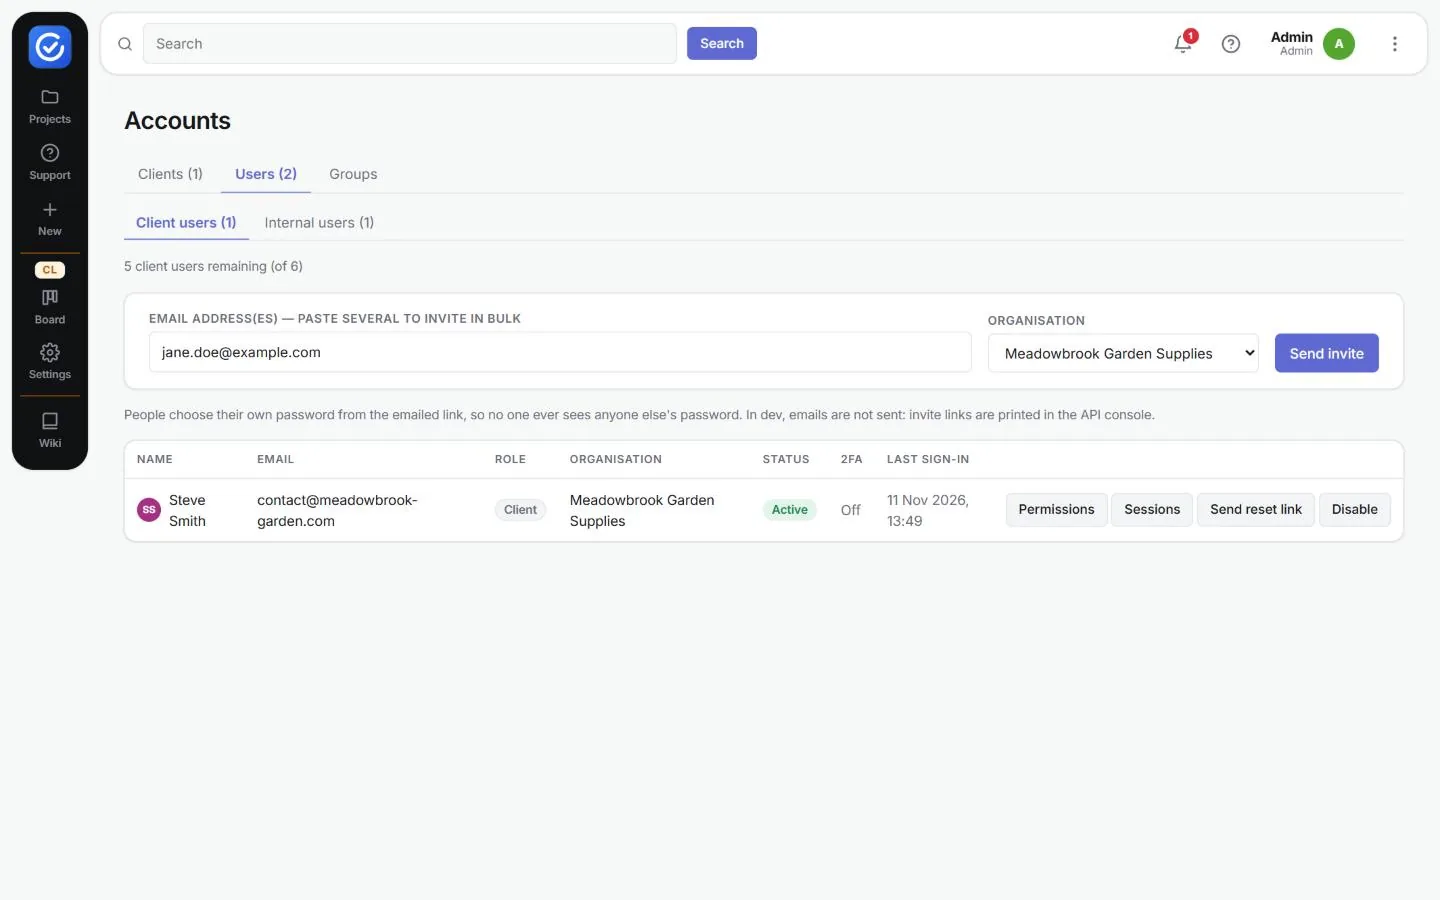
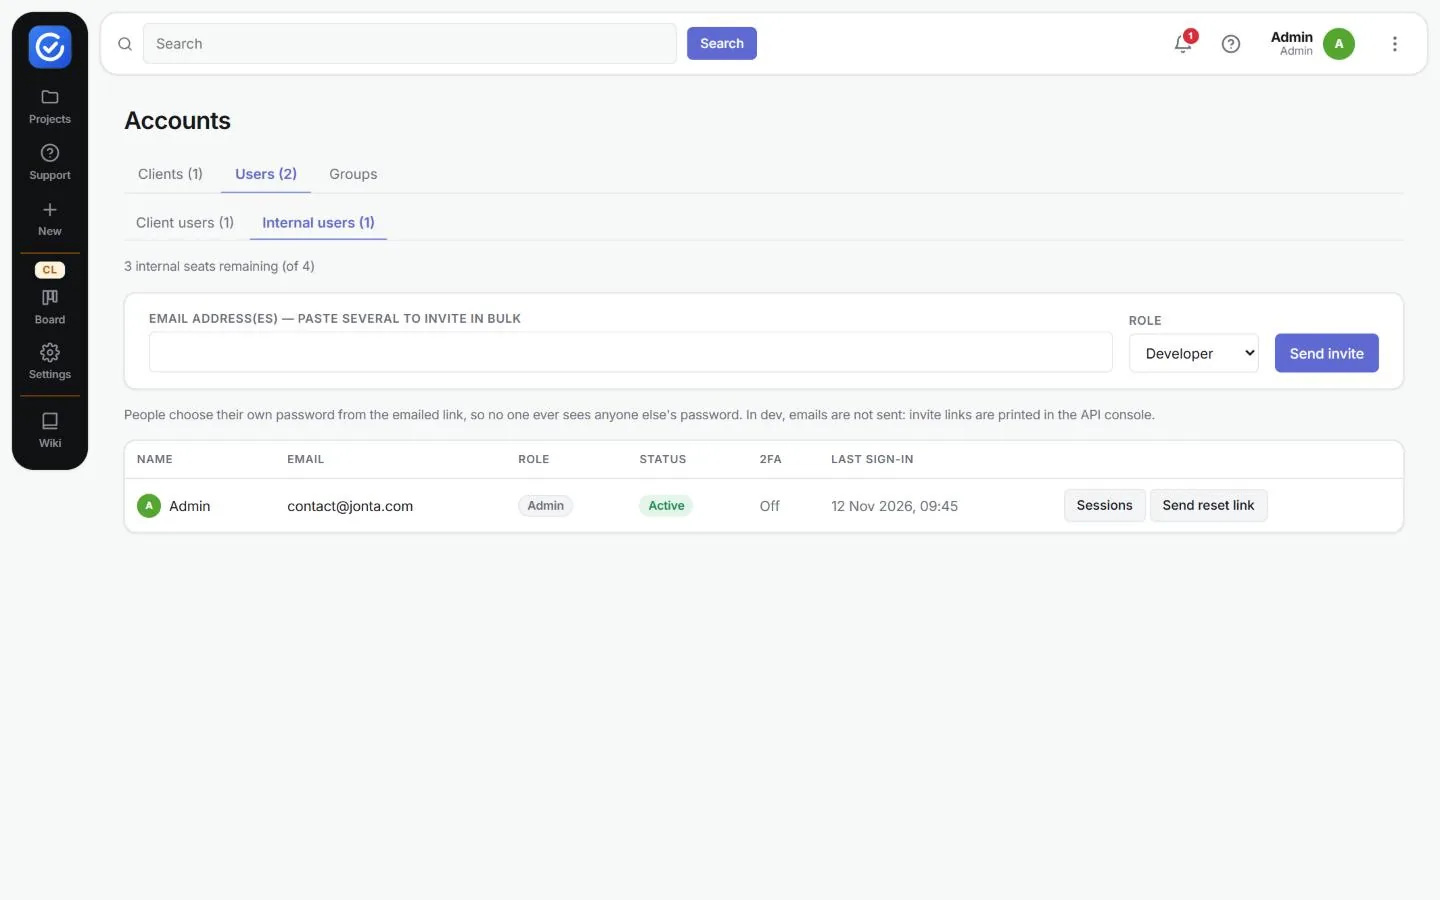
Accounts › Users has two sub-tabs: Client users and Internal users. Each shows how many seats are left on your plan, for example 6 client users remaining (of 6) or 3 internal seats remaining (of 4). People choose their own password from the link in their invitation email, so nobody ever sees anyone else’s password.
Invite client users
- Open Client users.
- Enter one or more email addresses. To invite several people at once, paste a list.
- Choose the Organisation they belong to.
- Click Send invite. This sends an email straight away, so check the addresses first.
Invite internal users works the same way on the Internal users tab, except that you choose a Role (Admin, Developer or Support) instead of an organisation.
The users table shows each person’s role, status, whether two-factor authentication (2FA) is on, and when they last signed in. Use Sessions to see and end their sign-ins, and Send reset link to email them a password reset.
Groups
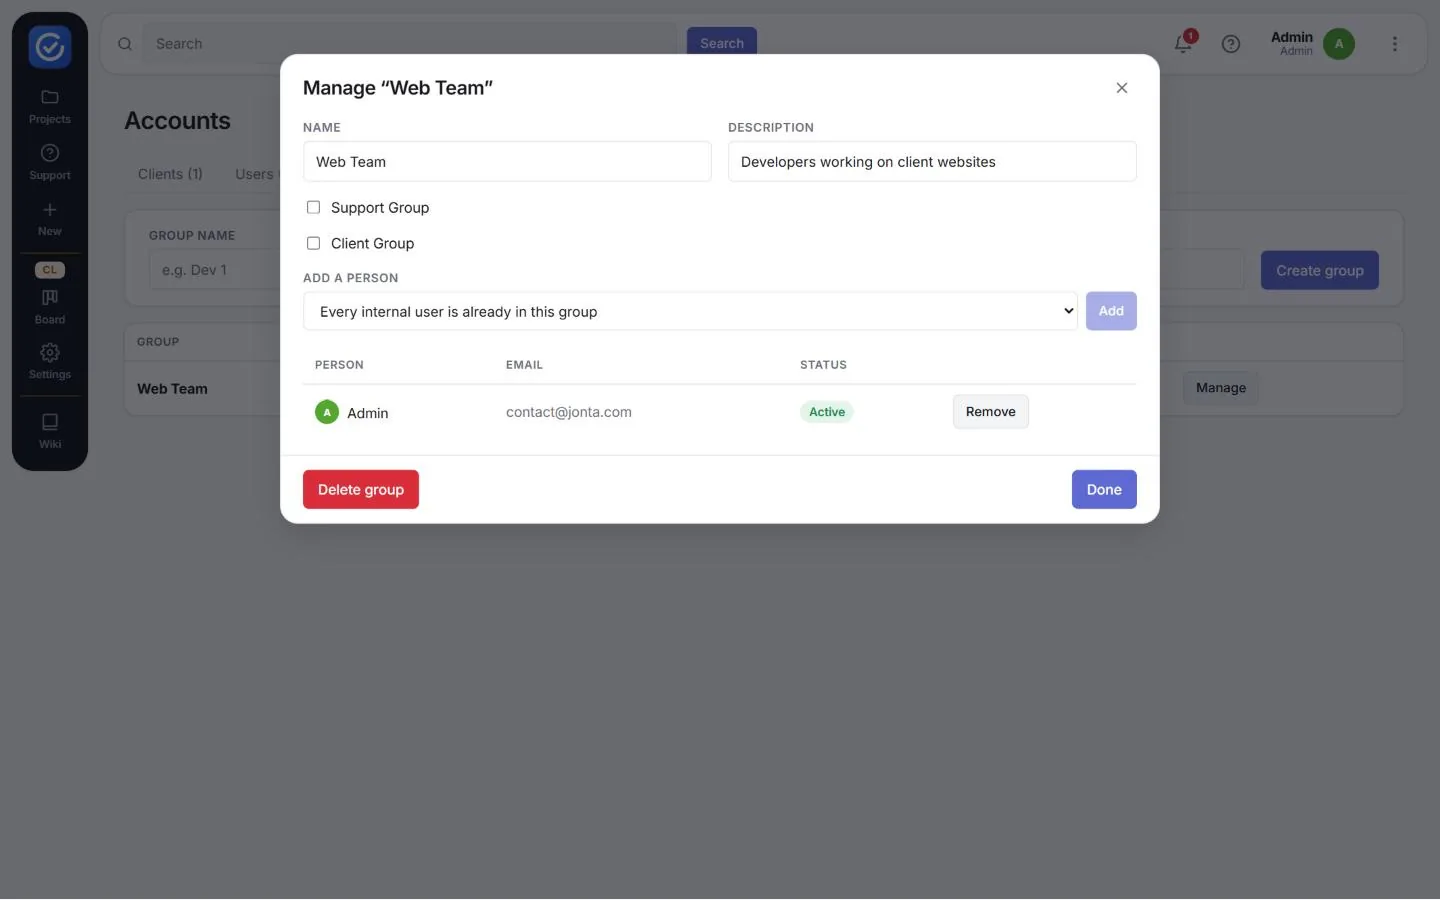
Groups let you add several internal users to a project, a Support board or a wiki space in one go.
- Open Accounts › Groups, enter a Group name and an optional Description, then click Create group.
- Click Manage next to the group.
- Choose people from Add a person and click Add.
- Tick Support Group if the group should be available to Support boards.
- Click Done. Delete group removes the group.
Organisation settings
More (⋮) › Settings opens Organisation Settings: the defaults that every project inherits. Individual projects can then adjust them in their own settings.
| Tab | Purpose |
|---|---|
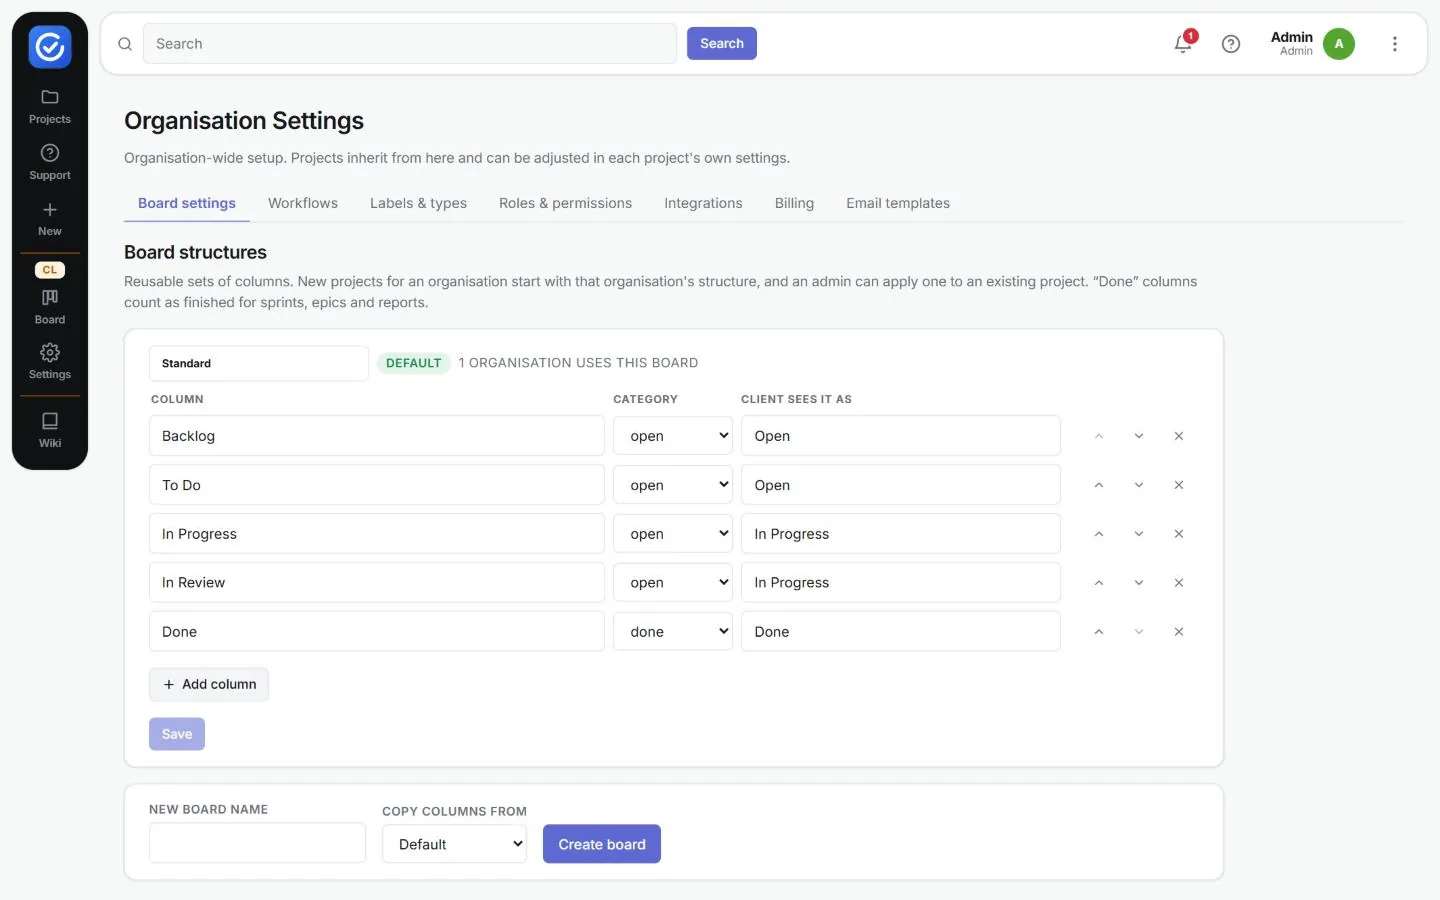
| Board settings | Board structures: reusable sets of columns. The built-in Standard structure is Backlog › To Do › In Progress › In Review › Done, and the list shows how many organisations use it. For each column, set its Category (open, waiting, done, cancelled or closed) and the name the Client sees it as. To create a new structure, enter a New board name, choose Copy columns from, then click Create board. |
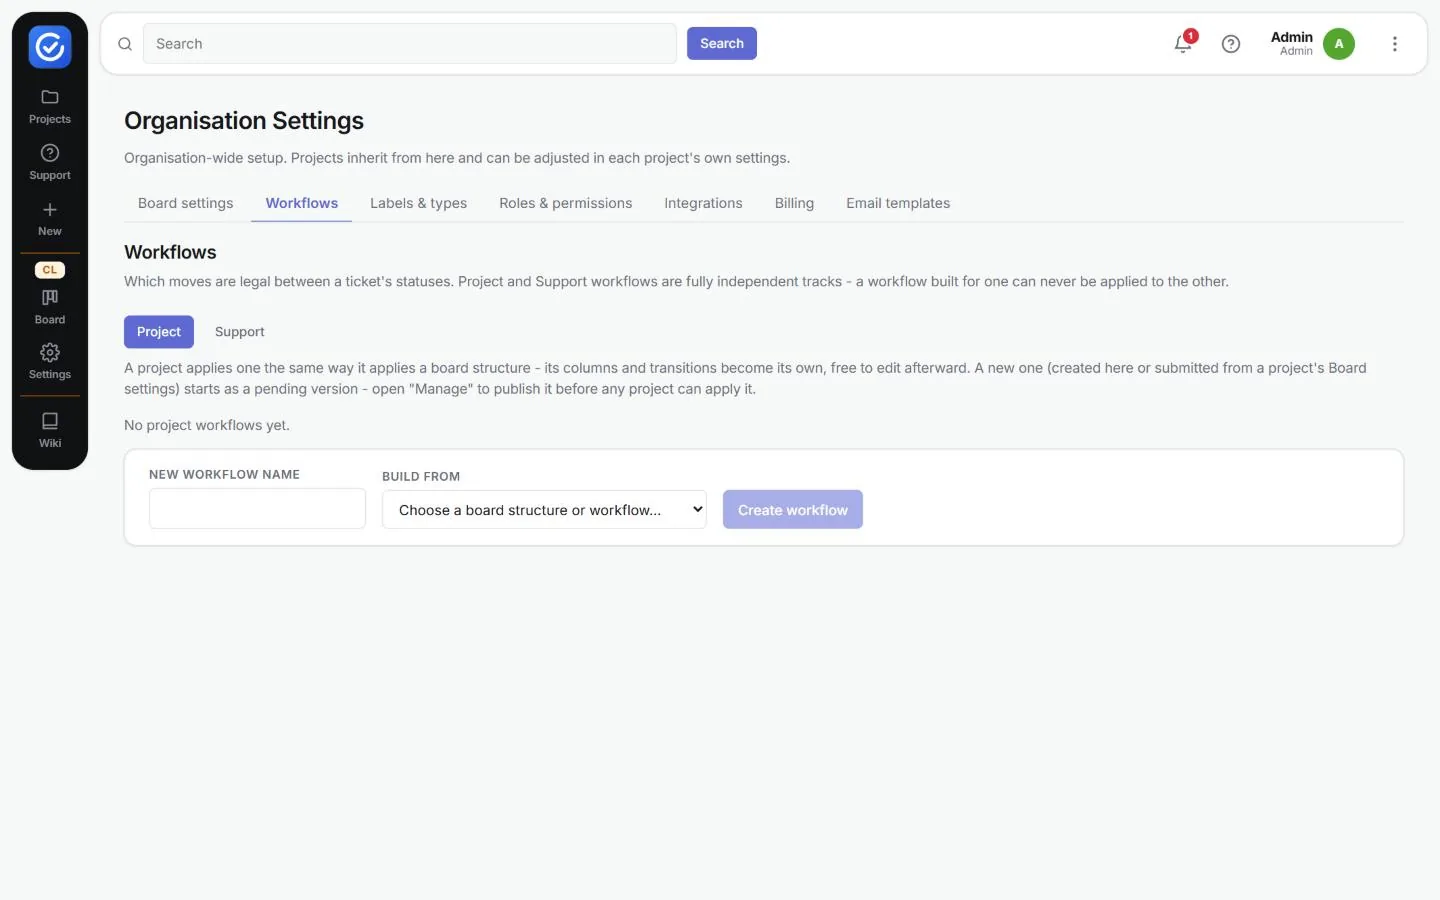
| Workflows | Shared workflows, with separate Project and Support tabs. Enter a New workflow name, choose what to Build from, then click Create workflow. A new workflow starts as a pending version: open Manage to publish it before any project or board can apply it. |
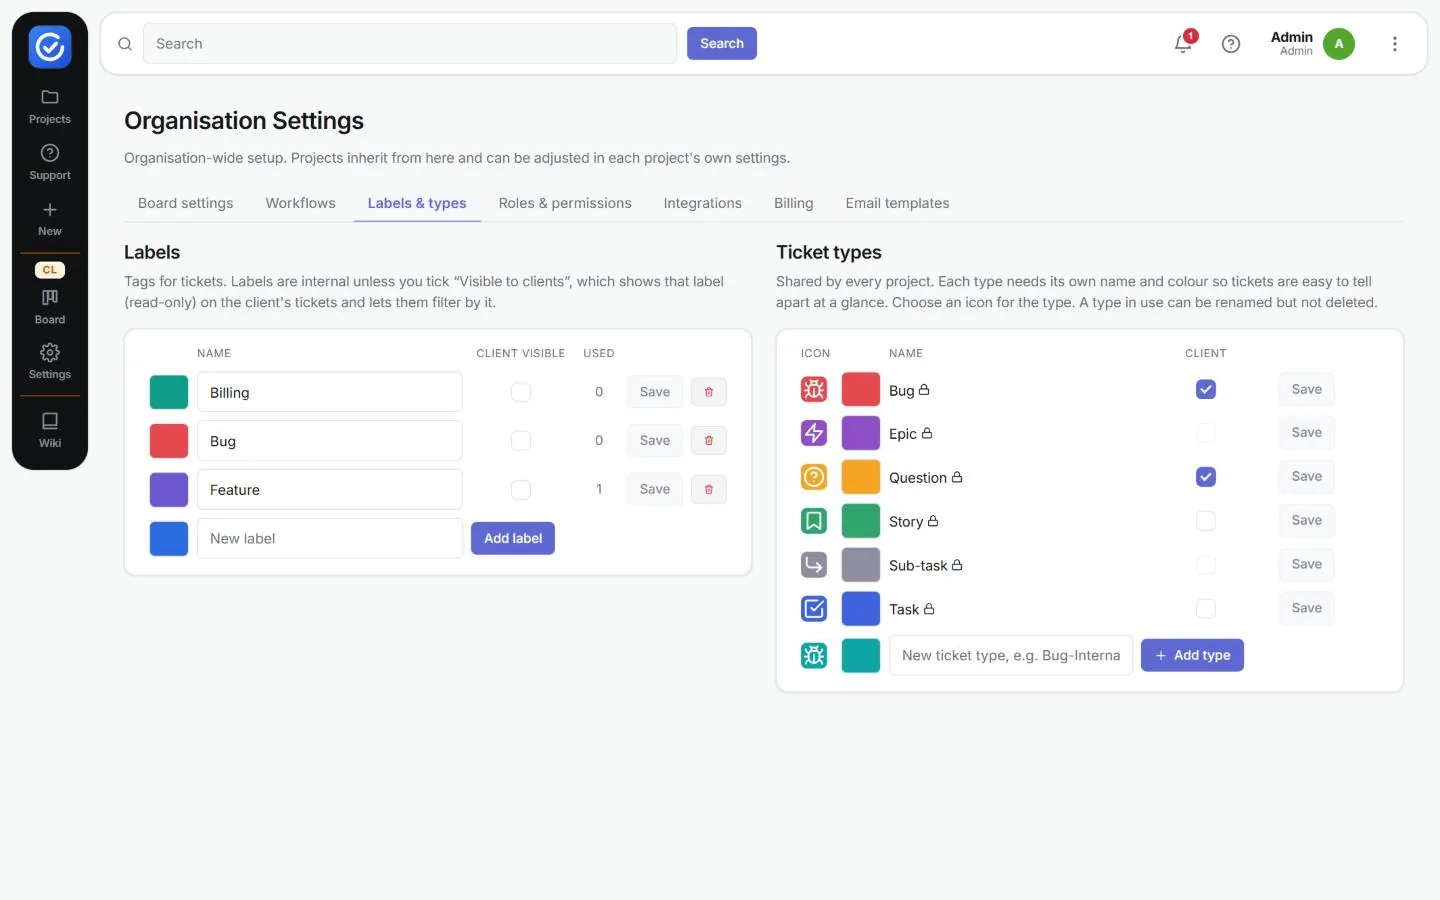
| Labels & types | Labels and Ticket types, side by side. A label is internal unless its Client visible box is ticked. Each ticket type has an icon, a colour and a name, and can be shown to clients. Built-in types show a lock icon. |
| Roles & permissions | Choose what each role can do (see below). |
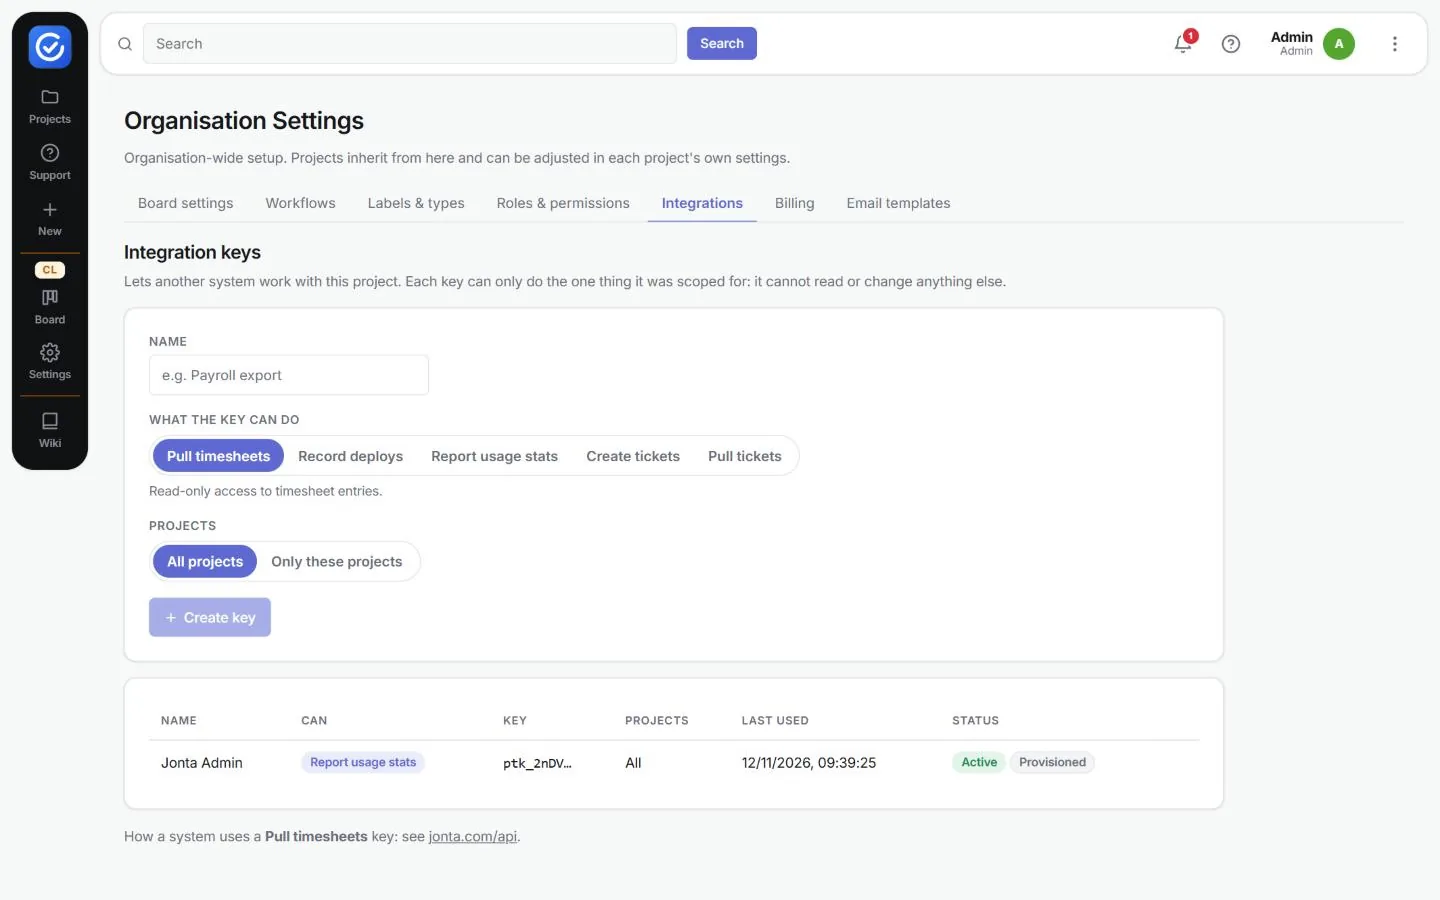
| Integrations | Integration keys that let another system do exactly one job (see below). |
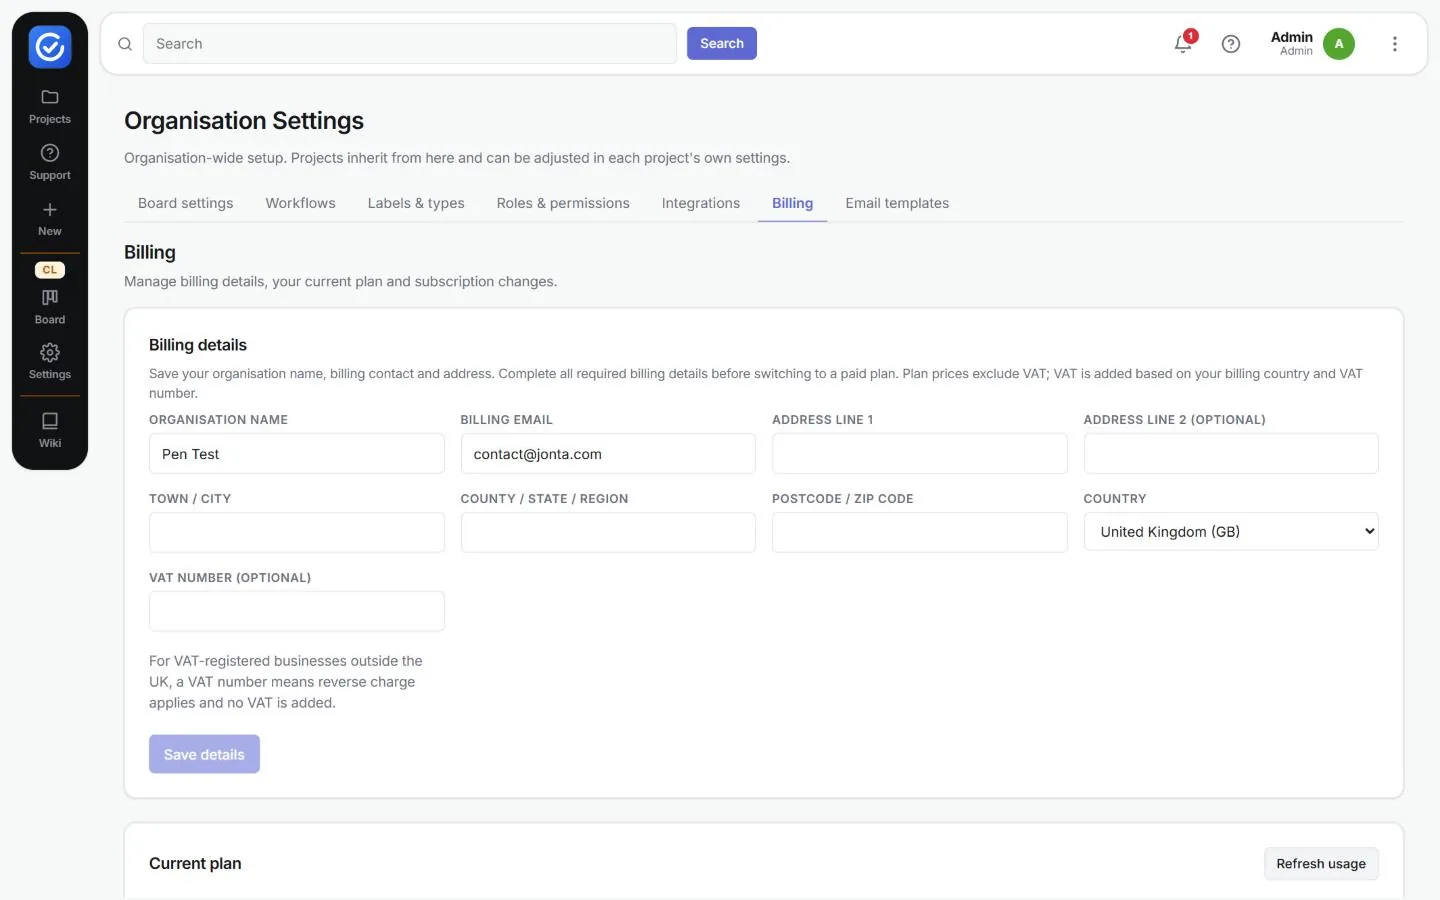
| Billing | Billing details, your plan, seats and storage used, and billing history (see below). |
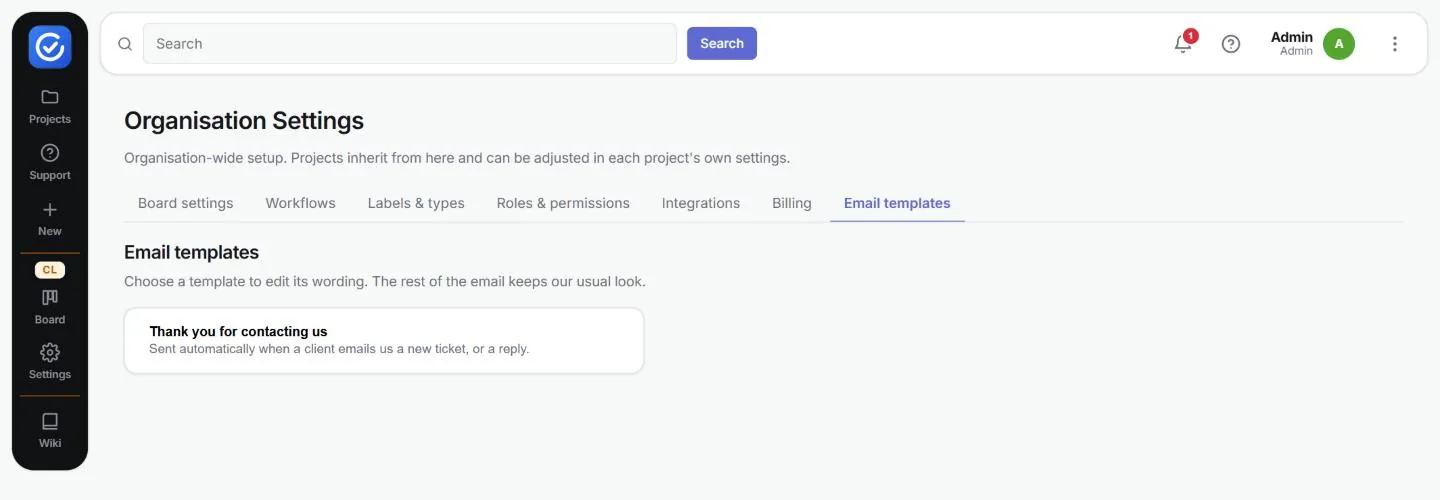
| Email templates | New. The automatic emails Jonta sends to clients (see below). |
The Support boards tab has moved out of Settings. Support boards are now created and set up from the Support page (see Support desk).
Email templates
The Email templates tab lists the automatic emails you can change. At present there is one:
Thank you for contacting us is sent automatically when a client emails you a new ticket or a reply.
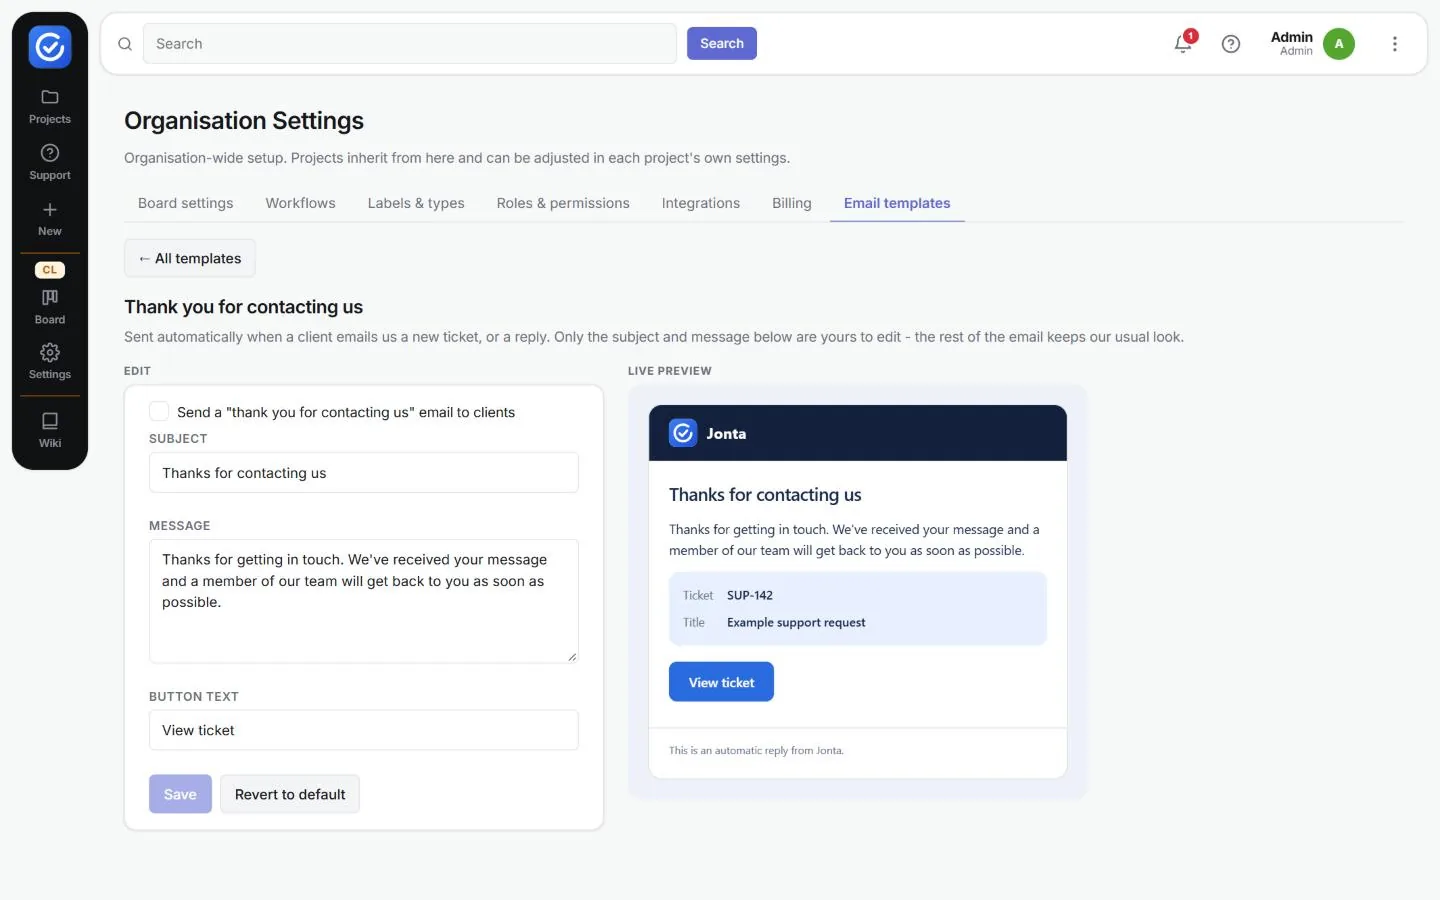
- Click the template to open it.
- Tick Send a “thank you for contacting us” email to clients to turn it on. It is off by default.
- Edit the Subject, the Message and the Button text. The rest of the email keeps Jonta’s standard look.
- Check the Live preview on the right.
- Click Save. Revert to default restores the original wording, and ← All templates goes back to the list.
Roles and permissions
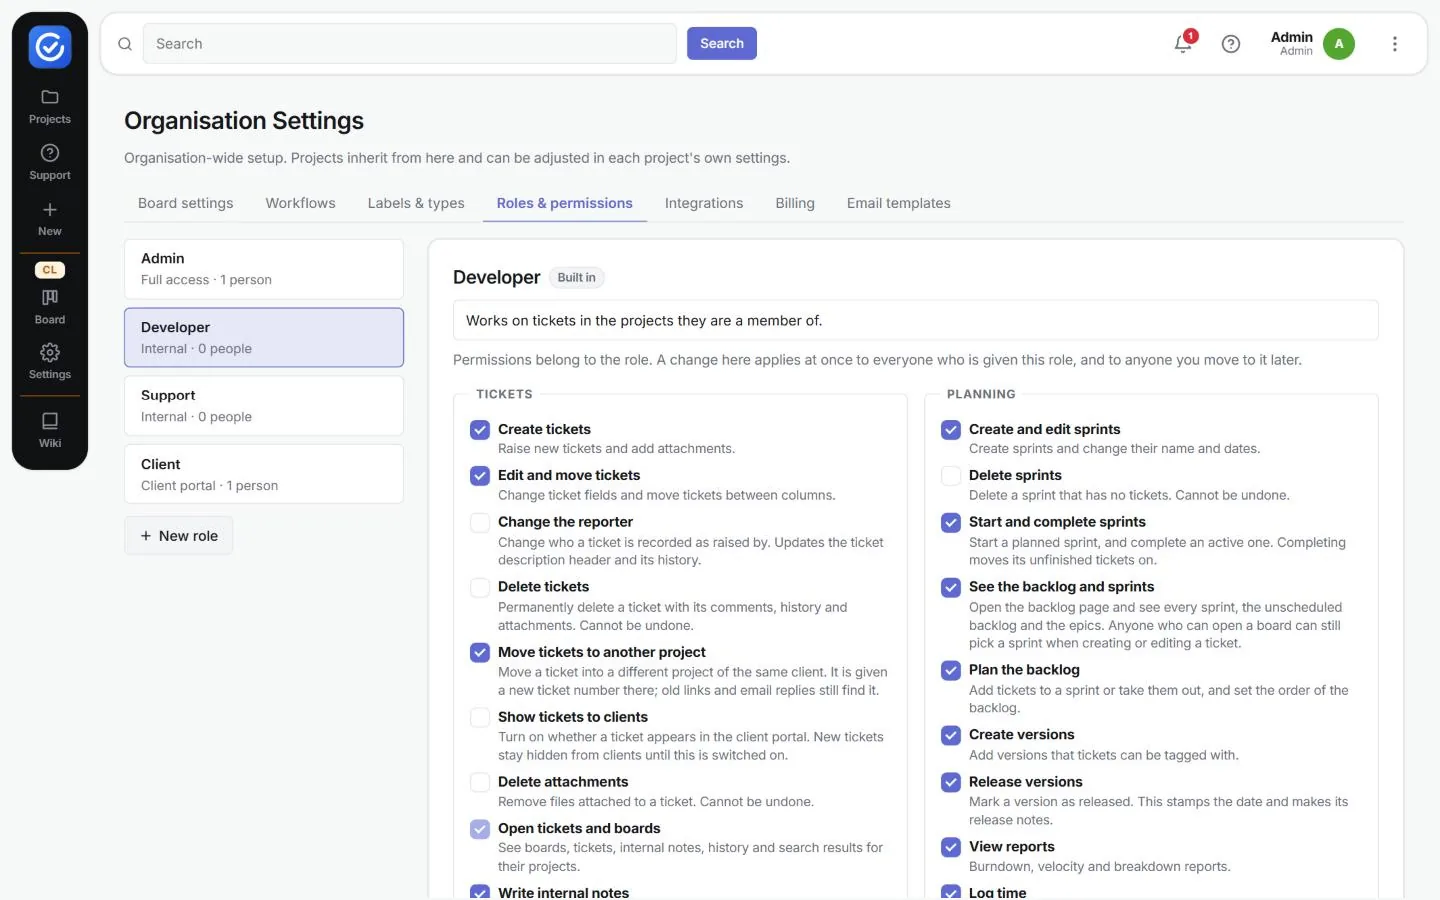
- Open Settings › Roles & permissions.
- Select a role on the left (Admin, Developer, Support, Client, or one you created with + New role).
- Tick or untick permissions. They are grouped under headings such as Tickets, Planning, Projects, Knowledge base, Administration and Support boards. Each permission has a one-line explanation.
- Click Save changes. The change applies at once to everyone with that role. Discard abandons your edits, and Reset to defaults restores the built-in settings.
Grant carefully: several permissions allow actions that cannot be undone, such as deleting tickets, attachments, sprints, projects, spaces or roles. Others send email to clients, such as replying to the client, showing tickets to clients and publishing incidents to clients.
Integration keys
- Open Settings › Integrations.
- Enter a Name (for example Payroll export).
- Choose What the key can do: for example pull timesheets, record deploys, report usage stats, create tickets or pull tickets. Each key can do only one thing.
- Choose All projects or Only these projects.
- Click Create key.
The table lists each key with what it can do, the projects it covers, when it was last used and its status. A key marked Provisioned is set up by Jonta, so leave it in place.
Billing
- Billing details: your organisation name, billing email, address, country and optional VAT number. Click Save details. All the required details must be complete before you can move to a paid plan. Prices exclude VAT.
- Current plan: shows the plan and licence status, internal users (for example 1 of 4 seats), client users (for example 0 of 6) and storage used. Click Refresh usage to update the figures.
- Billing history, Upgrade and the Danger zone (cancel or downgrade) work as before. Cancelling takes effect immediately, so read the warnings first.
Audit log
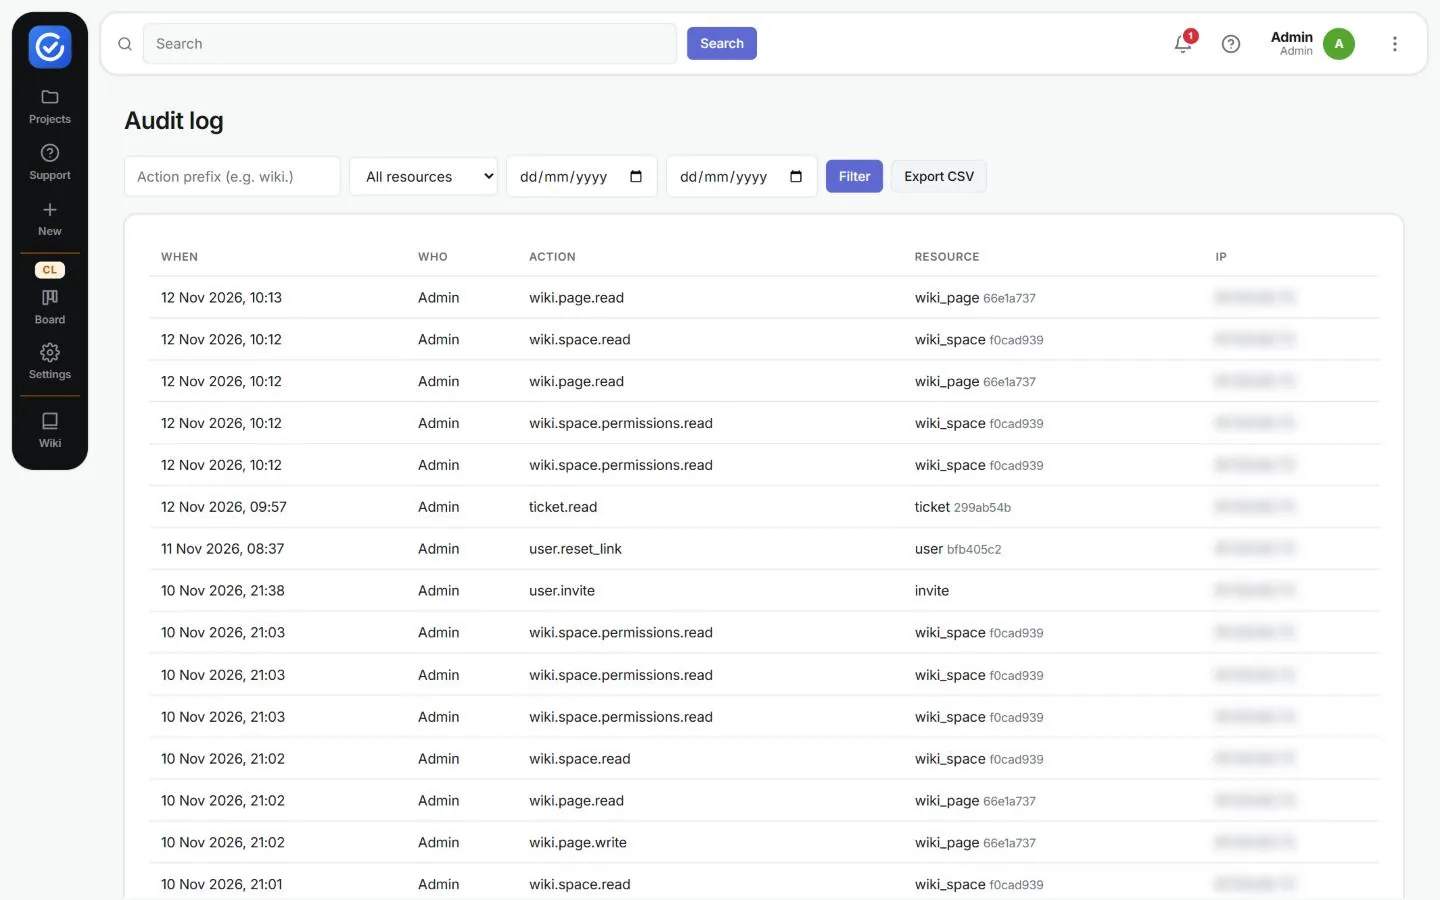
More (⋮) › Audit records who did what, when and from where: for example company.create, ticket.read, incident.declare and wiki.page.write. Filter by Action prefix (for example wiki.), by resource type and by date range, then click Filter. Click Export CSV to download the results.
Working with the client portal
The client portal is what your client users see. The Client portal guide explains it from their side, and you can send them that link.
- The portal’s own documentation explains raising tickets by email. The Help (?) menu links to Jonta’s online help (see Tickets that arrive by email).
- A client only ever sees their own organisation’s tickets, even when a Support board is shared with other clients.
- Tickets that clients raise arrive on the project’s Support board (column New) and show in the project board’s Support filter.
- The statuses clients see come from each Support board column’s Client sees it as label, for example Waiting on client shows as Waiting on you.
- Replying on a ticket’s Client conversation tab sends a message to the portal and emails the client.
- Clients only see wiki spaces you have shared with them under the space’s Clients permissions tab, and only pages whose status is Client.
- The search results page shows a ticket’s status as Open, while My tickets shows New for the same ticket. Clients may notice the difference.
Notifications and emails
Jonta emails both your team and your clients. Emails to clients matter most, because they go outside your organisation and cannot be recalled.
Actions that email clients or new users
| Action | Who is emailed | How to avoid sending it by mistake |
|---|---|---|
| Send invite (Accounts › Users) | Every address entered | Check each address before you click. Paste lists carefully. |
| Replying on the Client conversation tab | The client on that ticket | Use Internal notes for team-only discussion. |
| Thank you for contacting us template switched on (Settings › Email templates) | Every client who emails in a new ticket or a reply | It is off by default. Check the wording in the live preview before you turn it on. |
| Ticking Visible to the client on a ticket | Nothing is emailed, but the ticket appears in the client portal | Leave it unticked until the ticket is ready for the client. |
| Show this incident to clients / Show to clients | Clients on that project’s company, for severities that email | Leave unticked for internal incidents. |
| Uptime check whose incidents clients see | Clients, when an outage opens an incident automatically | Turn client visibility off while you test a new check. |
| Releasing a Version and emailing its notes | The client | Review the release notes first. |
| Setting a wiki page to Client in a space a client can use | Nothing is emailed, but the page becomes readable by that client | Keep pages on Draft or Internal until they are ready. |
| Send reset link (Accounts › Users) | That user | None needed; the email only goes to the account owner. |
Emails to your team
Each person chooses which of these to receive under Your profile › Notifications. All are on by default.
- A ticket is assigned to me
- A ticket I am assigned to or watching changes status
- A ticket I am assigned to or watching is updated
- Someone replies to my internal note
- A client replies on a ticket I am assigned to or watching
- I am @mentioned
- A client raises a new ticket
- An incident I command, or any incident with no commander, is declared
Watchers of a ticket are also emailed whenever its status changes. The bell in the top bar shows the same activity inside Jonta.
Tickets that arrive by email
Clients can raise tickets and add to them by email as well as through the portal. Each client’s Structure settings include a Default priority for email that arrives without an urgency tag, and the Thank you for contacting us template can send an automatic reply. The portal no longer explains this to clients, so share the steps with them: creating a ticket by email is in the client portal guide, under Create a ticket by email, and adding a comment by email is below. The examples use the support address shown in this guide, documentation@jonta.cloud; give clients your own support address.
Add a comment to an existing ticket by email
- Either reply to one of the notification emails about the ticket, or write a brand new email to the support address.
- Make sure the ticket’s reference (for example MGS-6) is somewhere in the subject. It can be anywhere in the subject, with or without Re:. The reference is all Jonta looks for.
- Write your comment in the body. Attachments and inline images are included.
- Send the email. It is added as a comment to that ticket’s conversation instead of opening a new ticket.
Example
| Part | What to write |
|---|---|
| Subject | Re: MGS-6 Discount code not applied at checkout |
| Body | We’ve narrowed it down to orders paying by card — PayPal checkouts are going through fine. |
| Result | The message is added to MGS-6’s conversation. |
Keep the reference in the subject. If the ticket reference is edited out of the subject, or dropped by an email program when forwarding, Jonta can’t tell which ticket the email belongs to, and it opens a new ticket instead.
Troubleshooting and FAQ
Where have Accounts, Settings, Import, Audit and Sign out gone? They are now in the More (⋮) menu at the top right of every page.
Where are the Support board settings? Open Support, click the board, then click Settings in the left-hand bar. New boards are created with + New Support board on the Support page.
I can’t see a project. Developers only see projects they have been added to, directly or through a group. Ask an admin to add you under Project settings › Team.
I can’t open the wiki or a space. A new space is admins only. Ask an admin to give you Access and Read in the space’s permissions, or to add a group you belong to.
A ticket won’t move out of a column. Once a board has any transitions, every column needs its own. Check Project settings › Workflow › Transitions (or the Support board’s settings) and add a transition from that column.
A client can’t reopen or move their ticket. Clients can only make the moves on the board’s Client transitions tab. Add one, such as Reopen ticket from Resolved to In progress.
My new workflow doesn’t appear when I try to apply it. New workflows start as a pending version. Open Settings › Workflows, click Manage and publish it.
The client says they can’t see a ticket. Tick Visible to the client on the ticket. Also check that its column has a Client sees it as label, because a blank label hides that column from clients.
Tickets disappeared from the client’s portal. A column’s Hide after (days) setting removes tickets from the client’s view after the chosen number of days. Staff can still see them. Set it to Never to stop this.
Clients aren’t getting an automatic reply when they email us. The Thank you for contacting us email is off by default. Turn it on under Settings › Email templates.
I can’t invite any more users. Each plan has a set number of internal and client seats. Accounts › Users shows how many are left, and Settings › Billing lets you upgrade.
There is no Time tab on a ticket. Time tracking is switched off for the project. Turn on Project settings › Timesheets › Track time on this project.
Velocity or lead time shows No data. Velocity needs at least one completed sprint. Lead time needs tickets with linked code that has been deployed.
I can’t change a project key or a wiki space key. Keys are permanent. If you need a different key, create a new project or space.
I’ve lost my phone with my authenticator app. Ask an admin to reset your two-factor authentication.
I see a session I don’t recognise. Go to Your profile › Security, click End session next to it, then change your password.
Invitation emails don’t arrive. Check spam and junk folders, then ask an admin to confirm the address under Accounts › Users.